Charlie is officially a toddler now. He took his first unassisted steps Sunday, August 28, and by Thursday he was wandering all around the house on his own. It is so fun to see how proud he is when he figures out a new skill.
He also has crawling up the stairs and climbing furniture down pat. Along with that comes pushing boundaries to learn where the lines are, which is trying for sleep-deprived parents. We are doing our best to take deep breaths, stay calm, and be patient.
We froze 9 bags of tomatoes (about a pound and a half each) this week. That makes 17 bags total so far, on top of what we’ve eaten. The plants keep going! We planted 8 tomato plants this year: 6 Romas, 1 Cherokee Purple, and 1 Giant Belgium.
We might be finally though the intense summer heat here. I’m going to leave the window units in a bit longer just incase, but we are loving having the windows open and not being drenched in sweat.
I mowed the lawn for the first time in a month. I’ve only had to mow once a month this summer because of how dry it has been. Most of the grass is brown and I’m only mowing to knock down the weeds that seem to thrive in the dry heat.
I’ve been a bit under the weather this week. I picked up a cold from Charlie, who picked it up from daycare. The goldenrod is in full bloom right now, too, kicking my seasonal allergies into high gear. I’m on the tail end of the cold, so next week should be easier. I’m thankful for this long holiday weekend.
Some work-related news: I’m switching teams (though staying within the same division/group) and becoming a team lead again, this time of one of our engineering teams. I wrapped up and handed off my projects last week and am starting the new position on Tuesday. I’m excited about the new role!
I’m getting sick of social media again. This happens once every few months. I might be scarce there for a bit and blog here more.
Amanda and I have been enjoying House of the Dragon on HBO and The Sandman on Netflix. The latter makes me want to revisit the comics again.
Going to post this and sign off now and make the best of the rest of the day today. Maybe making pizzas on the deck? Another tiki drink? Long walk by the river? We’ll see what the day has in store.
I skipped a week because I was traveling for work. I was in San Francisco for a team meetup. We spent some time working at Automattic’s SF office, explored the city, ate some great food, visited bookstores, and hit a few tiki bars. Some highlights:
Views from Alcatraz. The prison itself isn’t much more interesting than Eastern State in Philadelphia and the flies are a scourge, but the views of the bay and city are great.
Smuggler’s Cove – Best drinks and bartenders. Cool ambiance, but could use a good deep cleaning.
Tonga Room – Very cool ambiance and vibe, but the menu is stuck in the late 70s. The band plays in a boat in the pool/lagoon. Occasional indoor thunderstorms. Service is on par with other old institutions. I suppose classics are so for a reason.
Pagan Idol – Would be a great tiki bar in most other cities, but the drinks are overshadowed by other tiki bars here in SF. Tonga Room does the classics better and Smuggler’s Cove has more inventive new drinks. Well run and clean, but has a finance bro vibe.
Views from the Automattic office in the Mission:
There are some lowlights, too. The poverty and homelessness in SF is everywhere and it is heartbreaking. I saw people with monkeypox, terrible drug addictions, and mental health struggles, all in the course of a pretty normal walk from the office to the hotel. It made me even more thankful for our homes, jobs, family, and friends.
I love seeing a landscape below when flying that I recognize. I’m a definite window person. This trip I saw the Bear Mountain Bridge and Peekskill Bay, the Lorain lighthouse, and the islands in Lake Erie.
Bear Mountain Bride and Peekskill BayLake Erie Islands
This was my first trip away from Charlie and that was much harder than I thought it would be. I missed that little boy so much and spent the entire weekend with him when I got home. Swinging, lots of playing outside, snuggle naps, and backyard picnics. Salve for the soul.
We tried to video chat early in the trip, but he got upset, which made me feel terrible. Later in the trip he was saying “Dada” a lot, so we tried to video chat again and he smiled when he saw me.
He is currently snoozing on me while I type this.
His balance is getting great. I bet he will walk in the next couple weeks.
Rob Felty, a fellow A12 (that is short for Automattician, someone who works at Automattic) writes and posts annual reports each year. I like that idea and may give it a try.
It is that time of year where every empty storefront seems to transform into a Spirit Halloween store. The Spirit operations team must be incredible. Securing short-term leases, setting up full stores with all that entails, interviewing, hiring, and training local staff to run these stores, getting merch to these locations by September, then shutting down after October. Year after year, with enough margins to stay profitable. If any Harvard Business students are looking for a master’s thesis topic, here it is.
We froze 8lbs of tomatoes so far and have probably 8lbs more to freeze or make sauce with. I’m going to freeze the okra for gumbo. Tomatillos are getting turned into salsa verde.
Jalapeños are taking off after struggling most of the season. I plan to let them turn red on the plant and then smoke and dry them to make chipotles, which I’ll preserve in adobo sauce.
I harvested the white potatoes from the grow bags on Saturday. Some big ones, but not as much by volume as the red potatoes we harvested last month. Still better than I expected. I think I’ll try some bigger grow bags next year.
Reading
I read This is How You Lose the Time War on the plane ride and listened to more of The Confusion. I visited two excellent bookstores in SF and brought home more books to add to my to-read list:
Charlie has been amazing us this week. He started standing up on his own from sitting without holding on to anything for 5-10 seconds at a time. When he does, he shouts, “Up up!” He figured out how to use a fork. He also learned a new gesture (shaking his head no in reply to certain things), and he seems to have a bit more of a personality than he did last week. Children are amazing.
We had a great weekend playing and gardening in the yard, as well as meeting up with some new friends for a low stress play date at a playground. You have to be super intentional and proactive to forge new friendships in adulthood. Shared interests and/or shared circumstances aren’t enough like they were in high school and college. One nice way to make it easy for someone to say yes to hanging out is suggesting a place like a park so neither party has to host (which requires a lot of clean up and prep that is difficult with an infant or toddler).
Dad hack: move the grill over by the swing set so you can push your child on the swing and make dinner at the same time.
Aging kindly
Recently I’ve been inundated with ads about hair loss products, weight loss products, exercise products, and health supplements. It is crazy! No wonder people are feeling less content with their physical appearance.
I know it is generally worse for women than men, too.
We’ve learned to pretend to celebrate older women, but we haven’t learned to accept what happens naturally to their skin. We celebrate older women but not the un-intervened-upon face. This fuels a multibillion-dollar cosmetic and skin care industry dedicated to helping people — mainly women — stay young, or rather, try to look like it.
I’d like to tell the people in my life these things:
It is okay if your hair isn’t the same color or as thick as it used to be.
It is okay if your skin has more wrinkles, stretch marks, or scars than it used to.
It is okay if you are heavier than you’d like to be.
What matters most is how kind you are, how much love you show those around you, how much you help others, and what you create.
In short, your actions matter more than your appearance. It is okay to be kind to yourself.
Related: My current favorite Instagram scam is Colon Broom, which is being marketed as a trendy new weight loss product. It is just psyllium husk, which your grandfather would recognize as Metamucil.
Gardening and cooking
The heat wave finally broke in the middle of this week, so we’ve been spending a lot of time outside: Many meals and playtimes on the porch, swinging time before and after daycare, a fire in the chiminea, gardening, and washing the car for the first time in over a year.
Tomatoes and tomatillos are coming in steadily. We get baskets like this every couple days. Lots of kale to harvest and freeze for winter and dill to dry, too.
Whenever we pick tomatoes, Charlie always grabs one directly out of the basket and digs in.
We cleaned the dried up pea vines out of the garden and planted another batch for a fall harvest. We also planted some daikon radishes and more cilantro.
I made some tomatillo salsa with the first batch of tomatillos. More of that to come as the tomatillos continue to drop. Probably albondigas, too.
I tried two new culinary tricks this week: Making egg bites in the Instant Pot and cooking a sheet pan meal outside in the Ooni pizza oven. The egg bites turned out great and we are making more for the week ahead. The sheet pan meal was tasty, but it cooked faster than I expected even at the lowest temperature, so I scorched some of the vegetables. I also used up some old pizza dough by making a focaccia-ish bread.
Digital Garden
I tended to my digital garden a lot as well this week.
Added trackback/pingback support for pages to support cross/backlinking.
Since I’m already 80 pages in but only just now enabled pings, I’m probably going to have to run a wp-cli script on the site to generate them for existing pages.
^^ A piece the NYTimes did about the town we live in.
Kevin Kelley’s website got a refresh recently! Check it out. I’m a huge fan of Kevin’s various projects.
Books
Finished Odalisque by Neal Stephenson and started The Confusion by same.
Continued reading Dancing at the Rascal Fair by Ivan Doig
After Salman Rushdie’s stabbing in Chautauqua, I realized I haven’t read any of his books yet, so I’ll be on the lookout for them at used book stores. I’ve spent time in Chautauqua, which is typically a quiet, peaceful place. What a shame for a fanatic to irrevocably alter that.
Ideas
Photos.app -> WordPress media library
I’d love to make (or download if it already exists!) an extension for Photos dot app on macOS to select some photos and have them automatically uploaded to the media library on one of my WordPress sites. Would save me time multiple days a week.
I think this could be accomplished with Automator or Shortcuts. Something like selecting the photos, clicking a share action to kick off the Automation Action or Shortcut, which then exports the photos and runs a bash script that makes a POST to the /wp/v2/media endpoint.
Revisions block
I want to make (or download/install) a custom block that shows a list of revisions for the current post on the front end. Bonus points if it can be a linkable version. Looks like this might help.
Charlie turned one this past week. It is incredible to think about how much he has grown and learned in just one year. He is so sweet, curious, brave, fierce, playful, independent, and snuggly. We are so thankful he is here.
This year Amanda and I were the most tired we’ve ever been, but also so deeply rewarded. We’ve been reflecting a lot on the past year this week. We’ve head to learn and grow a lot this year, too.
Some recent skills Charlie has learned:
How to crawl up the stairs
How to flush the toilet
It is a race… will you finish before he flushes?!
Signing
He knows the signs for milk, water, more, and eat.
Opening and closing every reachable door in the house, and routinely emptying the cabinets
Twisting lids/caps on bottles and the applesauce pouches he likes
Really getting the hang of flipping pages in books on his own and while we read to him
Independent play
His stretches of independent play are getting longer and longer. Recently he has enjoyed finding cups or bowls and then finding things to put in them, shake around, and dump back out again.
We had a small birthday party in our backyard on Friday, took it easy on Saturday, then put together a swing set on Sunday, then we got ice cream at Weir’s and went to the top of Bear Mountain. It was the first time in a couple years that I’ve seen Perkins Memorial Tower open!
Charlie’s second year got off to a tough start. One of his little friends who came to his birthday party gave him Hand, Foot, and Mouth. The poor guy started showing symptoms late on Monday and then had to stay home from daycare all week. Thankfully it was a mild case. A lot of my week looked like this (holding a sick, sleeping baby while working):
Garden
We had our first BLTs with our garden tomatoes on Friday!
The Romas are going to start coming in steadily this week, so I anticipate a lot of skinning, freezing, and sauce making next weekend.
Tomatillos are starting to drop, too. I’d like to make some tomatillo salsa this week if I have time.
We finally have some jalapeños and Black HungarianArchived Link peppers growing on our plants. All of my neighbors said that it is a bad year for peppers for them, too.
The okra is loving this hot weather! It probably won’t be ready to pick for another week or two.
Ideas
It seems like it was a lot hotter this summer than the last couple that we’ve been in Peekskill. I’ve been doing a lot of sifting through data at work, so why not pull temperature data for this area from the NOAA and see how many days each year are above 90F compared to this year so far?
I’ll probably download a CSV then stuff the CSV contents into sqlite with sqlite-utils then connect the sqlite db to Metabase, which is what I’ve been using at work recently.
It is so hot that I don’t want to use the oven and heat up the house. Can I make a peach & blackberry galette or tart in the Ooni pizza oven instead? How about a frittata? I think so, as long as I am mindful of the temperature.
Is there a block in FSE for Pingbacks and Trackbacks? I’d like to show them in specific places in my Digital Garden. I need to look into this.
Work
I went to a meetup with part of my team at work on Monday. It was the first time I’d seen all but one of them in person in the two and a half years of working at Automattic, and I really enjoyed hanging out with them. You get a different sense of a person when you hang out with them in person for an afternoon than you do from months of Zoom calls.
We worked, got some pizza, went to MoMA, and then got some Mediterranean food.
I also got some ideas for art projects to try with Charlie when he is a bit older. It is fun to explore and emulate some of the classics!
The rest of the week was hectic, as Amanda and I both timeshifted a lot to take care of Charlie. Lots of late nights and early mornings. I did manage to finish what I needed to get done this week on projects.
Food & drink
I made a tex mex menu for Charlie’s party because one of his favorite things to eat are quesadillas. The adults had chicken fajitas and the kids had chicken quesadillas. Salad, chips and salsa, and esquites for sides. A pitcher of margaritas and a pitcher of lemonade for refreshments.
I made the corn, fajitas, and quesadillas on a Blackstone griddle. I love cooking on the griddle, but unless it is for a group of people it is hard to justify the time investment to clean it afterward.
Amanda and I had a date sans-Charlie last weekend at The Bird and Bottle. We enjoyed ourselves and plan to go back and have dinner on the patio again.
I found out that a local farm in Fishkill is now making cider, so I went and sampled some this weekend (and also picked up some fresh peaches!). The dry stuff is really nice, so I got a couple bottles to bring home. They also have a nice outdoor bar and eatery there, so I think we’ll go back again soon.
Big Mouth Coffee in Beacon is experimenting with canning some of their coffee. They work with Snapchill, a company that brews coffee hot, cools it rapidly, and then cans it right away to seal in the flavors. The results are fantastic so far. Some of the best cold black coffee I’ve had.
We tried a new pizza dough recipe last week (the one from Ooni) and liked the results. It is a same-day dough that was easy to work with and shape. I’m cold proofing some right now, so we’ll see how that turns out.
Reading
I only read a little bit the last two weeks: Some of Dancing at the Rascal Fair by Ivan Doig and some of Odalisque by Neal Stephenson.
That’s all for now. Looking forward to a week ahead with no sickness and a regular work schedule. Hopefully reading some more in the evenings, too. And cooler temperatures later in the week!
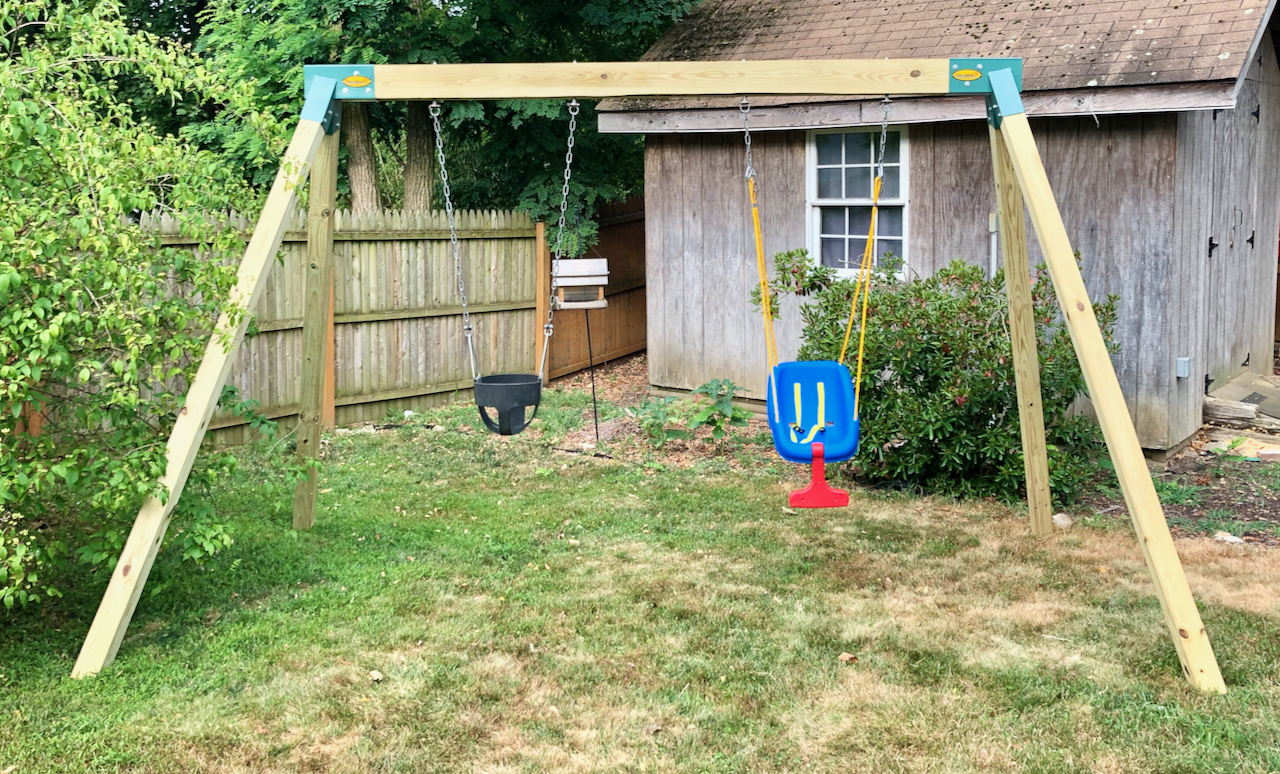
We just built my son a swing set using Eastern Jungle Gym’s A-frame brackets. When I started out, I couldn’t find a guide that laid out everything I needed to buy, how to put it together, and what kind of footprint the finished product would have. So I decided to put one together.
Finished Dimensions
Width: 7ft 3in
Length: 13ft 3in
Height: 7ft 9in
Lumber
4 – 4″x4″x8′ pressure treated posts
1- 4″x6″x10′ pressure treated beam
Some people don’t like the chemicals in pressure treated wood, but this is going to be out in the elements 24×7, so I think it is worth using treated lumber to keep it from rotting. I plan to put deck sealer & stain on mine once it dries out a bit.
Lumber is very expensive right now, so this cost $127 when I purchased it in July 2022.
You need two per swing. The 10′ beam has enough room for two swings, so I linked to a set of four brackets. You could squeeze in a third if you needed to. These are nice because they will go all the way through the beam and hold a lot of weight. There is no way these are coming out. The ones that just screw to the underside of the beam with a few screws make me nervous.
Swings
You’ll need swings! The swing set I built is for a 1 year old, so we have two baby swings: One black bucket swing like the ones you see at playgrounds and one of the blue Little Tikes rocker swings that is more of a full seat. Charlie likes both, so we usually switch between them when we are swinging. He usually starts in the bucket swing then switches to the rocker when he gets tired of holding himself up. We also have a regular sling-style swing to switch in if an older kid comes over (or for Amanda or me to use!).
We also plan to get a two-person porch swing to occasionally swap in so Amanda and I can sit there while Charlie is playing in the yard when he is a little older. The swings are easy to change with the swing brackets I linked to above—just pull out the pin, pull off the chain, put the new chain on, and put the pin back in.
If you buy or have a swing that doesn’t come with chains, you’ll need approximately 10 feet of swing chain per swing (5 feet per side).
Tools
Drill set up for drilling
I think we used a 3/16″ for drilling pilot holes for the lag bolts for attaching the A-frame brackets to the posts and beam to avoid them splitting.
We used an extra long 1/4″ bit to drill the initial hole though the beam for the swing brackets. Then we enlarged it from each side with a 7/16″ bit (the hanger brackets are 10mm, which is between 3/8 and 7/16).
Impact driver
You either need a socket adapter to use one of your sockets with the impact driver to drive in the hex lag bolts, or you could use a universal driver if you have one.
If you don’t have an impact driver, you could use a standard drill on the low setting, or you could use a socket wrench, though it will take longer.
Some swings have special kinds of bolts that you need a special driver (like a star bit with a pin in the center) to attach to the chain. Take a look at your swings before you get started to see what you’ll need.
Bolt cutters
We needed to cut some chain down to the right length, so bolt cutters came in handy.
Adjustable wrench
You’ll need a wrench to put the nuts on the hanger brackets. They are too long for a driver.
Hack saw with a metal cutting blade + Angle grinder with flap disc
The hanger brackets we bought stuck out of the top of the beam a few inches, so we used a hack saw with a metal blade to cut them down after they were on, then ground them down with an angle grinder + flap disc so they wouldn’t be sharp. This step is totally optional.
The bolts are stainless steel, so they will dull your blade quickly. Might need a backup blade.
Sawhorses
Sawhorses are helpful, but not necessary. You could put this together on the ground.
Rubber-faced hammer
We had to tap the A-Frame brackets and the swing hanger into place with a rubber-faced hammer. If you don’t have one, you can use a regular hammer with a piece of 2×4 as a buffer so you don’t mar your brackets.
Measure tape
We need to do a bit of measuring to get the swings in the right place.
Short step ladder
Will be helpful for driving the bolts and attaching the swings once the swing set is stood up.
A friend
This is heavy. You’ll need someone to help you stand it up!
Putting it together
Put the A-frame brackets on the 4x6x10 beam with the outer edge of the beam flush against the outside of the brackets. Make sure the spots for the legs are facing out and down.
Drill pilot holes with 3/16in bit and drive the lag bolts in to secure the A-frame brackets in place.
Drill the holes for the hanger brackets. Measurements here assume two regular swings. You may need to adjust if you are adding a third swing or a two-person swing.
Measure 10in from the inside edge of the A-frame bracket and make your first mark. This is where the first bracket of the first swing will go. Then measure 24in from your mark and make your second mark. This is where the second bracket of the first swing will go.
Repeat from the other side.
You will have something like 29in between the two inside marks.
Make marks in the middle of the beam at your marks.
Drill the pilot holes all the way through with the long 1/4in bit at all four marks. Make sure the bit is perpendicular to the beam and straight.
Enlarge the holes with a 7/16in bit from both sides.
Here is a rough diagram of what the bracket placement looks like:
Put in your swing hanger brackets.
You want the bracket flush against the beam on the bottom, so run one washer and nut all the way down to the U-shaped hanger.
Tap the bolts through.
Put a washer on the top, then use your wrench to tighten down the lock nuts.
Cut off and grind down the bolt if you’d like to. Leave some of the thread in case you need to get the bolt off later.
Put in all four posts for the legs and drive one bolt in each, then stand it up. You’ll probably need two people for this.
Adjust the legs (wiggle them, pull them out, push them in, etc) until they seem solid and at a good resting spot. Then drill pilot holes with the 3/16in bit and drive in the remaining lag bolts.
Attach the swings. Make sure the chains are the same length. Count the links! If you need to shorten the chain, this is where the bolt cutters come in handy.
Go get your child and push them on the swing!
Future plans
We plan to put deck sealer + stain on the wood to help it last longer (and look better in the yard)
Next year I plan to put a small climbing wall on one side, kind of like this:
Update, March 2024
I added the climbing wall and wrote a post about that, too.
We went to a cookout at our friends’ place on Friday and figured that Charlie would get sleepy around 8pm and we would head home then. 8pm came and went, and Charlie was still the life of the party, playing with three dogs and crawling around to everyone there, so we decided to see how long it would last. To our surprise he lasted until we left and 10pm, but was asleep in his carseat before we even backed out of their driveway.
Charlie seems to be adjusting well to daycare, and we are finally getting in a morning routine. We’ve had time a couple mornings this week to go for a walk by the waterfront before daycare, which has been really nice.
Instagram turned into QVC 2.0. I’ve complained about it here on the blog before. I’ve been trying to think about what I can do to minimize my usage of Instagram.
What I’d miss about it:
We live far away from family, so a lot of keeping up with extended family is done on Instagram.
We also live far away from lots of our friends. As people have kids, texts, emails, and calls become less and less frequent, but at least we have Instagram to keep in touch.
I don’t really want to lose those two things, so realistically I’m probably going to stay on Instagram. That said, I think there are some ways I can nudge people toward better communication mediums:
Encourage more friends to blog and help them set up a blog
Emails newsgroups with friends
Letter writing
Book groups, preferably with a group blog where everyone can share their thoughts. Wouldn’t that be a cool use of P2?
We planted six grow bags (7gal size) of potatoes this year, three bags of a white variety and three bags of a red variety (Adirondack red). The red variety was ready to harvest, so we dug through them this morning. Charlie grabbed one and started chomping on it 🙂
We cooked some of these tonight. Parboiled, finished on the grill, then tossed with butter, parsley, salt, and pepper. Probably going to use some in brown butter potato salad with dill next.
We also picked some of our first snow peas and added them to our salads tonight.
I baked Alison Roman’s Blueberry Cornmeal Tart for the aforementioned friends’ cookout. It turned out great! We’ve been getting 2 quarts of blueberries a week for the past four weeks from the fruit share we are a part of. Charlie eats about as many as Amanda and me put together, so we’ve been going through them. But we’ve frozen enough to make a couple more of these tarts this winter.
A Trader Joe’s opened close to us this week! Very exciting to be able to shop there whenever instead of needing to plan for a 40 minute drive each way. A lot of their stuff is “convenience food” and more expensive than making everything yourself, but at this stage of life with a 1 year old and both parents working full time, we are willing to spend a bit more for the time savings. We tend to get things like their tamales, the marinated meats like chicken shawarma and carne asada, dips, and some pantry items like rice pilaf mixes, pasta, couscous, and sauces. We rarely get fruits and vegetables there (we get most from local farms during the summer and fall), but if we do it is usually a convenience item like shredded cabbage for a quick coleslaw or base for a bowl.
I can manage my heartburn/reflux by watching what I eat and not eating anything after 6 or 7pm. At least once a month I think it will be fine to eat pizza and have a beer at 10pm and it never is.
Red wine, amaro, and liquors without mixers are my best bet for avoiding heartburn if I want a drink. Beer just doesn’t sit well with me anymore. Neither do cocktails with lots of citrus. Dry ciders are mostly okay.
I picked up some kefir today and am interested in making a glass of it a day part of my regular diet. I’d like to start making it again, but probably not in the cards right now.
Speaking of fermented foods: We found a great babysitter a couple months ago whose parents are Haitian immigrants. We often chat about Haitian food. Today she brought us some pikliz (spicy pickled vegetable slaw that slowly ferments). I’ve been having a bit with dinner the last couple nights. Really good stuff! I think I might make some of my own. This version is cabbage, carrots, habanero peppers, white vinegar, and lime juice. Some recipes online have onions or shallots, some don’t. I’m in favor of leaving onions out, because they tend to get pretty pungent and funky after a week or so.
When I’m feeling unmotivated, down, or generally off, it is so important to either accomplish something right away (even something mundane like emptying the dishwasher) or get outside and go for a walk. I usually need to drink water, too. I rarely drink enough water.
An important question I’ve been asking myself recently: What are some things taking place during this season (of life, of work, meteorological) that I can embrace instead of focusing on the things that aren’t?
Reading
Currently reading:
Sand, Wind, and Stars by Antoine de Saint-Exupery
Dancing at the Rascal Fair by Ivan Doig
Second book in the Montana series. I already had book one and read it a couple weeks ago (English Creek), and I was able to find nice hardcover versions with good dust jackets this week at the local used bookstore, Bruised Apple.
Books I learned about this week and added to the ever-growing “want to read” list:
The Stormlight Archive by Brandon Sanderson
Candy House by Jennifer Egan
Dark Matter by Blake Crouch
Wild Problems by Russ Roberts
The Living Mountain by Nan Shepherd
This Is How You Lose the Time War by Amal El-Mohtar and Max Gladstone
Around the internet
Two recent discussions on blogging (a perennial interest of mine) on Hacker News.
The Wandering Inn, seven books and counting published chapter by chapter on a blog as it is being written. Pretty cool. h/t Manton Reece
A foldable treadmill for under your desk. Ever since I read the essay in Neal Stephenson’s Some Remarks on using a treadmill desk, I’ve wanted one. I’m probably going to get one of these. The ability to fold it and slide it under my desk sold it for me. (And not needing to buy one of those giant clunky treadmills and mod it.)
Charlie has been very active this week, crawling and exploring as much as he can. He is fast! So curious, too. One of our goals is to keep fostering that natural curiosity as much as we can.
I brush his hair every morning before daycare and he started grabbing the brush and trying to brush his hair himself. So cute.
Charlie helped spin the salad spinner tonight and he loved it. I can’t wait to find little things that he can do to help out and feel a sense of accomplishment.
We still haven’t gotten in a good groove with breakfast, getting ready, and taking Charlie to daycare in the morning. We are getting closer, though. I made a frittata on Sunday night so we have an easy, healthy breakfast for the first half of the week, which should help. The main disruptor is still how often Charlie gets up during the night. On nights that he wakes up less, things are smooth the next morning. If he gets up a lot, we are all tired, groggy, and tend to fall behind. We’ll get there.
We usually listen to classical or jazz with Charlie, though occasionally we throw on stuff like the Beastie Boys or Chali 2na and get him dancing. While we were out for dinner this week, Rancid’s …And Out Come the Wolves album came on (one of my favorites) and he seemed to enjoy it and bopped along with it. So now we listen to some of the cleaner Rancid songs sometimes on the way to daycare. It is good to be musically well-rounded.
Friday night we went to the Italian festival in Verplanck, celebrating its 100th year. The thing to go for there is the sausage & peppers booth. We went for the first time last year while Amanda was still pregnant, two weeks before Charlie arrived. I’m excited to start yearly traditions like now that with Charlie.
Saturday afternoon we made calzones on the deck and ate them on a picnic blanket in the yard. Charlie got his own with sausage, mozzarella, and sauce.
Saturday night I found myself sitting on the porch after Charlie goes to bed, reading on a lounge chair that I built, reading a book and sipping a Belgian golden ale while the setting sun paints the sky above the trees gradients of purple, pink, orange, and grey.
Sunday night I find myself writing this post.
Lots of tomatoes and tomatillos, but none ready to pick yet. Two of the roma tomato plants are showing some bloom end rot, so even though I solved the watering issue, I must not have fertilized enough. The okra and pepper plants are finally looking good, and we have snow peas to pick this week. This coming Monday will have the first rain we’ve seen in a couple weeks.
The hummingbirds seem to love the nasturtium and borage!
Lots of data munging at work this week, so lots of time working in spreadsheets writing formulas. I stuck some of them in P2 so I can find them again later, but this is a good reminder to stick them in my digital garden, too.
I think there are two prevailing mental models for spreadsheets:
Tables that can live anywhere in the sheet(s)
As a lightweight relational database that is primarily row and column driven
I’m strongly in the lightweight relational camp and find it difficult to efficiently work with spreadsheets from folks in the table camp.
The Query Loop block in WordPress needs the ability to exclude certain parameters, too. For example, it would be nice to exclude posts in certain categories or tags. This is of course possible in WP_Query, so I expect it to get added to the block eventually.
iOS now has the App Library feature, which means that apps do not need to live on one of your screens or deep in some folder. It also has useful widgets. So for the first time in years I’ve rethought my homepage with a single page of the apps I use most often and a second screen with two useful widgets. I’m liking the change so far.
Reading
I finished reading Ivan Doig’s English Creek and started reading Antoine de Saint-Exupery’s Wind, Sand, and Stars. I’m also still listening to Neal Stephenson’s Odalisque.
I’m keeping my eyes peeled for more Ivan Doig books at used bookstores.
I’ve decreased the amount of time I’ve spent on social media again this week. It has been nice. I’ll try to keep it going.
A week of trying to get back to normal after Charlie and I were sick last week. Lots of playing catch up, but I’m glad to report that Charlie went back to daycare and Amanda and I got back on normal work schedules.
A couple things I’ve been trying to get back to doing each day:
Listing three things I’m thankful for. Good to keep gratitude in focus.
Going for a walk, preferably with Charlie and Amanda. Spending a bit of time outside when it is cool in the morning or evening is restorative and grounding.
Charlie on my shoulders
The wineberry patch I like to pick looks like it should be ready by Wednesday or Thursday this week. Not sure what I plan to do with them yet, but I’m sure I’ll decide in the next couple of days. Most likely another flaugnarde.
The Swiss Giant Snow Peas I planted are finally blooming and producing pods. Looking forward to munching them in salads and stir fries!
Made some progress on my current batch of orange bitters I started back in April. They should be ready to bottle later this week. Let me know if you’d like a bottle!
One of the best parts about doing a veggie share is being challenged to think creatively about how to use the veggies you get each week and eating something not in your regular rotation. We’ve been having lots of salads, sheet pan dinners, and grilled meals full of vegetables. Also lots of sautéed greens (turnip, chard, kale, beet, etc) with garlic scapes as a quick side dish.
Charlie LOVES blueberries, which are in season around here right now 🫐
Farmers markets local vs food terminals
I love going to farmers markets on Saturday mornings. There are two really good ones that all of the best vendors go to about 20 minutes away each (Cold Spring and Tarrytown), but the local one here in Peekskill is gaining some steam. We usually go to the one in Peekskill, but occasionally make the drive to Tarrytown or Cold Spring if we have the time.
I love buying from local growers, bakers, and makers, which is what keeps me going back. I do get really frustrated by a certain type of vendor commonly found at the smaller second-tier farmers markets: The truck with “[Generic name] Farms” painted on it that clearly buys produce from the food terminals, puts it in baskets, and tries to pass it off as their own. Things like sweet corn and plums in late June that clearly aren’t in season locally yet. Stickers painstakingly peeled off before the cucumbers get put out, the broken down waxed Andy Boy boxes stuffed out of sight behind the tables. Stuff that is no different than what is being put out at the grocery stores. There is probably money in it, but I refuse to buy stuff from those booths. They go against the ethos of the small local farmers markets. One thing that makes the Tarrytown and Cold Spring markets really good is that they keep these kinds of vendors out and give the actual farmers and producers a chance to shine.
Saturday was a day to fix things around the house:
Reversed the gate on the back porch so it only opens in to prevent Charlie from falling down the stairs
Fixed the pin going into the ground on the secondary fence gate. It isn’t normally used, but I had to move some big stuff into the yard last month and needed to pull the pin so I could open the second gate and make the opening large enough for a wide landscaping dolly to move through. When I tried to open it, I discovered that whoever put it in before we bought the house put it in wrong, so it was impossible to get the pin out. They must have put the pin in and then screwed the brackets on without trying it. I took the brackets off last month and tossed them aside, so I finally took a few minutes to put them back correctly so the door could be opened.
Screwed a few loose deck slats back down.
Screwed a shelf back in place in a bookshelf.
Put wall anchors on all of our bookshelves now that Charlie is mobile.
I got two of these umbrella clamps to put the umbrellas up on the deck railing instead of needing to be in a table. They free up a lot of space and give Charlie more room to play on the deck without being in direct sun. They were one of those “I wonder if this exists…” purchases and I’m delighted they do.
Logging out of Twitter in my browsers and deleting the app off my phone was a good idea. Having instant access to the news around the world (negativity gets pageviews!) and everyone’s hot takes about it is not healthy. I’m not ready to say goodbye to Twitter forever, but I am glad to have less time on it.
I’m currently reading:
Odalisque, book three of volume one of Neal Stephenson’s Baroque Cycle. Currently listening to it on audiobook while I run errands and do dishes.
I’d love to have a Stephenson book entirely about Enoch Root, who appears in the Baroque Cycle, Cryptonomicon, and Fall.
This is pretty helpful when an update breaks something. Make sure to turn off autoupdates for that particular plugin, though.
Toronto’s major internet and cell service outage this past week reminded me that I still need to get a store of cash to keep at home in case of just such an outage. Credit cards are so convenient, especially when you pay them off in full each month. But cash is king.
Virtually any business or service that relies on Rogers for internet or mobile connection is warning customers that debit machines, ATMs or phone lines are not working.
Music I encountered this week for the first time that I’m digging:
Charlie’s illness ended up getting worse early this week, despite looking like it was clearing up over last weekend, so it was another week of keeping a sick baby home from daycare while we tried to work. The doctor said that the poor guy had a double ear infection.
Then I caught whatever caused his illness, which knocked me out for a couple days, too. I assumed it was Covid, but everyone’s tests came back negative. Some other upper respiratory virus, then.
Thankfully the antibiotics seem to be working and Charlie is doing a lot better now. I’m still recovering, but also doing better.
I think the only thing of note to report this week is Charlie’s mobility. He graduated from army crawling to regular crawling! His holding on to the furniture and walls while cruising has greatly improved, too. He can make it around corners, transfer between objects with gaps as wide as his arms are long, and climb over obstacles in his path. He is on the move now.
I finished listening to King of the Vagabonds while rocking a sleeping Charlie this week.
I’m thankful for the break this holiday weekend provides. I’m going to spend as much of it as I can offline because I spent entirely too much time on Twitter while I was sick, which isn’t good for one’s mental state.
Looking forward to splashing with Charlie in his little turtle pool, taking some walks, having a small cookout with friends, watering the garden, getting ice cream, and reading Ivan Doig’s English Creek.
Two anniversaries this week: Amanda and I have been married for 9 years and this blog is 14 years old. Both anniversaries are actually on the same day! I’m incredibly thankful to have Amanda as my partner in life, though all of its ups and downs. I’m also
Charlie started daycare this week and made it a whole three days before coming down with his first stomach virus, complete with fever, vomiting, and cartoonish green boogers. Poor little guy.
I spent the week with a bucket of conflicting emotions: Relieved that daycare afforded focus time at work, intensely missing Charlie while he was at daycare, feeling so sorry for Charlie that he was sick, glad we could snuggle and comfort him, and stressed about the focus shattered by his fussiness and juggling taking care of him while needing to work, thankful for the flexibility of working from home, and grateful to have such a sweet little boy who smiles at us even if he doesn’t feel good.
I often want to start this post with something like “it has been a tough week.” But I can’t start every week’s post like that. Our life isn’t hard. We have it relatively good. What, then, is making me think each week has been difficult? Perhaps I need to update my baseline expectations. Our lives are much more complex than ten years ago, so I shouldn’t expect things to be as simple and spontaneous as ten years ago, either. It is probably mostly the lack of sleep affecting how I feel about things.
Besides for changing my expectations, I can probably also do more on the weekends to make the week go more smoothly: Doing more meal planning and prep to make getting lunch and dinner ready faster.
Like I posted last week, I need to remind myself to take a wider view.
The tomatoes, tomatillos, and okra love this heat. The nasturtium and Bachelor’s Buttons do, too. Dill, peas, and kale are coming along nicely. The pepper plants aren’t doing as well as I’d hoped, but maybe we’ll get some peppers off of them in late summer.
I had a dream last night that deer got in the fence and ate every last one of our tomato plants. Thankfully it was just a dream.
We had kolokithokeftedes (Greek zucchini fritters) for the first time this week and they were delicious. From what I could tell these had zucchini, onion, feta, and dill in them. Since zucchini season is fast approaching, I think we’ll start making these at home.
Fellow Automattician Artur Piszek wrote about how he and his wife do long-term RV travel with a dog and a 1 year old while working. The part about learning to manage vs things getting easier spoke to me. I think I need to stop hoping that things will get easier and double down on figuring out how to manage. (See above!)
King of the Vagabonds (book 2 of Quicksilver, volume 1 in Neal Stephenson’s Baroque Cycle series)
Building a Second Brain by Tiago Forte
Working by Studs Terkel
This is something I occasionally pull off the shelf to read a couple sections rather than trying to read it all at once. I like the short vignettes into how people view their jobs and work.
I want to find a copy of Terkel’s “Hard Times” too. I prefer purchasing old books like this at used bookstores rather than reprints from Amazon.
I switched from Alfred to Raycast this week. I spent a couple hours Tuesday night rebuilding my workflows, snippets, hotkeys, etc, so that I could make a clean transition. It is faster than Alfred and I love all of the available extensions, which have a huge amount of overlap with other tools I use. In fact, I replaced Alfred, TextExpander, and Paste (clipboard app) with Raycast.
If you use Raycast and have built any cool workflows with it, I’d love to hear from you.
I wanted to write a bit about the Dobbs decision overturning Roe v Wade, but I honestly don’t know what to write, partially because I’m still forming it. If you want to talk about it in good faith and we are friends, feel free to give me a call. All sides of the discourse on seem to be lacking in empathy and nuance. Spending more characters and pixels on it here will be futile.
Focus how you can help friends and family in your community who are struggling, in pain, grieving, stressed, and sad. Miscarriages are hard, failed pregnancies are hard, trying to get pregnant is hard, getting pregnant when you didn’t want to is hard, raising a child is hard, making the decision to terminate a pregnancy is hard, birth is hard, struggling to find formula to feed a baby is hard, sleep deprivation is hard, adoption is hard, struggling with shame and fear is hard, and grappling with religious beliefs is hard. Do yourself and everyone in your orbit a favor in the coming months and work on your capacity for empathy. And maybe think thrice before hitting send on that hot take.
It was a long, tiring week. Despite that, I’m feeling really thankful and lucky this week.
Both Amanda and I have good jobs.
We have a sweet, curious little boy.
It is my first Father’s Day as a father. Spending the day going for a long family walk, holding Charlie while he naps, and hanging out on the deck making pizza.
We closed on our house at a great time pre-covid and don’t have to worry about the constantly rising rental market prices.
We live in a place where we used to drive > 45 mins to get to on the weekends to escape our apartment. We also traveled here by train when we didn’t have a car.
We can look up and clearly see the stars at night, something that from 2012-2019 was only really possible on vacation for us.
We have a garden where we can grow things. Planting seeds and watching them grow seems like a miracle.
It is so easy to get caught up in the current short-term difficulties. I do all the time. (Teething babies with separation anxiety are no joke!) It is important to remind yourself what you are thankful for to take a longer view.
From the lookout on top of Bear Mountain this week
The most useful thing I learned from studying economics is methodological individualism. Only individuals, specifically individuals with subjective motivations and values, act. Groups don’t act; individuals within that group act. Companies don’t act; employees and owners within companies act. Political parties don’t act; individual voters and politicians act. Keeping this in mind when evaluating situations brings a lot of clarity.
This week in cooking:
Lots of big lunch salads. The vegetable shares started up last week, so we have plenty of salad greens coming in right now.
Stir fry bowls. Usually some kind of meat + vegetable + sauce + rice. This week it was pork + bok choy and chicken + asparagus + broccoli.
Strawberry cobbler. We got a fruit share along with the vegetable share from local farms this year, and right now is fresh strawberry season. Since the rest of last week’s batch was starting to turn, I made a quick cobbler with almond flour on Thursday morning.
Sausage, kale, cheddar, and onion quiche. I used puff pastry for the crust since we had some in the freezer. It worked pretty well!
Tiki Friday: Missionary’s Downfall with fresh mint and borage flowers from our garden.
I’ve been thinking a lot about how to protect my family against the effects of natural disasters, prolonged recessions, cyber attacks, new pandemics, power grid outages, food shortages, and supply chain issues.
I’m thinking about this in a “prepper” way but in a risk-weighted way. I’m not spending my days convinced something awful is happening and digging a bunker. I mostly want to protect against the major downside risks for my family while going about our daily lives.
It is important to keep in mind that whatever we are currently going through is likely not a temporary outlier. (h/t @aspiringpeasant)
I feel pretty good on the food and fuel/energy generation front. I don’t feel great about our water storage, though. Turning my attention to that next.
The book is full of great reminders for both coworker and client interactions: assuming positive intent, being proactive and following up, tips for diffusing rather than inflaming situations, making situations impersonal and solutions-oriented, and making small changes to critical words to underscore our intentions.
We got a cast aluminum chiminea for the porch. I’ve wanted one since we moved in. Used it twice this week. Part of the ongoing effort to spend more time outside and away from screens, especially before bed.
As I write this on Sunday morning, Charlie is napping on me. I’m sitting in that one Ikea chair everyone seems to have, Charlie’s head is on my shoulder, he is wrapped up in a blanket, and my laptop is perched on a pillow on my lap.
Some sweet Charlie vignettes from this week:
Having dinner as a picnic on a blanket in the backyard, Charlie enjoying every bit of it and feeding himself from his own bowl of chicken, rice, and cauliflower.
Charlie taking turns feeding Amanda and me.
Charlie saying “Dada” while I was looking the other direction so that I’d turn around and play peek-a-boo with him. First time saying my name to get my attention so that I’d do something!
Taking Charlie swimming and him having a thrill each time I disappear under the water across the pool and pop up next to him and his Mom.
Charlie learning how to stick his tongue out in the mirror, then sticking it out at us when we stick our tongues out at him.
Charlie is strongly in favor of self feeding, so we’ve been having a lot of fun putting together little plates and bowls of whatever we are having for him to self feed. This week it was ham, eggs, cheese, toast, and hashbrowns for breakfast, deconstructed taco salad, deconstructed cheeseburger, chicken, rice, and cauliflower bowls, and sushi (avocado roll) for lunch/dinner.
The potatoes, tomatillos, tomatoes, lavender, and borage are blooming! Growth has been a bit slow this year. After a few scorchers in May, it has been fairly cool. Looks like it is heating up next week, so we’ll probably see some nice growth this week.
Jon and I got his pergola all framed in! The 6×6 beams were freshly milled and very heavy. He had two dry ones laying around from a project last year, and they were half the weight of the wet ones.
The main skill in woodworking is not executing plans, but figuring out how to adjust when those plans don’t go as expected. For example, we spent a decent amount of time today figuring out how to adjust for a half inch gap between two 12ft beams that were supposed to be abutted. Ended up taking 1/4in off one end of the brace and 1/4in out of the brace’s opposite end housing on the post. Worked!
Also, one of the beams was actually 5.5×5.5″ instead of 6×6 like all the others, but didn’t catch it until it was already up, braced, and pegged, wondering why the two abutting beams didn’t match. We adjusted by cutting the shoulders a bit deeper on the one we hadn’t pegged yet.
We got smart toward the end of the framing and made templates to make cutting the mortises go faster, and used a router to clean out mortises and cut shoulders and brace housings.
We decided to get an Ooni Koda 16″ pizza oven. We tested it out on Saturday evening. I burned my calzone and charred one margherita pretty good, but the two other pizzas came out pretty good. Looking forward to improving my dough shaping technique and dialing in the temperature. Porch pizza summer.
Our tiki journey continues, too. I made my own pimento/allspice dram and honey syrup this week. The pimento dram: Toasted, crushed allspice berries soaked in rum for two weeks, mixed with equal parts brown sugar, vanilla, cinnamon syrup. Honey syrup: Equal parts honey and hot water.
I’m looking forward to incorporating more fresh fruit into the tiki drinks as it comes in season.
The tiki and pizza projects are great examples of how approaching something as an ongoing, long-term endeavor changes how you do it.
When you only make pizza once every couple months, you tend to try to make one of each of your favorite kinds, which becomes stressful with all the varied prep and execution. When you make it once every week or two, you can focus on 1-2 kinds each week, which takes the pressure off, makes prep easier, and allows you to dial it in.
Same with tiki. You can make 1 syrup/add-in each week, which allows you to explore that flavor in a couple drinks. Then after two months you have a wide variety of flavors to choose from and a better understanding of what you like.
I wrote a couple big bash scripts this week. One for work to pull data from a CRM and transform it into a sqlite database to hook up to Metabase for visualization, and one personal script to automate archiving website backups monthly (pulling the latest backups from my webhost’s API.) I used curl, jq, and tr pretty heavily. I posted some learnings in my digital garden.
Less reading this week than I’d prefer. Finished Quicksilver by Neal Stephenson and started King of the Vagabonds, the next book in the series. Also made some progress on Neuromancer by William Gibson , which I hadn’t picked up for a few weeks.
I went back to work this week after four months of parental leave. The hardest parts were Charlie crying when I had to hand him over to the nanny and go to work and watching him play through my office door but needing to work instead of hanging out with him. I think he felt it too because he was cranky and clingy. He is also struggling with some sleep regression. Poor guy.
Also, inconsistent/unreliable child care is zero fun. Pretty stressful. Looking forward to when he starts at a really nice day care later this month.
Our backyard looked nice this week. The mock orange is blooming.
I didn’t do much book reading this week, but I did listen to an audio book while I did dishes and was in the car. Quicksilver (book 1 of the Baroque Cycle) by Neal Stephenson.
I did do a lot of reading on P2 at work, but almost all of that is private.
I’m enjoying Jeremy Felt’s new Book notes posts. I usually incorporate mine into my weekly posts, though it may be worth breaking them out at some point if I stop doing weekly posts.
More timber framing work with my friend Jon on Saturday. It turns out that a laser level is a lot more accurate than a string with a line level on it. Easier to use, too.
I got our window unit ACs in this week because it got up into the 90s (Fahrenheit) again.
Amanda and I got to go on date this weekend while some good friends watched Charlie. We opted to pack a picnic lunch and go out rowing in the Peekskill Bay. Amanda hadn’t been in the Adirondack Guideboat yet because I finished it last summer when she was very pregnant. It was great to take her out in it today.
The coming US economic downturn/possible recession has been on my mind a lot this week.
How can I minimize the downsides for my family?
The biggest downside risk is one or both of us getting laid off.
In this situation, cash is king. The longer we can pay our fixed costs (mortgage and car payments), the less stressful it is to find new jobs. We refinanced during COVID and got a great rate, which helped lower our mortgage payments. So what remains is making sure some assets are accessible and liquid-ish.
Another risk is worsening supply chain issues.
In that case, having a well-stocked pantry that you can rotate through and access to/relationships with local farms for food is very helpful.
What purchases are best in recessions?
Valuable assets what have a reduced price due to the recession.
Tools for DIY and/or that can be used in contract/freelance work.
DIY home improvements if the cost of materials decreases AND it makes sense (decreasing energy usage, improving resale value).
What kinds of activities are best in recessions?
Gardening. Growing some of your own food + keeping busy at home so you spend less elsewhere.
Outdoor activities. Hiking, rowing (if you already have access to a human powered boat), etc. Low cost + good exercise.
Cooking. Decreasing eating out expenditures.
How are you thinking about minimizing the biggest risks for your family during the coming recession?
This was my last full week on paternity leave. I return to work next week. I snuggled Charlie as much as I could, including holding him for more naps instead of putting him in his crib like usual.
It was a bit of a stressful week for all of us in the Grimmett house, and we are all more tired than usual. But we got through it, got childcare lined up for when I go back to work, and we were able to take it easy on Saturday while it rained.
Charlie and I have our own “thing” now: Multiple times a day when he sees me he scrunches up his face and breathes heavily and loudly through his nose, then I do it back. It never fails to bring smiles ad giggles to both of our faces.
I had to go buy some tomato plants at a local greenhouse because the ones I started from seed just didn’t take off. The tomatillos and peppers did, but tomatoes did not 🤷♂️
So I got the tomatoes in the ground this week and set up the new watering system I wanted to try: Wick irrigation. 1/2 inch nylon braid wraps around the root balls and wicks water from a bucket. I’m still trying to decide whether I want to cover and bury the buckets or not. We’ll see how this coming week goes (a couple of 90F+ days).
The peonies bloomed this week, so we cut a few and brought them inside. So nice to have flowers from our own garden on the mantle.
Amaranth, nasturtium, borage, calendula, both red and white potatoes, and dill are all doing great with all this rain and warm weather. I had to replant the peas because the original ones never came up. I went with the Swiss Giant Snow Pea variety.
Currently reading:
Quicksilver (book 1 of the Baroque Cycle) by Neal Stephenson – Audio
I’ve been on a mission to eat more beans recently, so I’ve been trying out new recipes. This week I made Enfrijoladas with some delicious Rancho Gordo Rio Zape beans. The recipe only uses 1/2 pound, so we are definitely making this again. It was delicious!
I changed the SIM cards on our phones this week. Believe it or not, this is the first time I’ve ever changed a SIM in the 16 years of having a cell phone.
Every week I think I did nothing, then surprise myself with how much I did once I finish this post.
Spent lots of time outside this week. It seems like we had about a week of Spring, then jumped directly to Summer. It was in the mid 90s (Fahrenheit) all weekend, which is just too dang hot for May. I didn’t put any air conditioners in the windows because it will be back in the 70s next week and we prefer the fresh air whenever we can get it. Getting a baby to sleep when it is 80+ degrees in the house is tough.
Charlie and I went out searching for morels three days, but I think they are finished for the season. Too warm now. We did see a garter and a black rat snake, a pileated woodpecker, two kinds of millipedes, toads, frogs, wildflowers, and an owl pellet.
I also met up with guide Lex TaylorArchived Link to search one of his favorite spots with lots of dead elms, but we came back empty-handed. He taught me how to identify dead elms, which I’m grateful for.
I covered up the potato plants with dirt twice this week and they need covered up again! They are growing like crazy in this heat.
I mowed in spurts during Charlie’s nap times this week. It was too hot and I was too tired to have him in the carrier while I mowed. Charlie is teething again and getting up very early (5-6am most days), so we are all pretty tired.
We’ve instituted Tiki Fridays for the summer. Tiki is notorious for having tedious prep, so I’m treating it like a long-term project and making a new syrup/mix or two each week. Soon we’ll have a wide variety of ingredients on-hand. I was surprised at how easy most tiki ingredients are to make at home once I started looking into it. Separate blog post coming soon.
I helped my friend Jon do some timber framing this week. He is building a pergola over one of his patios. We help each other with projects.
We road tripped up to Williamstown, MA, on Sunday to see the Strict Beauty Sol LeWitt prints exhibition at Williams College. It was worth the drive. I hadn’t seen many LeWitt prints, mostly just wall drawings. It was cool to learn that many of the prints with lots of editions were made from a small number of plates that were rotated and prepared with different colors.
On the way back we stopped at the West Taghkanic Diner, which lives up to the hype. The food was excellent. Amanda had the veggie burger (created to be a good veggie patty, not to mimic meat), I had the smoked chicken, and we both had a vanilla cardamom milkshake. We’ll definitely go back.
âÂÂCoffee, the sober drink, the mighty nourishment of the brain, which unlike other spirits, heightens purity and lucidity; coffee, which clears the clouds of the imagination and their gloomy weight; which illumines the reality of things suddenly with the flash of truth.âÂÂ
Jules Michelet
This is my last full week on paternity leave. I’m snuggling Charlie extra.
Charlie is learning how to walk by slowly holding on to and pushing a small stool and stepping along with it. He is making great progress! He’s been trying so hard and we are very proud of him.
Charlie seems to like chicken shawarma and pickled turnips. That’s my boy.
The thing that has the biggest influence on my day is the length and quality of sleep the night before. Two things seem to affect that the most: What I eat (heartburn/reflux) and when I go to bed.
I found another nice morel in our yard! There was a third that I didn’t catch in time and it shriveled up. Still haven’t found any in the woods yet.
What I thought were black eyed susans coming up along the fence turned out to be mugwort. Whoops.
We have another small garter snake in our yard this year. This one likes to hang out in the front flower beds. It is a bit smaller than the one that hung around last year. I haven’t seen any black rat snakes in the yard yet this year.
I’ve noticed a lot more cardinals in our neighborhood this year. And this seems to be a banner year for maple seedlings. I don’t think I’ve ever seen this many come up.
We are trying nasturtium in pots on the porch this year so they can cascade over the railing instead of just laying on the ground. They’ve sprouted in the pots, so we are hopeful!
Mowing season is here. Thankfully our electric mower is quiet enough that I can mow with Charlie in the carrier without either of us needing ear protection.
More sawing and moving wood from the trunk of my neighbor’s downed tree this weekend.
I participated in a cool project this week. Kristin Henry is collecting data on mail delivery timed. Kristin sends some stuff to you and you let her know when it arrives, then you send something back. If you are interested in participating, fill out this form.
Slim Gaillard, who Charlie and I’ve been listening to while we eat, made up a lot of slang for his songs and wrote a dictionary for them:
On soil and regenerative farming:
Almost single-handedly, through trial and error, Tolly has developed a new and revolutionary model of horticulture. At first it looks like magic. In reality, it’s the result of many years of meticulous experiments.
Two of his innovations appear to be crucial. The first, as he puts it, is to “make the system watertight”: preventing rain from washing through the soil, taking the nutrients with it. What this means is ensuring the land is almost never left bare. Beneath his vegetables grows an understorey of “green manure”, plants that cover the soil. Under the leaves of his pumpkins, I could see thousands of tiny seedlings: the “weeds” he had deliberately sown. When the crops are harvested, the green manure fills the gap and soon becomes a thicket of colour: blue chicory flowers, crimson clover, yellow melilot and trefoil, mauve Phacelia, pink sainfoin.
Soil is fractally scaled, which means its structure is consistent, regardless of magnification. Bacteria, fungi, plants and soil animals, working unconsciously together, build an immeasurably intricate, endlessly ramifying architecture that, like Dust in a Philip Pullman novel, organises itself spontaneously into coherent worlds. This biological structure helps to explain soil’s resistance to droughts and floods: if it were just a heap of matter, it would be swept away.
It also reveals why soil can break down so quickly when it’s farmed. Under certain conditions, when farmers apply nitrogen fertiliser, the microbes respond by burning through the carbon: in other words, the cement that holds their catacombs together. The pores cave in. The passages collapse. The soil becomes sodden, airless and compacted.
This week went by quickly. Lots of rain and time indoors. I didn’t do much during the week except take care of Charlie, cook, do dishes, and read. I did make up for that a bit this weekend by mowing, weedeating, and sawing and splitting some wood with my friend Jon that my neighbor let me have from a tree she took down. I’m planning on turning and carving some bowls out of the wood, and perhaps make a couple stools.
Charlie absolutely loved swim class this week. He started smiling and splashing as soon as we got him in the water. The next day we took him to the park and put him in the baby swing, which he also loved. Such a happy little boy 😊
Speaking of Charlie, he expanded his repertoire of foods a bit this week: Naan (which he dipped in tikka masala sauce), hummus, grilled chicken, pizza, and French toast (no syrup). Old classics like cucumbers, pears, and broccolini are still a hit. He strongly prefers to self-feed, so we are just cutting things into strips or putting it in a bowl and sticking it in front of him to see if he eats it.
We’ve been listening to classical and jazz music with Charlie while we eat breakfast each morning. Favorites include Peter and the Wolf, Young Person’s Guide to the Orchestra narrated by David Bowie, Ella Fitzgerald’s renditions of nursery rhymes, and Slim Gaillard’s Serenade to a Poodle and Potato Chips. We started collecting it in a playlist on Spotify:
I found my first morel this week! After two years of searching the woods near our house and coming out empty handed, I found this one in our own backyard of all places.
Some tasty things I cooked this week:
Chicken tikka masala and naan
Chicken thighs, radishes, and broccolini on a sheet pan with everyday spice
Chicken burritos with rice, pico de gallo, pinto beans, and cheese. Griddled to crisp the outside.
Breakfast burritos
Chicken shawarma bowls with roasted cabbage, hummus, tomatoes, and cucumbers.
Amanda and I recently finished watching Russian Doll season 2.
We are enjoying Ted Lasso. This post is late this week because we decided to snuggle and watch Ted Lasso after Charlie’s bedtime this past weekend instead of blog.
New newsletter subscription: Drinking and Knowing Things, a weekly newsletter to help you learn about wine. I might get the book, too.
Jason Kottke is taking a break. Good on him for taking the time he needs to recharge, reset, and reconnect.
Looks like my digital garden has some problems: List items style inexplicably changed and the links in the page list block are no longer clickable. Neither reason is readily apparent. I’ll investigate more this week.
My reflection on blogging has been getting linked to from other folks and shared on quite a bit this week! Trackbacks and pingbacks warm the heart.
Tough week. All three of us had colds the beginning half of the week (the first for Amanda and me since before COVID), then Charlie started teething again the latter half of the week. Seasonal allergies hit me this week, too.
I now have his Shortnotes plugin up and running under a different namespace/slug (micro), so I’ll be using it soon!
Cooked/baked some English muffins this week. I always forget how easy they are to make at home, and how much tastier they are than Thomas’. I use the Baking Steel recipe, but I prefer to fry them in a cast iron skillet, which is easier to clean up than the baking steel.
Bought and set up a grow lightArchived Link for our seedlings. I bought a bulb and put it in the swing arm light I already had attached to my desk so it is easy to position.
Swim class on Saturday with Charlie was fun. He is really getting the hang of kicking, and he started splashing a lot on his own this time, which is a good step to being comfortable in the water.
I sowed some flower seeds on Sunday. Some of the neighbor’s black eyed susans self-seeded along a section of our fence, so we decided to turn over the ground along the rest of it and seed it with echinacea, African blue daisies, amaranth, cosmos, and showy orange milkweed.
It is ice cream season again! We’ve wanted to get an ice cream maker for a while, but continue to hold off because going out to a local ice cream shop is always a good diversion for all of us. Our current go-to is The Blue Pig in Croton.
I love Methuselian characters in stories: Daniel Defoe in Mr. Eternity, Enoch Root in Neal Stephenson’s books, and Gaspery-Jacques Roberts in this book.
Some characters from Emily’s other books show up in this book, which is fun.
I just pre-ordered The Woks of Life cookbook. I’ve cooked a lot of things off of their site and have subscribed to it in my RSS reader for years, so this was an instant pre-order for me.
My friend Garrett Robinson asked me on Twitter, “What do you see as the advantages of blogging?”. Naturally I had to reply with a blog post.
I see two main advantages of blogging, both with secondary advantages:
Having your own place on the web to keep a log of your thoughts, musings, opinions, trials, and happenings.
Engaging with and increasing the knowledge of the world.
Carve out a place of your own
Platforms come and go. Buy a domain and set up a permanent space on the web where others can find and link back to you. I have no idea what I put on Myspace back in the day, but everything I’ve published on this site since 2008 is still accessible and the links still work.
A personal website is a digital homestead that you can improve, tinker with, and live in for years to come. It is a home for your thoughts, musings, opinions, trials, and happenings, built in a way that suits you.
From Frank Chimero’s post on digital homesteading:
Have you ever visited an architect’s house, one they designed themselves? It’s fun to walk through it with them. They have so many things, arranged so thoughtfully, and share the space with such pride because of the personal reflection the house required to design (not to mention the effort it took to build). It’s really quite special. I think there’s a pleasure to having everything under one roof. You feel together, all of you at once. In a way, building your own house is the ultimate project for a creative person: you’re making a home for what you think is important, done in the way you think is best.
But why go through the effort of blogging at all? If you like to engage with the world of ideas, blogging is one of the best ways to do so. Writing and publishing forces you to solidify and clarify your thoughts.
Other smart bloggers on the subject:
One of the most interesting aspects to blogging is discourse – the idea that in order to write something you must think about it with a critical eye and that this process actually helps you clarify your thinking around it.
Blogging is my way of pulling together into a coherent form all the stray thoughts rolling around in my mind. Writing helps me sift the good thoughts from all the bad and fit them all together in a logical pattern.
Even if nobody reads them, you should write them. It’s become pretty clear to me that blogging is a source of both innovation and clarity. I have many of my best ideas and insights while blogging. Struggling to express things that you’re thinking or feeling helps you understand them better.
And don’t concern yourself with whether or not you”write.” Don’t leave writing to writers. Don’t delegate your area of interest and knowledge to people with stronger rhetorical resources. You’ll find your voice as you make your way. There is, however, one thing to learn from writers that non-writers don’t always understand. Most writers don’t write to express what they think. They write to figure out what they think. Writing is a process of discovery. Blogging is an essential tool toward meditating over an extended period of time on a subject you consider to be important.
Why public? There is something about making your posts available to the rest of the world that holds your feet to the fire and makes you commit. I’ve tried dozens of times to keep a private ongoing digital notebook in Evernote, Devonthink, Roam, and Obsidian, but they never stick. But making my notes available to the world in my digital garden keeps me coming back and updating it daily.
Why a blog and not just Twitter? On a blog you have more space to make your arguments in your own words, away from the stream of noise. You can persuade instead altercate. Twitter is for shitposting, blogs are for thinking.
One of the things I have learned: mostly, use your own words, your own stories, if you want to influence people on your worldview.
Once you’ve been blogging for a while, having that searchable record allows you to follow your journey, connect the dots, and pick up stray threads years later. You can do that in a handwritten journal too, but things are much easier to surface on the web.
Sharing with the world
you radically underestimate both a) how much you know that other people do not and b) the instrumental benefits to you of publishing it.
I’ve learned so much on the internet and enjoy giving back when I can. I often blog about my projects and problems I’ve solved, and these tend to be the posts with the highest traffic. I get comments and emails about them multiple times a month. If I had to look them up, chances are someone else does, too. Examples:
And this isn’t just for other people! I often refer back to my own posts. And multiple times a year I get texts or emails from friends who tell me they searched for something and found one of my my blog posts in the top search result. These kinds of posts have a long tail.
Because of this long tail, blog posts have more impact than newsletters or presentations, too:
I’ve noticed that people at Amazon have a lot of important things to say, but those things are rarely recorded. If you give a brown-bag presentation, or send a thoughtful email to some internal mailing list, you’ll have an impact, but it won’t be anywhere near the impact you’ll have through blogging.
Blogging has more of an impact on careers than most people realize. One of our secret sauces at Praxis and Crash was getting our customers to show their work on a blog, which helped them land jobs. Blogging got me three of my four full time jobs post college. All three told me that my blog played a crucial role in their decision to send me an offer.
Showing your work in a place that is regularly updated is so much more powerful than a resume.
Keeping an intellectual journal is the main reason for writing my blog. My secondary reason is pure economics. Blogging is a loss-leader of sorts. Through this blog I market myself and my ideas to people who I hope to do business with eventually.
While the direct economic return to authoring a blog may not appear to justify the effort, the prospect of actively demonstrating one’s skillset for an interested public, many members of which work in talent-hungry organisations that pay real salaries, is an attractive one. Why waste time submitting CVs, when you could cultivate an audience of potential employers intimately familiar with your talents?
Here is blogger Tom Critchlow in 2015 on what blogging did for him:
I’ve been writing blog posts for 8 years. That’s not to say I’m any good at it, but here’s a few of the things that blogging has done for me:
brought in hundreds of thousands of dollars in revenue for Distilled
helped me build relationships with future employees
helped potential employees apply for jobs I was recruiting for
secured speaking slots at conferences
built lasting friendships and inspired healthy debates
helped me get hired at Google
took me to Staten Island for a family BBQ the first day I arrived in NYC with no friends
Similar to Tom’s list above, here is what blogging has done for me over the past 14 years:
Landed me 3 of my 4 full time jobs post college (all three told me that my blog played a crucial role in their decision to send me an offer)
Freelance work
Speaking/presentation gigs
Introduced me to people I otherwise wouldn’t have met, some of whom I now call friends
Interviews by journalists who found posts I’d written
Got my photography picked up in art shows and magazines
Helped old friends stay in touch
Beyond my own blog, I learn so much from other blogs! I follow ~200 blogs in my feed reader and regularly respond to many of them.
What can I blog about?
Anything! You don’t have to pick a certain subject or stay in a given lane. The site is yours—make it a reflection of your life, work, and interests in all of their facets.
The posts don’t need to be long. Short works, too! From Dave Winer, father of podcasting and RSS:
Think of creating a blog as you would think of writing on a page in a notepad. Or scribbling on the back of an envelope and handing it to someone. It takes two minutes at most to create a blog at wordpress.com. And from then on, you have a “place” to post emails you that are post-worthy
My own blogging has changed through the seasons of my life. For a while I blogged mostly photos, then longer thought pieces, then short Today I Learned posts and tutorials, and now 80% journaling-style updates with 10% woodworking and art posts and 10% miscellany.
What do you wish you had found via Google today but didn’t? Write that.
Setting up a site on WordPress.com is probably the easiest way to get started (full disclosure, I work there!), but you can also self-host WordPress, like I do. I use Pressable, another Automattic product. Or you can use some other service like Ghost, Jekyll, or Squarespace. Just make sure you purchase your own domain name and use that for the site so you stay in control of your content. Owning your domain makes it easy to switch blogging services without losing readers or breaking links. You just point your domain to the new service, import your work, and you are off to the races.
The world needs your creativity, insights, and knowledge. Your future self needs the catalogue of what you are thinking about and working on this week. Go set up a blog and get started.
New sprouts in the garden: Radishes, borage, calendula, bee balm, and more poppies. In the yard, wild violets are popping up and the forsythia and rhododendron look great. Black-eyed Susan volunteers came up all along the fence, self-seeded from the neighbor’s flowerbed on the other side. I’m going to leave them and weed around them.
I followed through on succession planting the French breakfast radishes and direct sowed kale, oregano, and seed potatoes. Also transplanted some fern roots by the shed.
I had to restart rosemary, lemongrass, tomatillos, Vietnamese peppers, Italian basil, Thai basil, and celeriac. The neighbor’s dog ate those seedlings while we were gone (neighbor was watching and watering the seedlings for us.) Now that those are a month behind, I’m going to buy a grow light to help them along.
I’m not mowing for a couple more weeks even though the grass is getting long because I want to save the violets and dandelions for the bees. ðÂÂÂ
Neighbors on both sides of us are cutting (or have cut) down large trees, just on their side of the lot lines this month. I know they are their trees, but I can’t help but feel frustrated that 50% of the trees providing shade to our yard are going to be gone this summer. I have a good relationship with the neighbors, but we might need to feud. See: The Lorax.
Looks like I’ll be putting in some new trees this year.
We spent Easter and the following week in Ohio with our family. It was great to see them and even better to see Charlie with them.
I spent a day in Holmes County, Ohio, with my parents and saw something new: Amish (or Mennonites, difficult for me to tell the difference from dress alone) riding ebikes. Men, women, and children, typically solo (not riding in groups). This seems to be a recent adoption; three years ago I saw zero Amish on ebikes, but today I saw more ebikes there in rural Ohio than I have in NYC or SF in a single day.
Holmes County, the second largest Amish settlement in the US (Lancaster is the first) is quite hilly, so I can see the big benefit of ebikes there. At first I was surprised to see so many of them because ebikes are relatively expensive, but when compared to the cost of a horse and buggy and how easily they can be charged via diesel generator or solar, they seem like a great investment for getting to and from work.Â
Next time IâÂÂm down there I intend to hunt down a bike shop and see which kinds are most popular and what kind of adaptations are sold with them.
I realized I don’t know as much as I’d like to know about the Amish. My family gets most of their firewood from an Amish mill that sells offcuts, and we also have some great Amish-made furniture, but those interactions have been very business-focused. So I put together a reading list to learn more:
You’ve probably seen Jarlsberg cheese at the grocery store. I knew it was from Norway and assumed it was only made there, but I didn’t know that it is also made in Holmes County, Ohio! We drove past the facility during our Amish country excursion.
My parents and I made char siu. We ate the first batch with rice and braised bok choy, then we used the leftovers in fried rice. Always nice to get the wok out. It was pretty good, though I think if it is going to be used in fried rice it needs to have more spice to stand out amongst the other ingredients. But eaten on its own it had plenty of flavor. We grilled it instead of roasting it due to time constraints, but I’ll roast it when I make it next time. Or smoke it with a bit of cherry wood.
Charlie is big enough to sit in the seat on shopping carts! He loves it.
I learned this week that cold weather affects baseball games. The density of the baseball changes, which affects how it interacts with the bat, and it travels differently through cold air, too.
I like this idea of a public river of RSS content. HereâÂÂs my own personal river. This is the flow of content from the 280 feeds I follow: /feeds.
My personal feed is generated using a Google Docs script because itâÂÂs a technology I know how to code. ItâÂÂs creaking at this point and I need something more robust – you know using a technology more advanced than a hyperlinked spreadsheet.
Turns out Dave Winer has the technology. River5 is his tech stack using NodeJS t
I like the idea of curated sets of feeds and I can subscribe to and changes to the source propagate down to me. I regularly publish an XML file of the feeds I subscribe to so others can check them out.
I made some traditional Easter Cheese with Grandma.
I tried to convince Grandma to cook the eggs very slowly to achieve more of a custardy consistency, but she wouldn’t have it. I think I may riff on this next year and make an Easter custard, and add some cinnamon and nutmeg, as some recipes call for.
I ate it on rye bread with ham and kielbasa. It was pretty good!
Our indoor seedlings are doing great and Charlie and I got out in the garden on Friday to direct sow some seeds: French breakfast radishes, peas, slo-bolt cilantro, borage, calendula, black eyed susans, hibiscus, moon flowers, and a pollinator wildflower mix. This year I’m planning on succession planting things like radishes, cilantro, and basil so we have a regular supply of them. Since I never actually followed through with it in previous years because I forgot, I added reminders to my calendar this year.
Speaking of gardening, I came across this great idea for keeping tomato plant roots consistently moist:
Details on the wick system: 1/2" nylon braid drilled into a reservoir, threaded around the root system at transplant time. Fill when empty, maybe uses 1.5 gallons a week, which is very efficient for such a large plant (I do fertilize once/week with a liquid fertilizer). pic.twitter.com/wSxT1y0xIt
Charlie is doing swimming lessons now! ðââï¸
One of our friends let us know that the town we live in has swimming lessons for babies 6mo+ for a very reasonable fee at the local middle school once a week. The first week it was all new and Charlie was very unsure. The second week he warmed up to it and had more fun. The third week he took right to it and started kicking in the water, splashing, holding onto the wall when he was supposed to, and was comfortable with the floating exercises.
I took Charlie to his first art museum this week, Dia:Beacon.
We also explored some indie bookstores we haven’t been to before. Someone put together a site and bookmark with the indie bookstores in the Hudson ValleyArchived Link. We’ve been to half of the list just by taking day trips to the various towns and stumbling upon them. The one we are missing are primarily the northern ones, since those are a few hours away.
A hardcover collection of Aldous Huxley’s essays for $1
First edition hardcover of James Michener’s Hawaii with the dust jacket in great condition
Books 1-10 of the Wheel of Time series as a $10 “get it out of here” grab bag.
I always enjoy visits to Dia:Beacon, but the standout from this week’s visit was seeing Marian Zazeela’s drawings. I’m sorry to say that I hadn’t encountered her work before now!
Zazeela plays with themes of abstract letters, words, and calligraphy, borders, symmetry, patterns, and repeating (and non-repeating) forms.
Here are some pieces I felt drawn to:
The gift shop had a book of Zazeela’s collected drawings from 1962-1991, which I immediately bought. There are a lot more great pieces in there.
Though Zazeela did her work by hand, a lot of her work is a precursor to some of the ideas being explored in the generative art space today with asemic writing and poetry, autoglyphs, and flow fields.
The generative art community tends to focus on early digital art pioneers like Michael Noll and Vera Molnar, but there were also similar themes being explored by artists like Marian Zazeela in physical mediums during the same timeframe.
I recently learned that Zazeela and her husband, composer La Monte Young, perform in their NYC loft, La Monte performing the music and Zazeela doing a light show that she pioneered. I want to go see it!
Another thing I discovered at Dia:Beacon this week: Behind each of the Sol LeWitt Isometric figure wall drawings (411 B, D, and E), there is a barely noticeable grid in a faint pencil line to help the drafters line the piece up.
I’d seen these particular drawings at Dia:Beacon before, but I hadn’t noticed that. It gives us insight into the process of drawing the piece: Lay the grid, subdivide it, subdivide it again, decide on grouping and colors, then fill it in.
This procedural approach is what makes LeWitt’s wall drawings so fun to recreate digitally (and generatively!)
Another observation from spending the day looking at art at Dia:Beacon: Look at the dates. Pieces with similar themes sometimes have years, even decades, separating them. Are you stuck on your current art project? Shelve it for a while and come back later with a fresh perspective.
I’ve been searching for one of these posters since I first saw it at a library two years ago. I finally jumped through a phone tree for the NY Bridge Authority and found the person who sells them. This week Charlie and I drove to their HQ in Highland (next to the Mid Hudson Bridge) and got one!
In the shop this week: Prototyping wooden toys for Charlie and trying to figure out how to speed up the production process.
ð± Recently sprouted in the digital garden:
Friends often ask me for NYC recommendations, so I’ve taken the various tourist recs I’ve given and put them all in one place.
While putting together this list, I learned that CW Pencil Enterprise closed, which makes me sad. I loved that little store. It was so unique! Thankfully they are keeping their blog up at https://www.cwpencils.com/ – Go check out the TED video from CW about the history of the pencil.
I stumbled across Jim Nielson’s fantastic Readlists reboot, h/t Ton Zijlstra. I love this. I used the original Readlists a lot and am happy to have a similar tool back.
I made two readlists so far: John McPhee‘s Tabula Rasa series and a sampling of 30 Kevin Kelly articles I want to read. I’m collecting the ongoing readlists I make in my digital garden and you can download the epub or mobi to read or json to remix there: https://notes.cagrimmett.com/readlists/
Cool site with collections of what people are reading or recommend. Reminds me a lot of https://usesthis.com, but for books instead of tools.
I finished the Stewart Brand bio by John Markoff this week. Recommended. I’d love to see a collection of Brand’s essays from his long career, preferably edited by Brand himself. And it definitely needs to be titled “Floating Upstream” or “Brand On Brand.”
Amanda and I are enjoying The Gilded Age on HBO. Agnes van Rhijn and Bannister the butler are our favorite characters.
I’ve been on a mission to use Amazon less, so I successfully got all of the books I had on my wishlist out into a spreadsheet. There were over 500 (I’ve been a Prime member since 2010.) The process was: Open the print view of the wishlist, which displays as an HTML table. You can copy and paste that into a spreadsheet, then use the text -> columns functionality to split columns by “by” and “(” to get the titles and authors into separate columns.
Next step is to get this wishlist and my own reading list into Open Library. I’ve been using my own custom post type here on my site, but I want something a little easier to use that pulls in more info about the book, and Open Library by the Internet Archive is a great alternative to Goodreads (owned by Amazon, no API.) Open Library has an API, so I just need to figure out the right sequence of calls to the search and bookshelf endpoints to put the various books where I want them. Then I’ll be able to query they API and display the books on my own site.
Since I’m doing so much work in my Digital Garden these days, I need to set up a script to pull one backup each week and store it locally. Pressable does a great job with the backups, but I’d like to keep one offline. Looks like this is possible with the Pressable API GET /sites/{site_id}/backups/{backup_id}, so I just need to set up a cron job to manage it.
So, it is Saturday morning and I haven’t written a thing for this week’s update. I usually collect notes in a draft throughout the week, but not this week. Thankfully Charlie’s naps have been longer and I should have time to knock something out.
Fingers crossed that this past week was the last 20F cold snap of the season. This week I did maintenance on the elevated beds—leveled them, added brackets to support the bottom, loosened the soil, and added compost, soil, and fertilizer. I think I’m going to sow radishes, dill, and peas this week.
Forsythias are starting to bloom! I’d love to take the guideboat out on the Hudson and try to catch some striped bass (they start to run when the forsythias bloom), but I don’t think that is going to happen this year. Maybe next year.
After a 5 year hiatus, I’m getting back into curing meat. I cured and smoked some pastrami and tasso ham this week. Both turned out pretty good! Next I’m planning on getting a pork belly and curing pancetta. I’m using the Ruhlman/Polcyn Charcuterie book for the base techniques, but usually modifying the spices.
Cooked some latkes this week with butternut squash instead of potatoes because a friend with Crohn’s disease came over for dinner. I used almond flour and egg as the binder, and shredded the butternut squash and the onion with the shedder attachment in the food processor. Instead of frying them on the stove, I baked them on sheet pans in the oven. They turned out better than expected!
We made more food for Charlie this week: Mango and strawberry puree to mix with his morning yogurt (the little guy almost refuses to drink milk in the mornings now, preferring yogurt for breakfast), and pear/spinach for lunch/dinner.
We’ve also been feeding him what we eat for dinner: Some chunky tomato sauce when we had spaghetti and meatballs, mashed up beans and polenta, and butternut squash latkes. We’ve also been taking some of the veggies we cook with and steaming them for him (asparagus, carrots, yellow squash.)
I heard about a new Sol LeWitt exhibition at Williams College in MA. It shows ~200 of his prints, which I’ve not seen many of. Most exhibitions focus on his sculptures or wall drawings. We are going to take a drive up there in a couple weeks!
An area of personal interest: How do we get more people blogging? Tom Critchlow offers some ideas:
The idea is to make a blogging accelerator. Only you don’t call it anything to do with blogging. Instead you just make it an interesting project that people engage in, with a by-product being writing up the project online.
The thesis is this: don’t tell people they should be blogging or explain to them why to blog but instead trick them into writing online and show them how the magic works. Get them to feel it for themselves.
What are your learning questions?
Similarly, a Learning Question is designed to encourage a full and meaningful enquiry. It’s more about provoking a process of learning than about finding an answer, but if you do seek an answer it must be one that incorporates your growing knowledge and personal perspective.
Rich Tabor published his Gutenberg blocks on GitHub. I’ve found them helpful as a learning tool, especially since he made a block that does the same thing that I made a block for: Modified dates on posts. Except that his works in FSE and mine does not. I’m rewriting mine soon using his approach to making the block dynamic as inspiration.
I’ve been impressed with Marcus Burnette‘s ability to spin up useful Chrome extensions for various online tasks. We are both moderators for the WordPress Photo directory, for which he’s already made a couple extensions to add some extra functionality and add favorites.
Speaking of Chrome extensions, I’ve been using Quotebacks to save and embed quotes from articles I read. Check them out above!
What can I build into a Chrome extension to make my life better?
Update on the seeds I posted about planting last week: Kale, Black Vernissage tomatoes, Cherokee Purple tomatoes, Ten Fingers of Naples tomatoes, Milkweed, and Hollyhock have already sprouted.
We have another cold snap coming early next week that will probably include frost, so I’ve held off on direct sowing radishes, peas, and dill. I’ll probably do that late next week after doing a bit of maintenance on the garden beds and adding some soil, compost, and fertilizer to them.
ðÃÂÃÂø Frog fact of the week ðÃÂÃÂø: Did you know there is a different word for hibernation in cold-blooded creatures? It is called brumation. Hibernation refers to periods of dormancy in warm-blooded creatures (endotherms).
I used the Merlin Bird ID app this week to identify a bird that I couldn’t see by its song. I’m terrible at identifying birdsongs, and I want to get better. This app is really good.
Charlie has been sleeping longer during the night this week, which has been pretty nice. He got to try a swing this week, he ate some new foods (fresh mango, polenta, tomatoes with cranberry beans), and he worked with me outside.
I made and minted some pixel art on 8bidou late one night this week. Not usually my style, but it was fun!
I haven’t done a lot of sewing other than sewing the ballistic nylon together for the kayaks and guideboat, but my favorite pair of jeans got a huge split in the crotch and needed to be fixed, so I watched a few YouTube videos about mending splits and I mended them. It isn’t the neatest sewing job, but it is pretty sturdy, and I feel confident in fixing other splits in the future.
I mentioned 12ft.io a couple weeks ago for hopping paywalls. This week I made an iOS sharesheet shortcut to open URLs in 12ft.io. Just add it to your Shortcuts app, then open it via the Share button when you hit a paywall. https://www.icloud.com/shortcuts/c4863730ea2641b48eaf612590ad08dd
If you haven’t used Shortcuts before, you’ll need to open the Shortcuts app, run any random shortcut, then go to Settings âÃÂàShortcuts âÃÂàAllow Untrusted Shortcuts in order to install this.
Here is a video showing how to use it:
I cooked a pretty good, quick one-pot meal this week that I think I’ll make again: Orzo with spinach, peas, mushrooms, shallots, and pancetta.
Crisp up the diced pancetta.
Add the shallots and mushrooms and let them soften for a few minutes.
Add 1lb of orzo with 4 cups of chicken broth.
Add 1/4 cup cream and 1/4 cup grated parmesan with the peas and spinach.
Let everything simmer on low, stirring regularly, until the broth is absorbed by the orzo.
I listened to this album for the first time this week and I’m really digging it.
I used to think words needed to have unchanging definitions. Now I don’t think it matters as long as the meaning is understood by both parties communicating. Words are a means to an end: Communication.
My friend Mitchell Earl shared this quote with me that gets at the heart of it:
âÃÂÃÂThe limits of my language mean the limits of my world.âÃÂÃÂ
Ludwig Wittgenstein
I’m decreasing my usage of Amazon and supporting local indie stores instead. Just canceled all of my Amazon book pre-orders and emailed a local indie bookstore to reserve copies. Three reasons:
I’ve been a huge advocate of the indie web, but realized I don’t always carry that independent spirit to where I shop.
I want to support what I want to see more of in the world.
I like building relationships with local businesses by being a regular.
This is a good article in The Atlantic about MBS, the crown prince of Saudi Arabia. Long, but good. MBS is likely to become king in the next five years, which is terrifying. On one hand he is opening up the country and modernizing it on multiple fronts (more freedom for women, limiting the power of the clerics), but on the other hand he is quickly slipping into the territory of a brutal dictator (jailing and dismembering dissidents).
âÃÂÃÂYou Americans think there is something strange about a ruler who sends his unqualified son-in-law to conduct international relations,âÃÂàone Saudi analyst told me. âÃÂÃÂFor us this is completely normal.âÃÂÃÂ
A crown prince with a subtler mind and a gentler soul might have implemented MBSâÃÂÃÂs reforms without resorting to his brutal methods. But it is pointless to consider policy in a state of childlike fantasy, as if it were possible to conjure some new Saudi monarch by closing your eyes and wishing him into existence. Open your eyes, and MBS will still be there. If he is not, then the man ruling in his place will not be an Arab Dalai Lama. He will be, at best, a member of the unsustainable Saudi old guard, and at worst one of the big beards of jihadism, now richer than Croesus and ready to fight. As MBS told me, to justify the Ritz operation, âÃÂÃÂItâÃÂÃÂs sometimes a decision between bad and worse.âÃÂÃÂ
I’ve been reading and enjoying artist interviews. Here are some quotes I saved this week.
The interconnectivity between the natural and the digital is an important part of our lives, and will become even more important as we shift further into digital spaces. We find connection in the calmness and beauty of the natural world, and we must maintain that connection even while living more of our life in the digital realm.ÃÂ
This project is the result of an exploration that did not succeed. I was initially studying the possibility of creating a fur or hair coat effect. This exploration gave birth to a ball of fur with eyes. I didnâÃÂÃÂt really like the direction taken by the project. I explored the possibilities offered by the existing code, turned the hair into grass and tried to simulate some perspective effect. The result was not yet worthy. Adding a circle to test the interaction of the grass with objects was the trigger. The contrast between the circle (simple shape with a smooth and soft aspect) and the grass (repetitive and pointed shape) appealed to me right away. This was the starting point to create a surreal world around these 2 elements.
Nothing is ever finished, everything is always a work in progress. Finished to me is where IâÃÂÃÂm happy to let it go and let others interact with the token. ItâÃÂÃÂs finished where it reaches the state where itâÃÂÃÂs mature enough to make small mistakes to be interesting enough but is consistent enough to tie together into a single concept and visual output.
I suggest to students that they pick three artworks or artists and then try to smash those styles together, which serves a couple of purposes. If you choose just one artist and then someone goes, âÃÂÃÂYou just copied so-and-soâÃÂÃÂ, thatâÃÂÃÂs a feel-bad moment, especially if you attempted to pretend it wasnâÃÂÃÂt true! But if you mash together three different styles, you can happily say, âÃÂÃÂI was influenced by these three artistsâÃÂÃÂ, which is an excellent way of doing art. YouâÃÂÃÂre most likely pushing one of the styles forwards in a new direction, even if just by a little bit, which is how traditional art works, and youâÃÂÃÂre acknowledging your inspiration. And in the process, youâÃÂÃÂll probably move away from those sources anyway as you explore your own take on the whole thing.
I don’t think I ever mention on the blog that I started an artist interview site over at Behind the Art.
I’ve only done five interviews so far but I plan to do more in the future. If you are interested in interviewing digital artists and want to publish them on the site, send me an email.
I got back out in the shop today for the first time in a while. I decided to split a piece of cherry I’d been saving and turn it.
With the first piece, I had intended to make another French rolling pin, but a few unfortunately placed cracks foiled that plan. Only the middle section was useful. So I turned a dry vase!
With both ends supported, I started by roughing the piece out to make it round, then I turned it to the basic shape I wanted. Then I cut a 2×1.5in holding piece on the big end and took it off of the two centers and cut off the excess. I held the piece in the carpenter’s vice and drilled a 4in hole in the top to put stems and sticks in. Then I mounted the vase in the Nova chuck with only one end supported and sanded it with 150, 220, 400, and 800 grit, then finished it with a beeswax/jojoba oil polish. After cutting it off of the chuck, I sanded the bottom flat.
I can make a couple more of these out of the log I split as long as it doesn’t crack any further!