


Some spoons, scoops, and spatulas I’ve carved in the past two years:


Unlike the folks who are dogmatic about only carving greenwood, I carve both greenwood and dry wood, depending on what I have around. Some are firewood, some are offcuts from other projects, and some are foraged from downed trees in the woods nearby. I prefer cherry, but have also carved oak, walnut, beech, and mahogany.
Some folks get hung up on only using hand tools for spoon carving, but I don’t. Carving is all about removing as much material as you can as quickly as you can early so that you can spend the rest of the time where it really matters: refining the shape. A bandsaw, rotary tool, and beltsander really help with that. Some folks only carve spoons and do it in a particular way, and that is fulfilling for them. I mostly carve utensils to use at my own table or give out as gifts. Carving spoons is just one kind of woodworking I do amongst many others.
I’m reading these three with my friend TK Coleman to up our thinking, reasoning, and decision-making abilities. A question that has been on my mind a lot in the past six months is, “How can I make sure I’m not fooling myself?”/”how do I become less wrong in my thinking?”. I’ve read other things on this topic recently, and these are a continuation:
For delicious fun:
If you have any recommendations, drop me a line!

A friend gave me some nice cherry logs that I sealed the ends of and let dry for the past year. I haven’t done much of my own milling, but I decided to get one of the logs out and see how much I could make out of it.
What I ended up getting out of one log:
First I split it in half and then split one of the halves in half again, leaving me with a half and two quarters to work with. Look at that gorgeous red!


I milled the half down into a square blank on the bandsaw, carefully removing the pith, which always splits when it dries. I also cut off most of the sap wood (the wood around the outer edges). Sap wood is younger, more wet, and more susceptible to splitting and tearing that the heart wood, which is older. The sap wood is growing and it is where the tree’s nutrients are carried to its limbs. The heartwood is no longer growing.

Turning: First, make it round. Second, plan out the cuts. I tend to mark them with a pencil. This wood was still a bit green, so it cut easily and made large shavings. I roughed it out to its final shape, then had it let it dry for a few hours before I could smooth it out and sand it.


Once it dried, I sanded it with 80, 150, and 220 grit sandpaper. Then I cut the grooves in the handle with a skew chisel and sanded the whole thing with 400 grit sandpaper before cutting it off the lathe. I cut it off by gouging the ends down to the size of a dime or so, cutting it close with a hand saw, then sanding down the ends to match the 400 grit. After that I take it inside and finish it with a coat of mineral oil + beeswax that I heat up over a flame on the stove so it soaks in and buff the wax with a cloth.
Finished! I paired this with a Lewis Ice bag when I gave it to my friend.


All of the rolling pins started out just like the mallet, but the blanks were a little smaller. I didn’t take many photos of that process, but in essence it is the same as the mallet:


Each rolling pin is roughly 14 inches long. The French-style can be used for all 14 inches. The traditional one can be used on the 9 inch center portion.
The three French-style rolling pins have a taper all the way across. To achieve this, I used a pair of spring-type calipers to measure the thickness at points equidistant from each end. I used the same technique on the traditional fixed-end rolling pin to cut the handles. I couldn’t resist putting the decorative bands on there to help with holding it.
I was able to get a few spoon blanks out of this wood, too:
I haven’t quite finished these yet. Hoping to do so this weekend. Note: Some of the things pictured are not from the log. I had three spoons already cut from a different piece of cherry I had. The butter knife, too.


Why have I shifted in this direction?
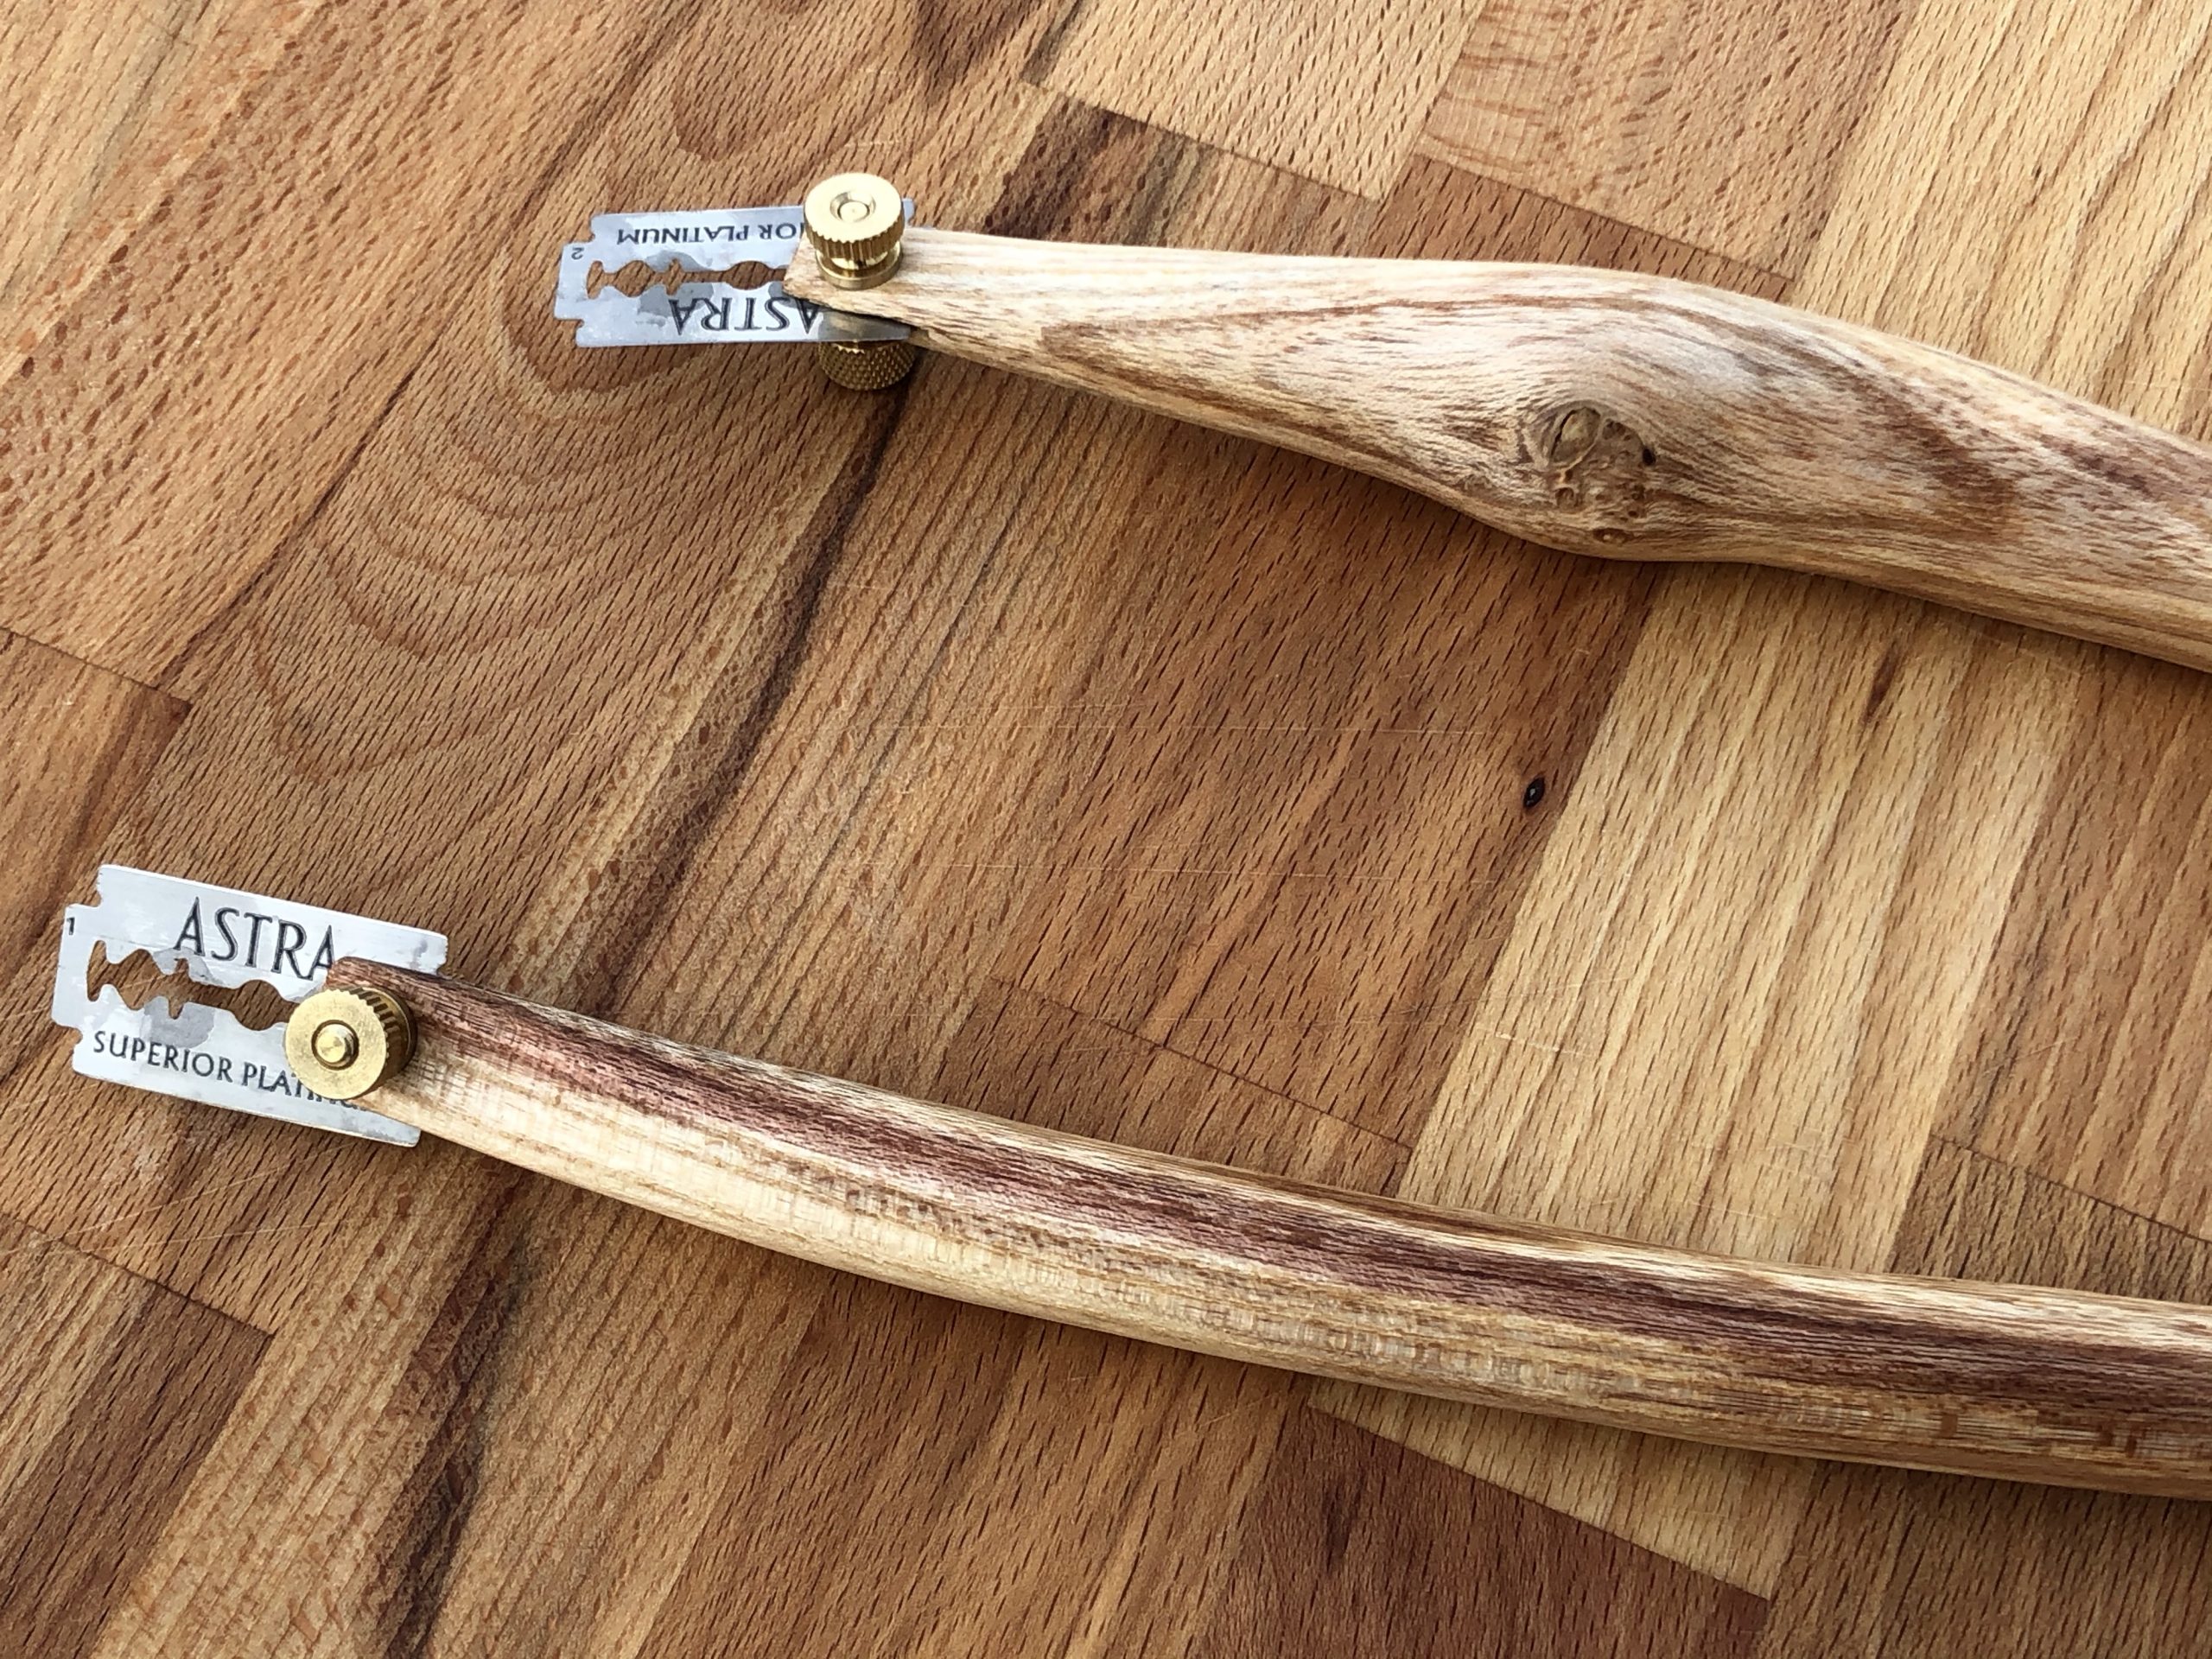
Like a lot of folks, I’ve been baking sourdough bread this year, and I wanted a bread lame to score the top.
While making a few other projects, namely spoons, I split two small pieces of cherry with a natural curve that I thought would be perfect for a bread lame, so I got to work shaping them and looking for hardware.
I did the rough shaping on the shavehorse with a drawknife, then did the final shaping with a Foredom flex shaft carving tool, sanded up to 400 grit, and coated them with mineral oil and beeswax.
The razor blade is held in place by 8-32 x 1/2 in knurled brass knobs that pinch the blade in a small groove cut down into the wood.
I kept one and gave the other as a gift.


Up next:
Back in September I made a serious effort to learn how to turn wood on the lathe. I turned a few tenons on the stool legs earlier this year, but that is it. I was on the hunt for a good beginner project and Amanda asked for some candlesticks, so I got to work.
As far as beginner/learning projects go, simple candlesticks are a great option. They take more planning than just making something round, but can be as simple or as fancy as you’d like. I didn’t get very fancy. I kept these to simple curves and let the wood grain shine.
I made three sets:
I made the five pine candlesticks from a Douglas fir 4×4 post left over from making our garden boxes this spring. They were inspired by a set that Amanda saw at West Elm.
I turned two individually, then planned ahead and turned three at once:


I finished them with mineral oil and beeswax. We used them at Thanksgiving and now have them on our mantle:


I turned the cherry candlesticks from some beautiful black cherry wood that my friends Erin and Tyler brought to me from a tree that they had cut down on their property. I sent these candlesticks as a thank you.
Since I turned these from a small log that the bark was still on, the grain pattern is completely different than the pine. It also had some cool bug damage inside that I kept. I chose to give one of them a live edge by leaving the bark on. I also finished these with mineral oil and beeswax.


They look great on Erin and Tyler’s mantle.


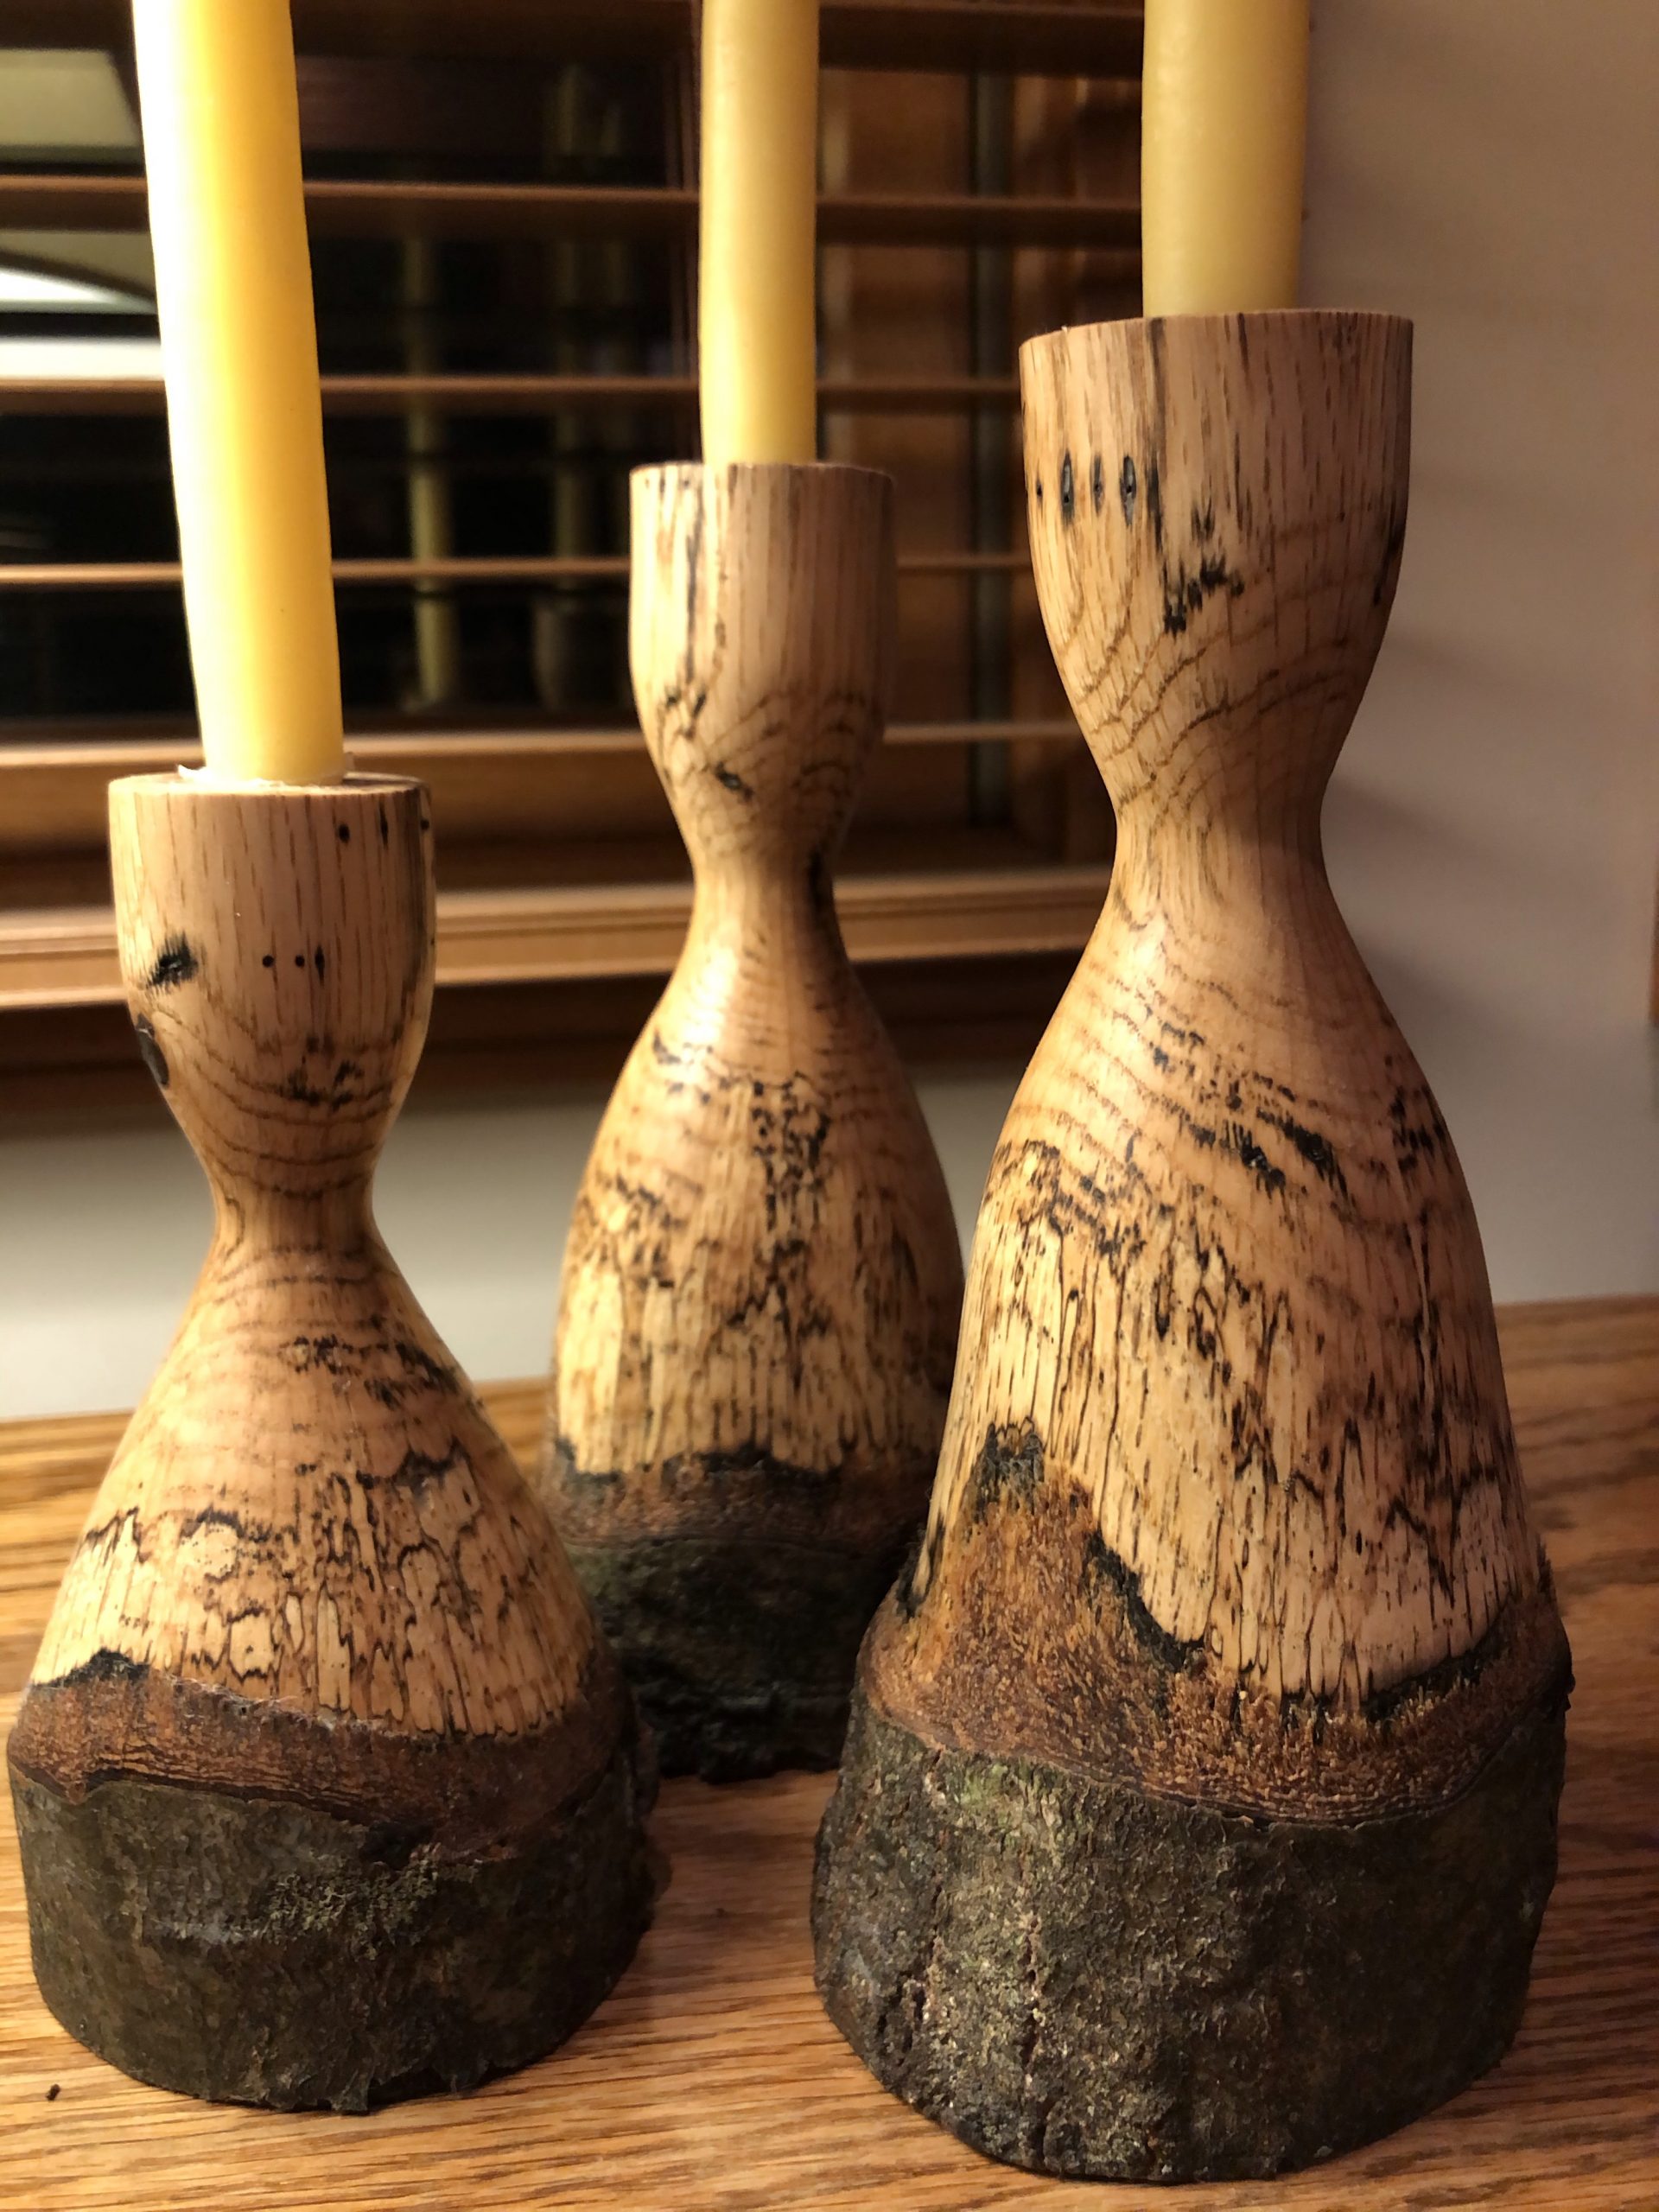
The oak candlesticks came from a limb off of a huge oak that fell in the woods at the end of our street. The trunk of the tree was pretty rotten, but the limbs I cut had some beautiful spalting. I loved the live edge I put on one of the cherry candlesticks, so I decided to make all three of these live edge.


I made a leveling jig to level the tops of these.

Finished!


What I learned about turning through this project:
My Dad now has his own blog: clgrimmett.com
He is using the Seedlet theme and is hosted at Pressable. His first post is about firewood. Go check it out!


We decided to change up our Christmas decor this year and go with an all natural aesthetic. Dried orange and cranberry garland, a basket instead of the tree stand, and wooden ornaments.
I’ve been learning how to do lathe work this year, so after Thanksgiving I started turning ornaments. I’m still pretty new to turning and had to throw about as many as I saved into the burn pile. Frustrating, but that is the way it goes when learning a new skill.
I first roughed them out and shaped them with a spindle gouge, then sanded them down with 80, 150, and 220 grit successively. On some of them I paused here and cut decorative grooves with a skew, then finished sanding with 400 and 800 grit. Then I cut them off the lathe, sanded the top, drilled a hole for the hook, and screwed in the hook.
I coated the ornaments with a mixture of beeswax and mineral oil that I heated up and buffed on with a rag.
Learnings
In progress shots with a piece of oak:


Here are two in-progess shots of the spalted oak ones that eventually split. I turned them both out of a single piece:


Finished ornaments. The small spoon is a hand-carved bonus!


The whole set:

Here is how they look on the tree:


Merry Christmas!
I love staked wooden chairs and I want to learn how to make them, so I picked up The Anarchist’s Design Book from Lost Art Press. All of their books are top-notch and I highly recommend them. Christopher Schwarz’s introduction on what he means by “anarchist” resonates deeply with me.
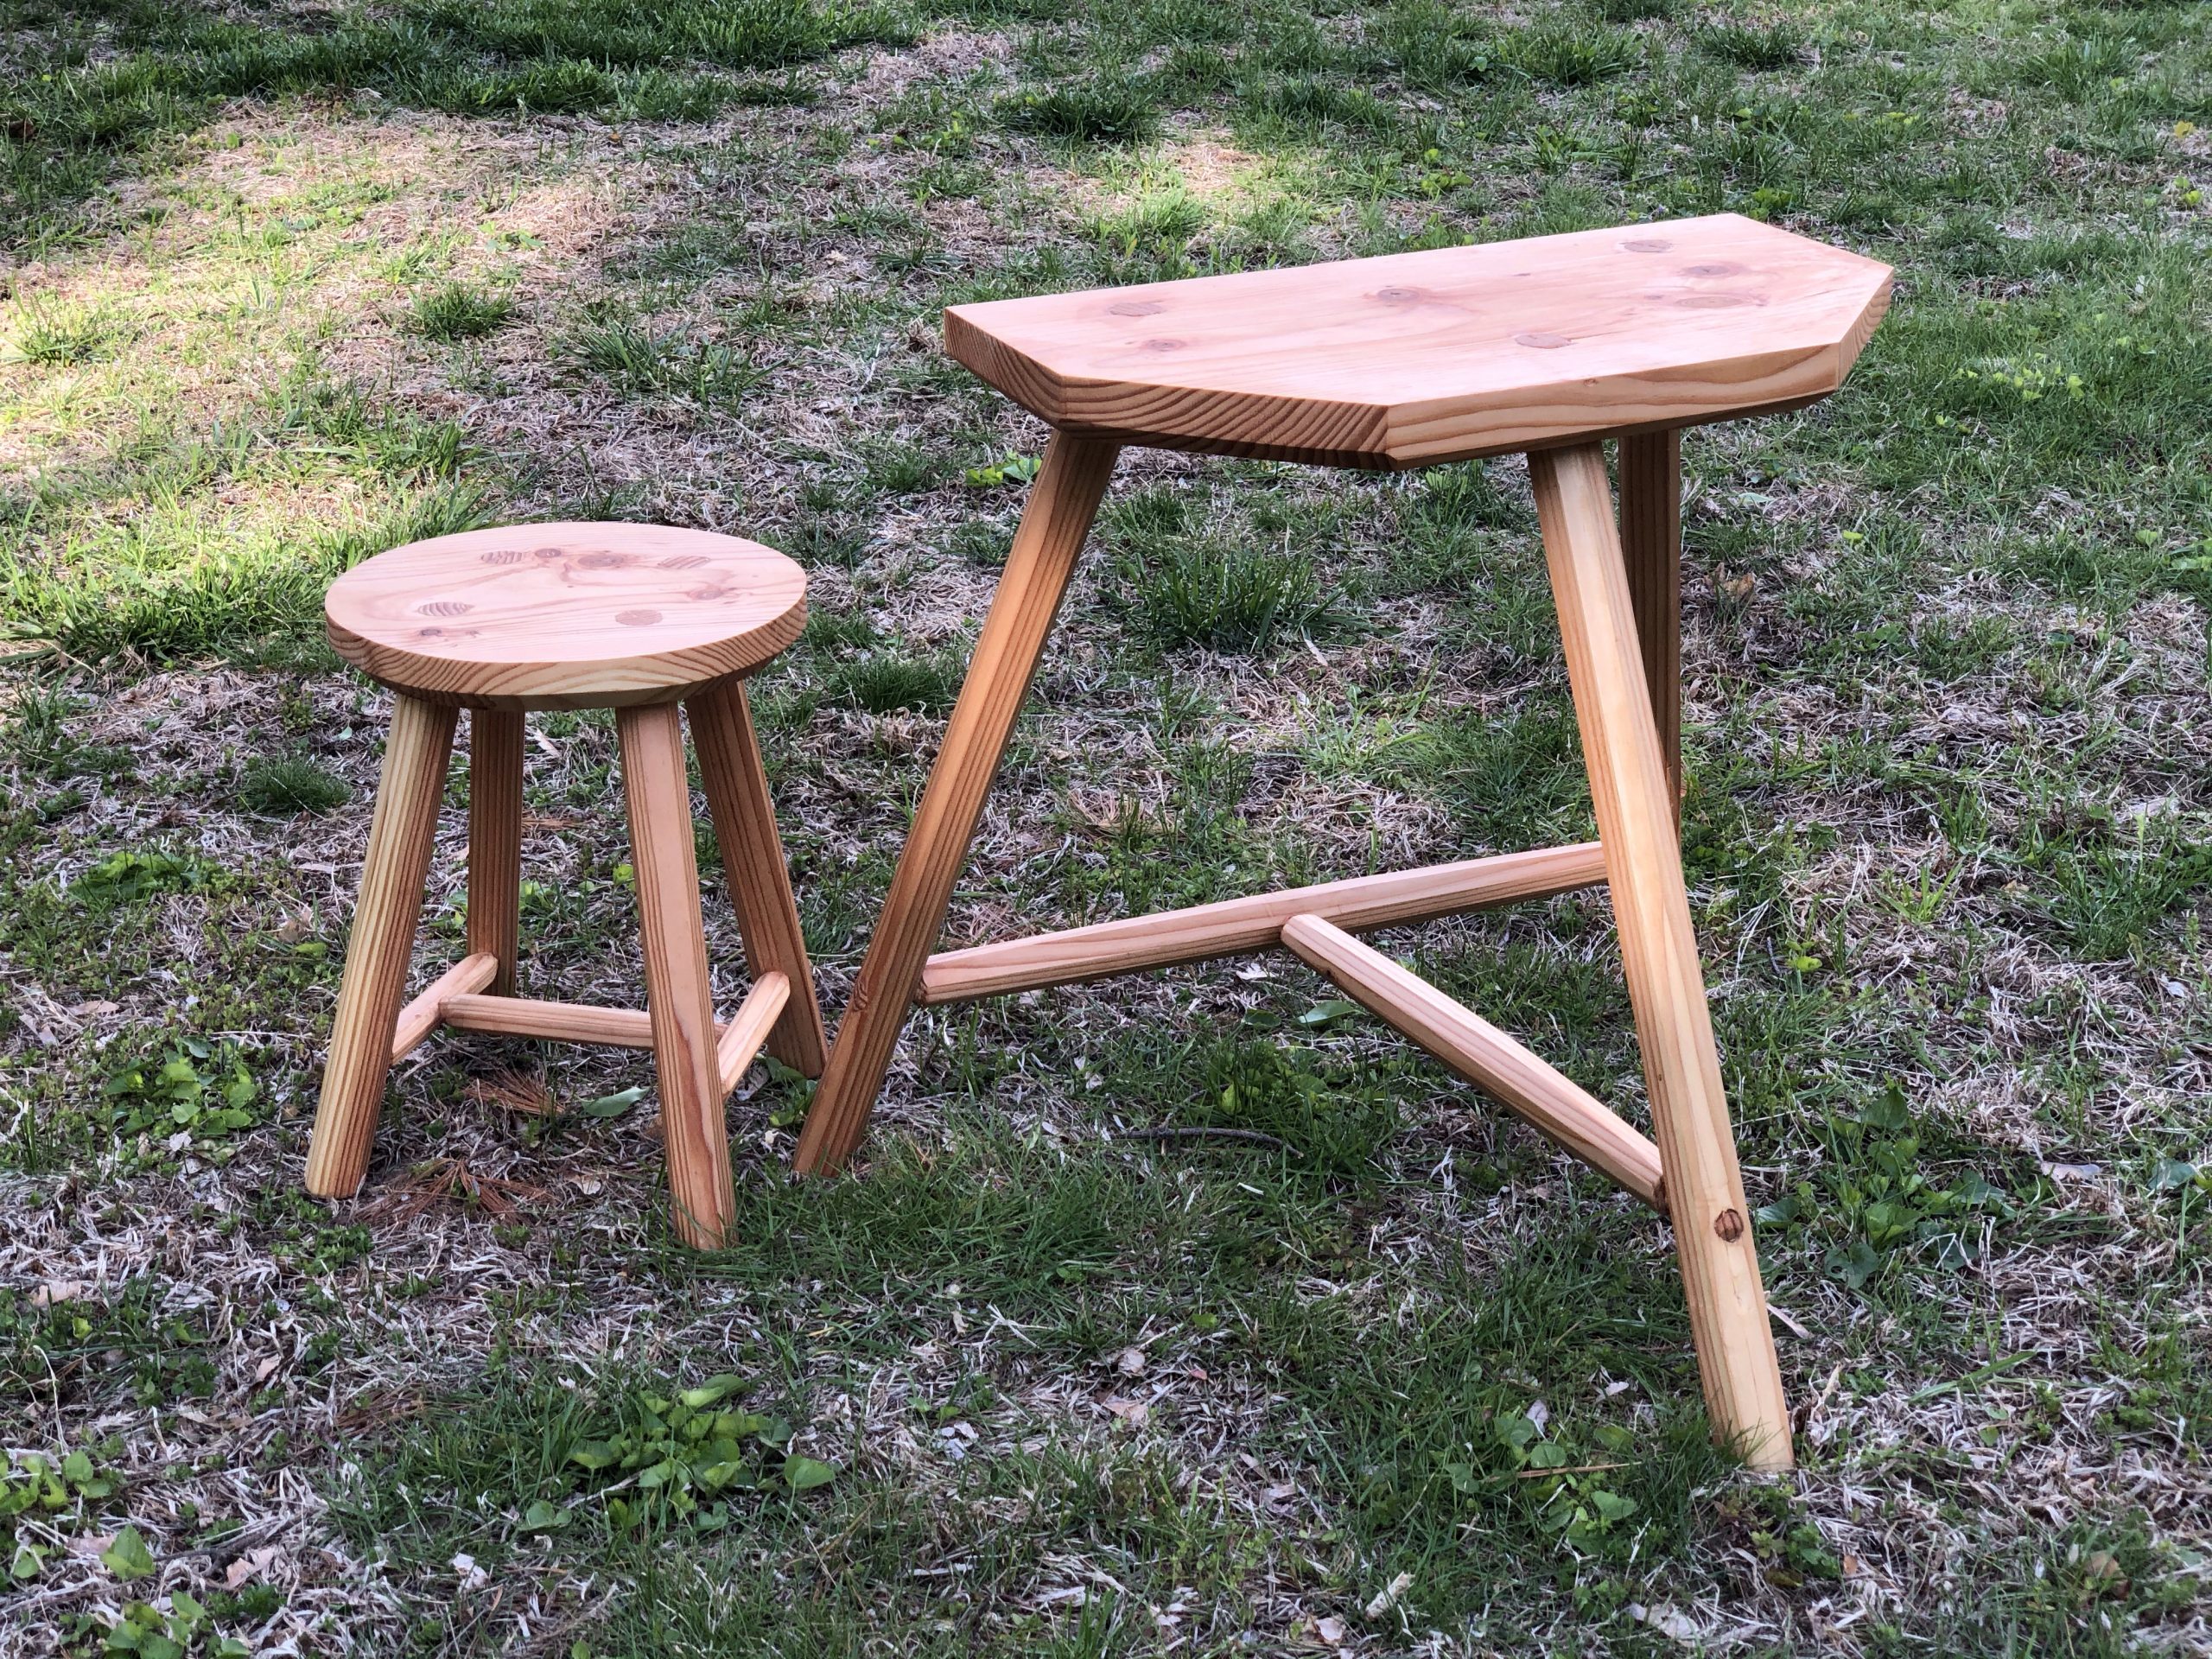
I figured I’d start small and work my way up: Make a low stool, then a high stool, then try one of the simpler armless chairs before going all-in on a staked arm chair.
First, I had to make some concessions: I used Douglas Fir instead of hardwood for the seat because it was all I had on-hand and we were in the depths of the pandemic. I had a few 2x12s sitting in the rafters of my shed. I wanted to avoid a glue up, so I made the seat a bit smaller than the plans.
Second, after I had the thing made and was flipping through the book again, a tiny slip of paper fell out. It read “Errata.” Sure enough, it was about the low stool. The angles of the legs were off, so mine looks pretty different from the plans. Oh, well. I learned a lot in the process and it made the second one easier.


I learned a lot while making the low stool, especially about shaping the legs and cutting the tenons on them, so I was a more confident on this one and it went faster.


The perils of pine: Sometimes breaks happen. Always make extra legs.


Here are the finished stools!


I finished both with boiled linseed oil and beeswax.
The low stool lives in my office as a small side table next to my reading chair, where it is often adorned with books and coffee. The high stool lives in my shop and I use it every time I’m in there, whether while carving, working at the bench, or just taking a break. We often pull it out and use it as a s’mores station by the campfire, too.
I’m planning on making another low stool with a hardwood seat. I have both Cherry and Oak right now and can do a glue-up.
After that, I want to make a staked back chair without arms. Working my way up!
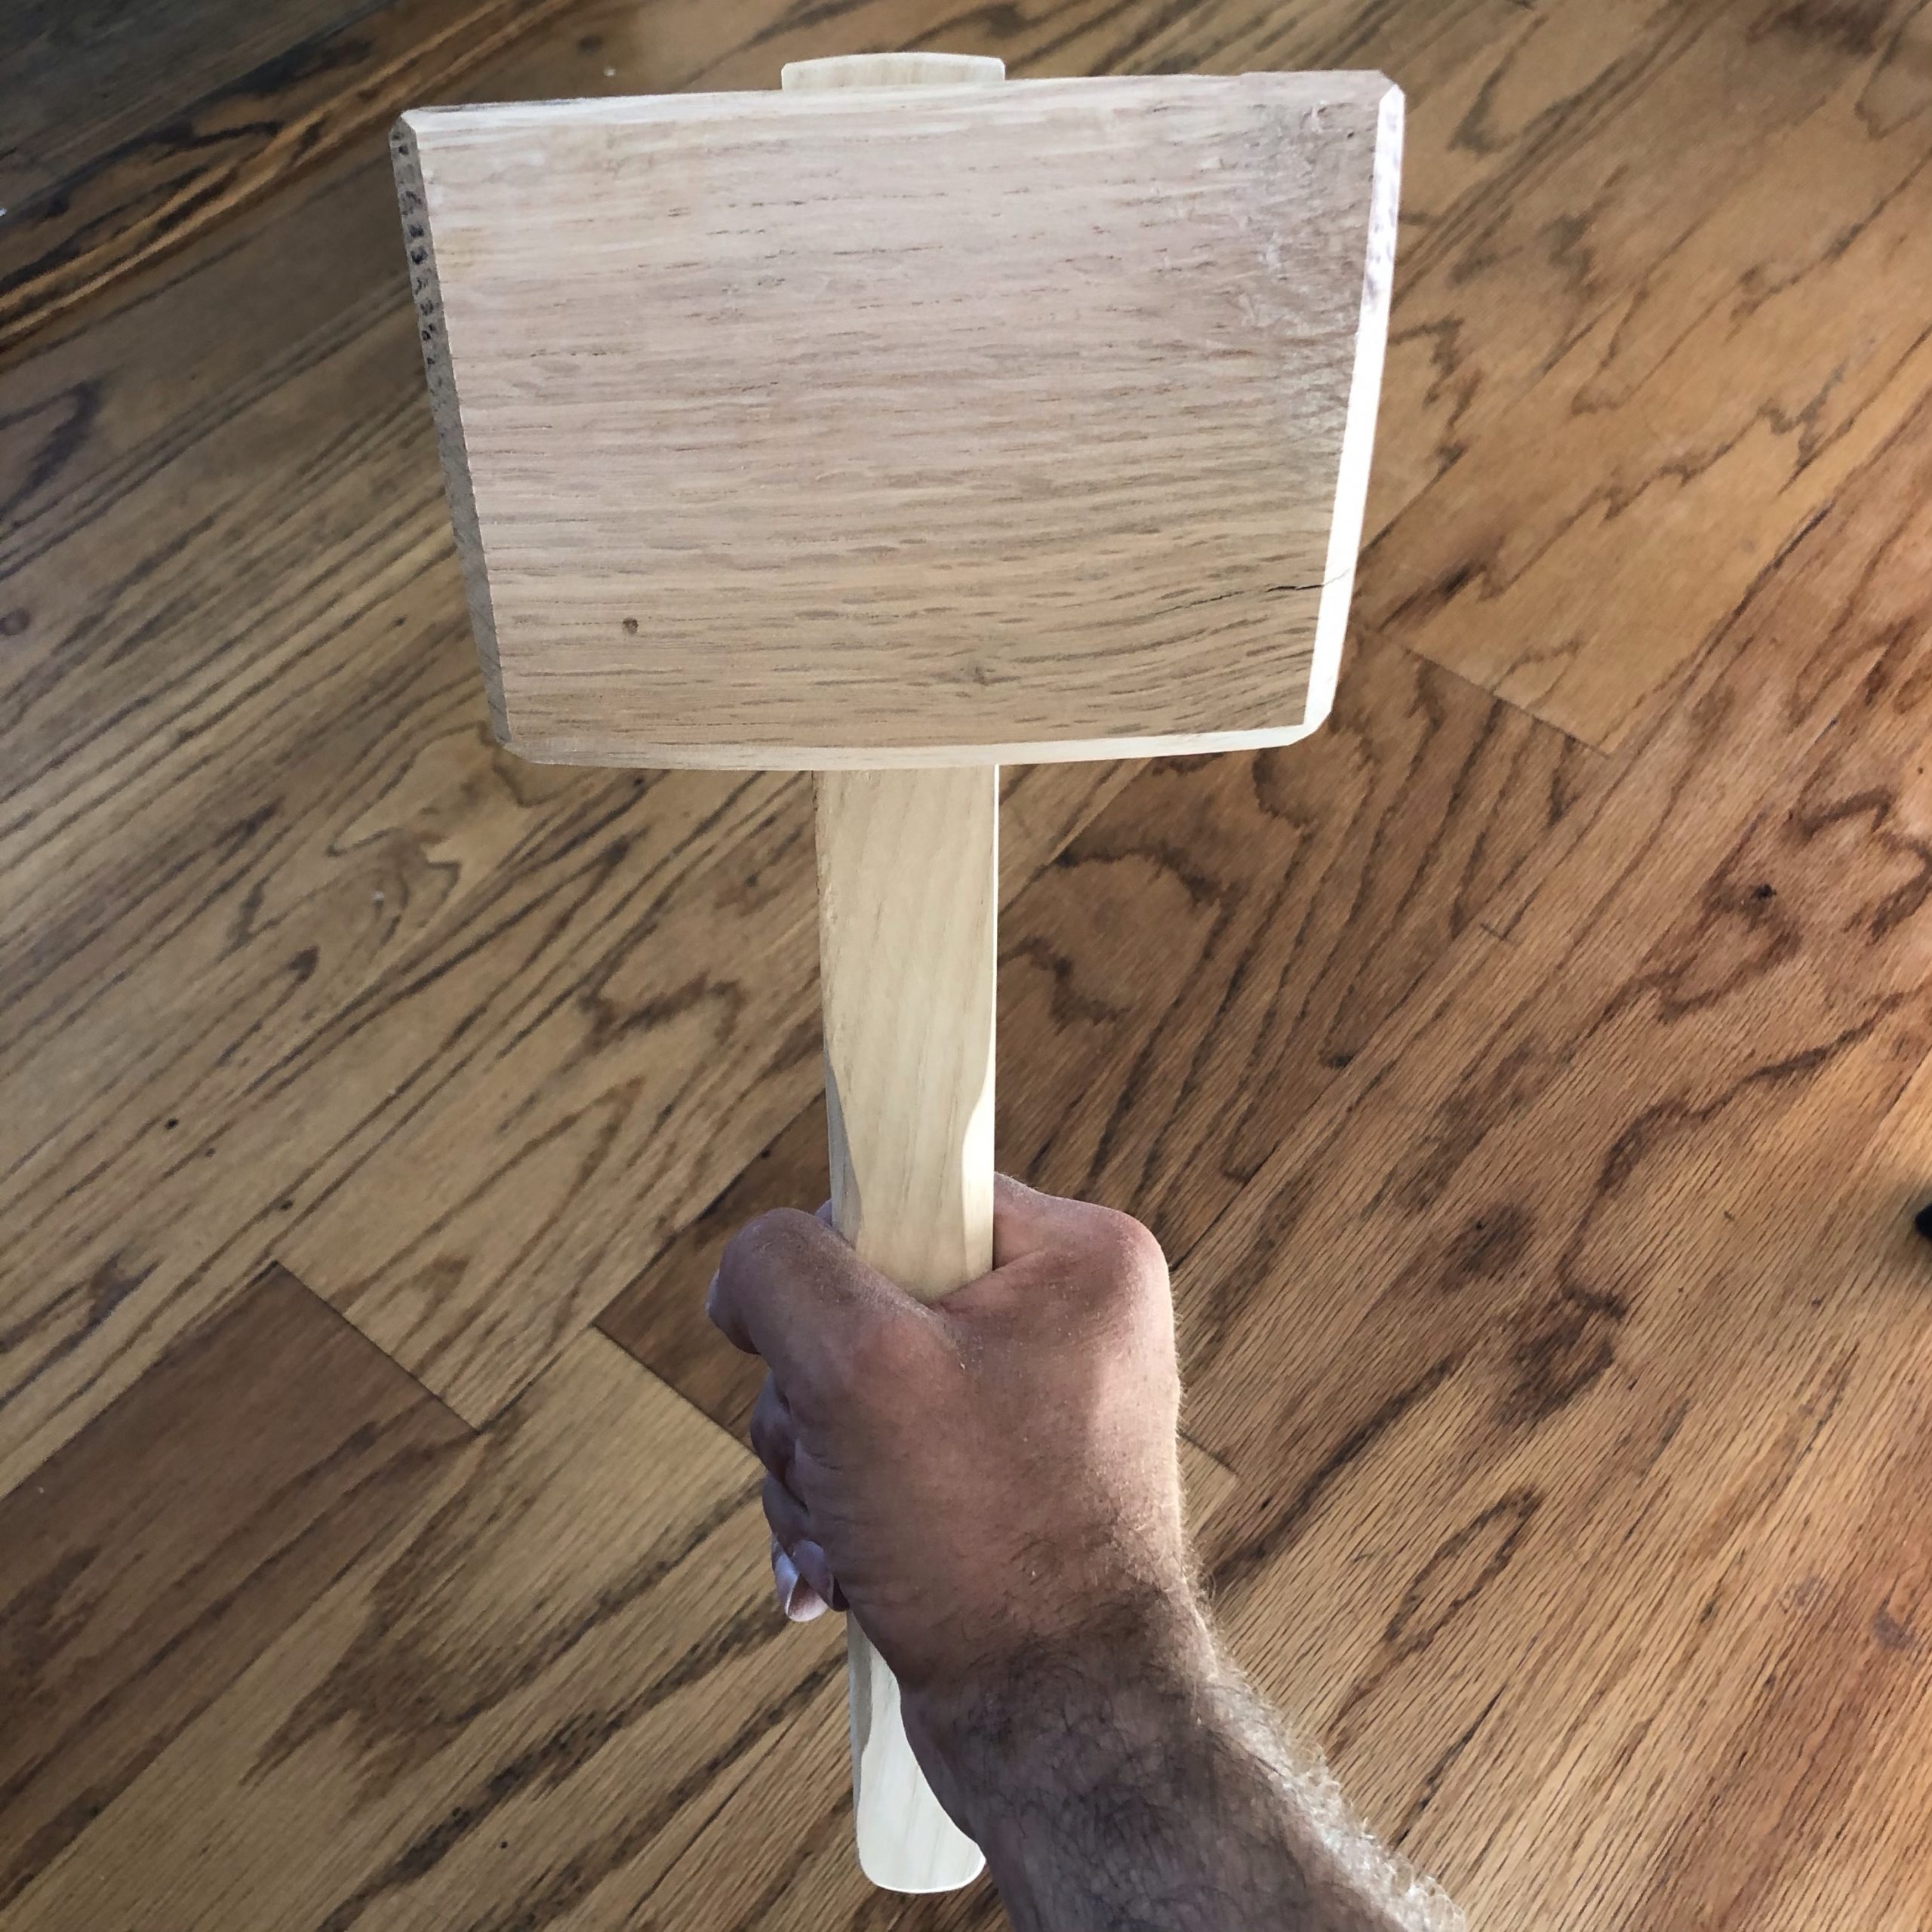
I made three wooden joiners mallets this year, following the Paul Sellers videos (1, 2, 3).
The first has a head of laminated Beech and an Ash handle. Mostly because that is what I had around!
There are no nails or screws in these, just wooden joinery. The handle and mortise in the head are both tapered to ensure a snug fit.
The process is pretty simple: Cut the head and handle to size, find the centers, plan out your mortise, drill out the mortise, chisel the mortise the rest of the way, shape the head, shape the handle, then coat!


I finished it with a mixture of boiled linseed oil and beeswax.
It is rougher than the next two I made, which is to be expected for my first time cutting deep mortises like this with a chisel. I also didn’t pay as much attention to the corners as I did with the later ones. I don’t love the way this one looks, so I use it as my main mallet for chisel work and don’t mind banging it up.
After learning a few lessons on the first one, I made two more with Oak heads. One was a Father’s Day gift for my Dad with an Ash handle and the other has an Oak handle as well and is kept on the house bar for crushing ice. I didn’t take any progress pictures unfortunately. I did get to use my first mallet to make these, though!
I opted to let the heads soak up mineral oil to give them a little extra heft and to help keep them from splitting. After they soaked up oil for a few days, I let the surface dry out a little bit and then coated them with Mighty Bull’s Wax Archived Linkfrom Corey’s Bio Blends.


The ice crusher has a shorter handle and a smaller head. It works great with a Lewis bag!


Amanda was watching a video about different types of handmade pasta (we had a lot of time on our hands during the pandemic and finally got some flour!) and asked if I might be able to make a malloreddus board. I decided to give it a try!
I started with sawing and planing down a piece of Beech I had for the board:


I tried a bunch different methods of making the grooves:
I ended up using a tablesaw tilted at a 45 degree angle and a bunch of homemade spacers, slightly wider and longer than popsicle sticks that I cut out of an old piece of fencing that I planed down. I started with all of the spacers, then I’d cut a groove, remove a spacer, and repeat.

It worked! Took me a little while to get the blade height just right, but I’m happy with how it turned out.
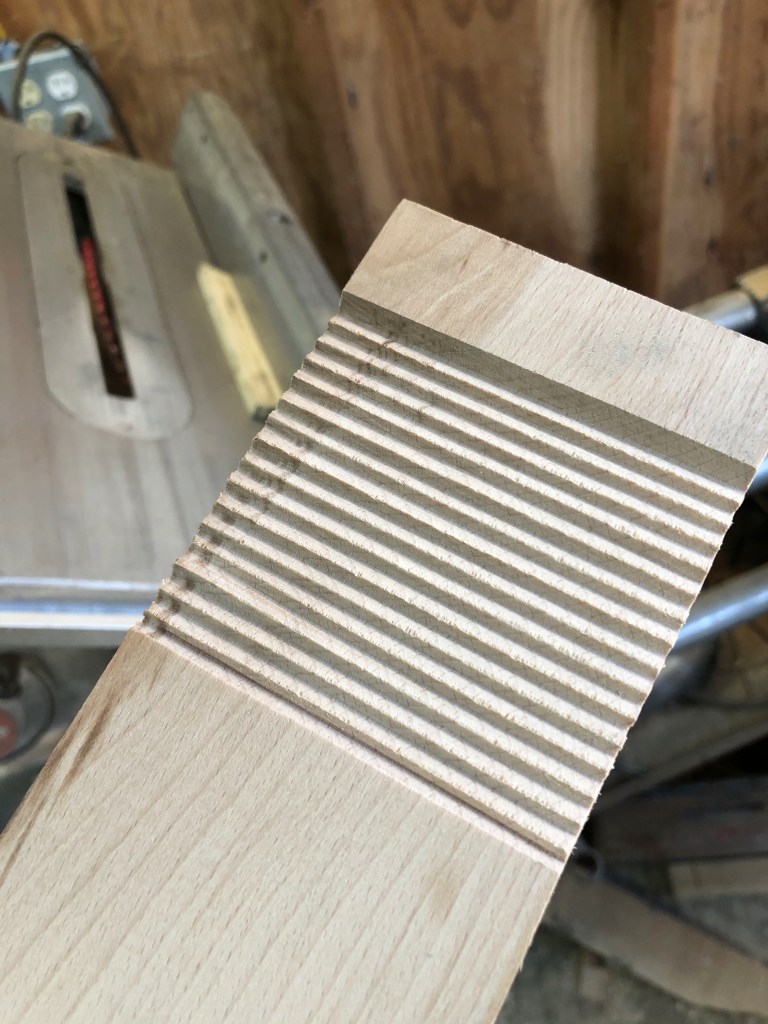
They needed a little clean up with some sanding sticks, but otherwise looked good!
I made two of them and cut them out in a round shape with a handle.

After some sanding, they were ready to make Malloreddus with!


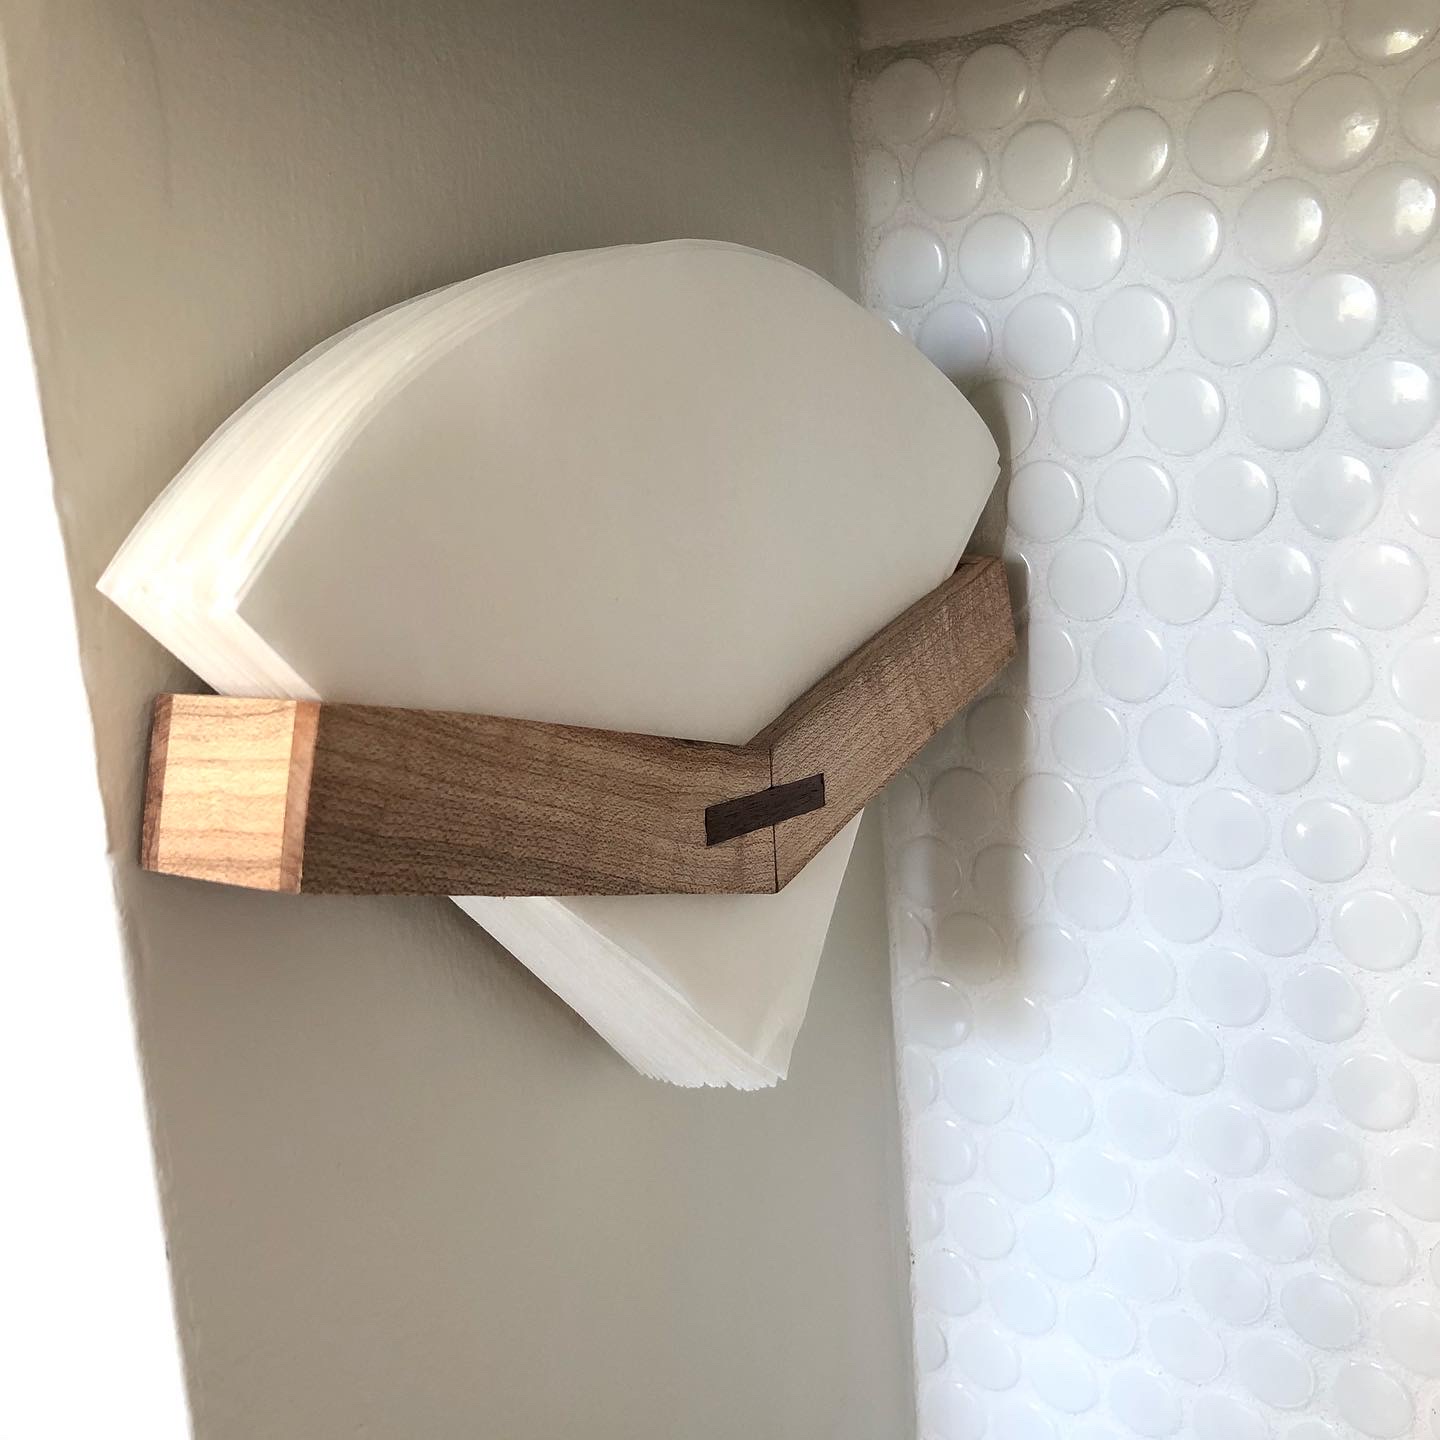
Amanda and I wanted to hang our coffee filters in a little nook above our coffee grinder, and I happened to have a lot of free time on my hands back in April, so I decided to make one.
This one by Yoshitaka NakayaArchived Link that inspired me:

I didn’t really have much of a side view, but this was enough to go off of.
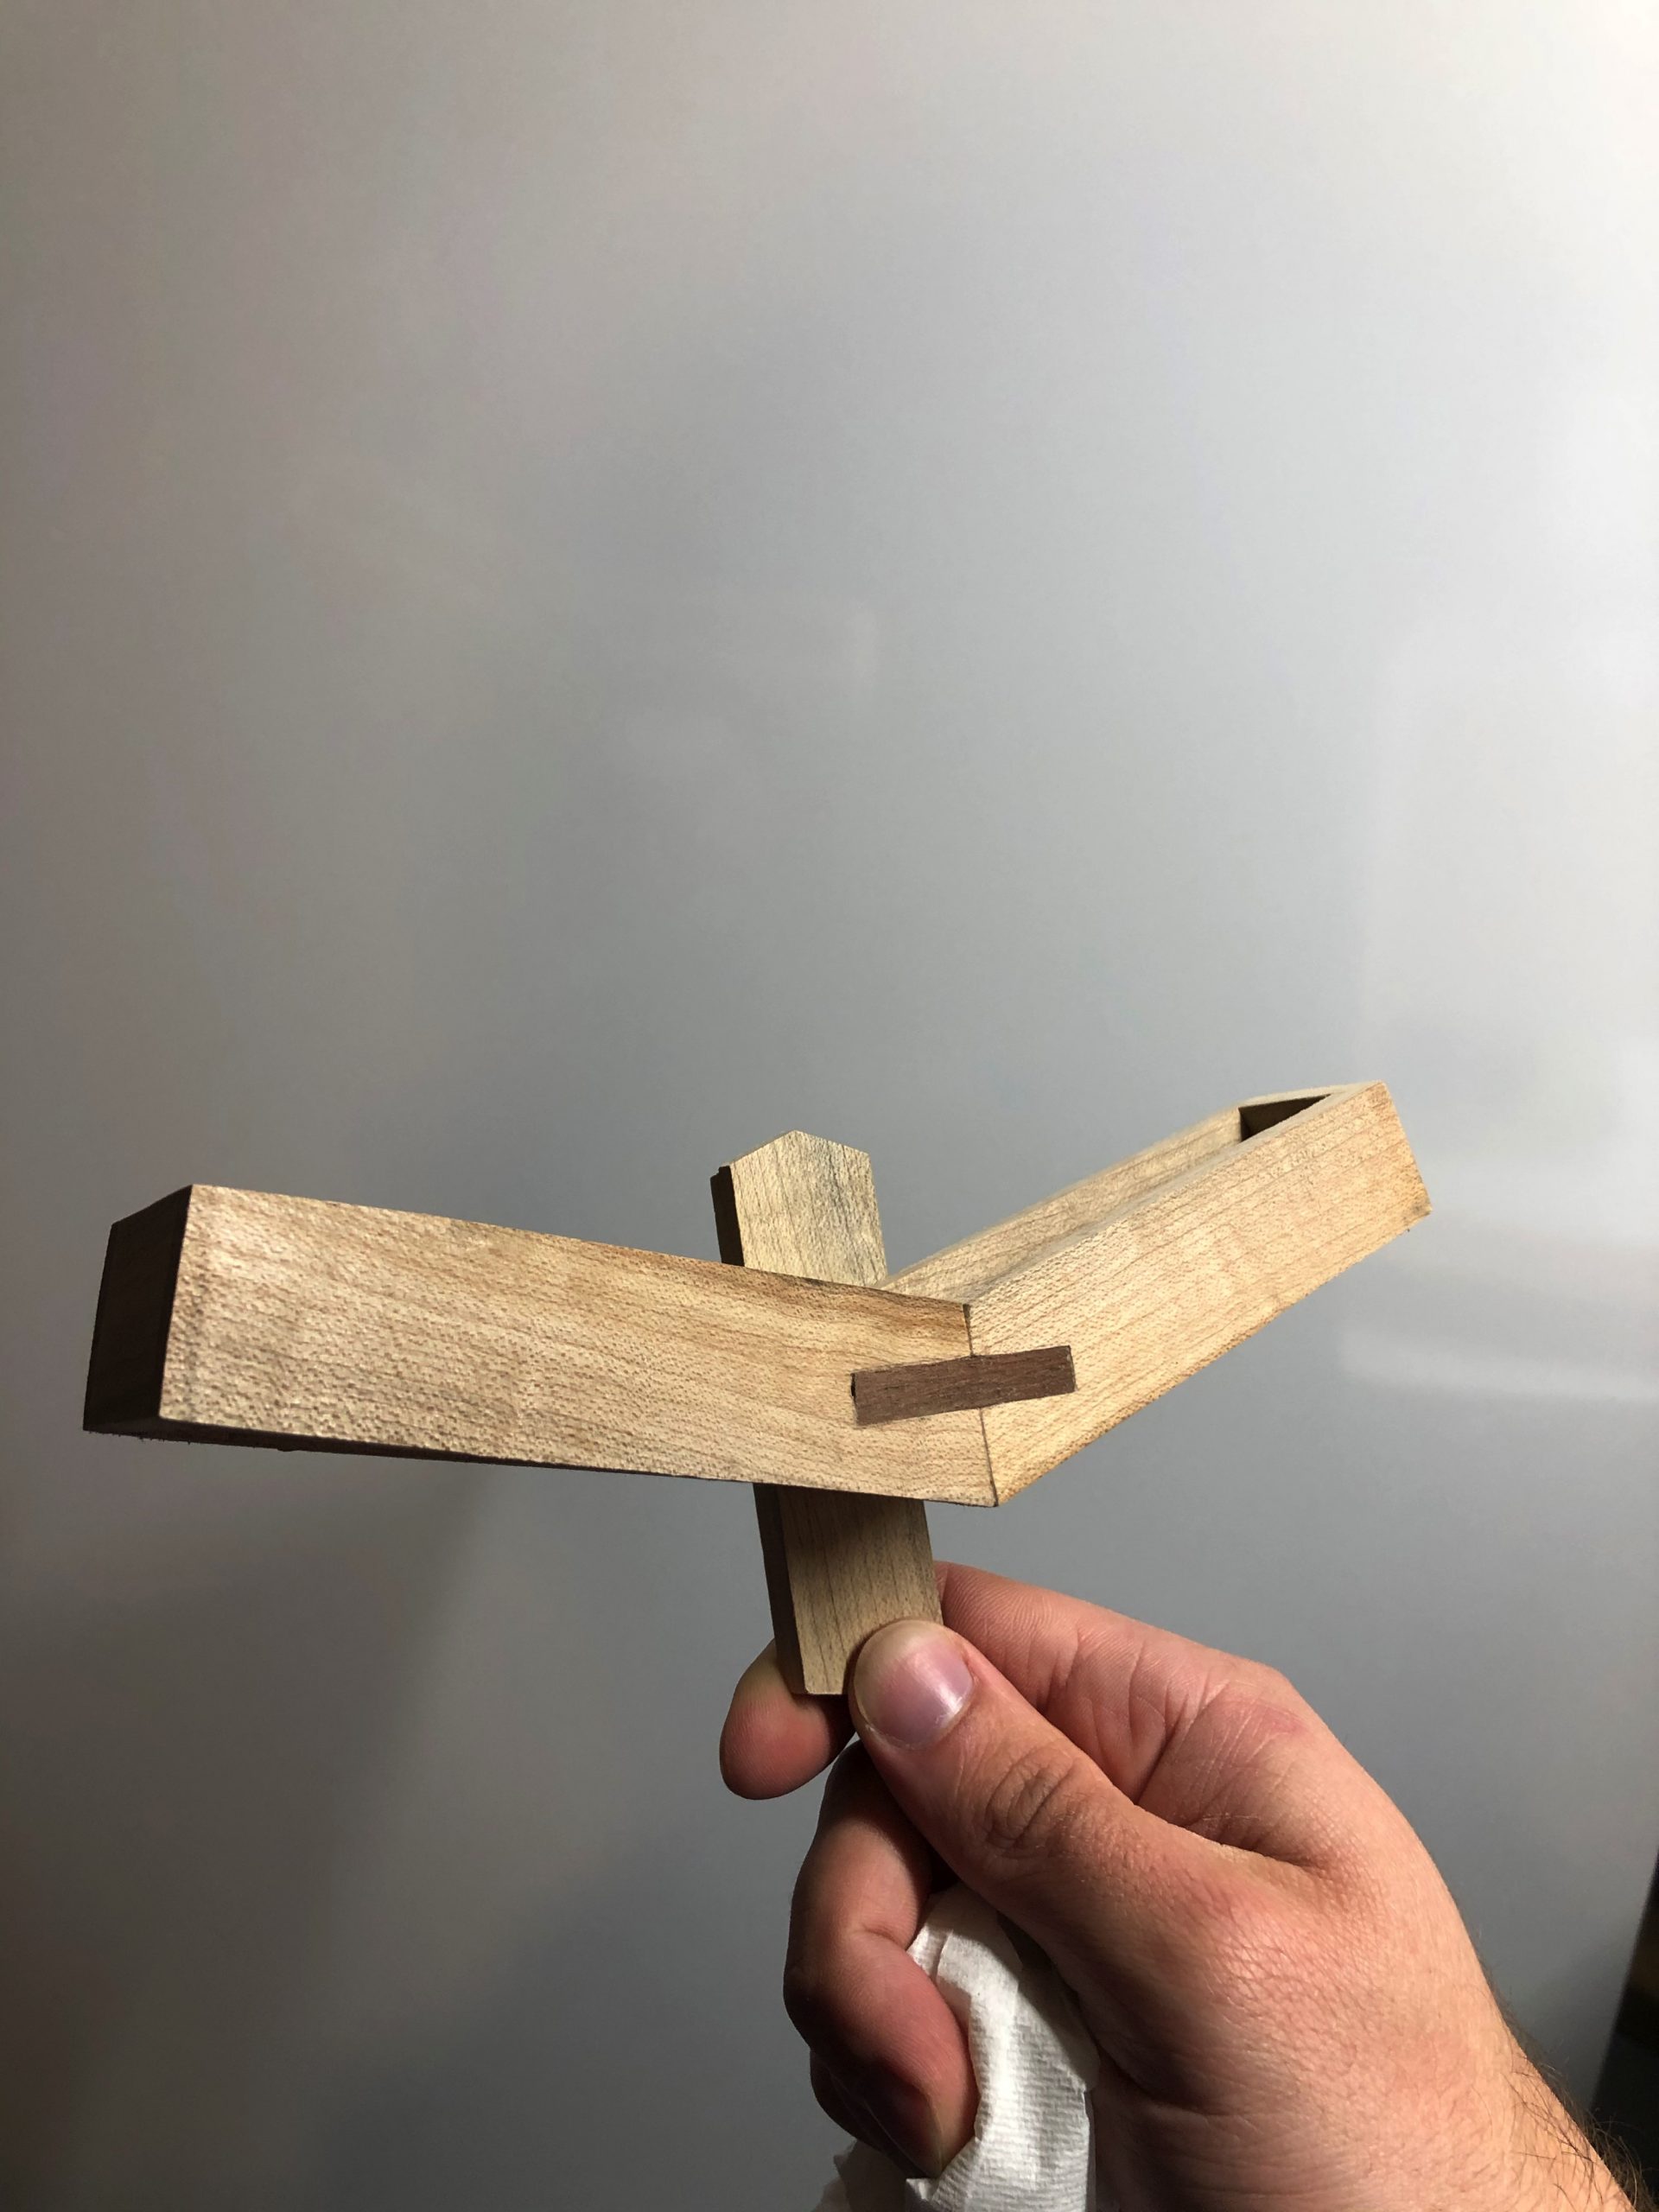
For the wood, I decided to use a strip of maple I had. I planed it down to the thickness I wanted, then worked on figuring out the angle and overall width of the holder.

Next I cut a walnut accent piece and transferred the size onto the wooden holder and then chiseled that out and inlayed the walnut.

Then I chiseled notches for the end pieces.

Last I glued everything up, let it dry, sanded, added the back piece for a hanger, and coated it with a clear satin wipe-on polyurethane.


It holds about 20 Chemex filters and looks great on the wall!

Here is a quick sketch with dimensions:

If I make one again. I’d probably cut the middle piece out of a single piece of wood instead of trying to join two pieces. I unfortunately didn’t have a wide enough piece of wood to use and there was a pandemic on, so I made due.

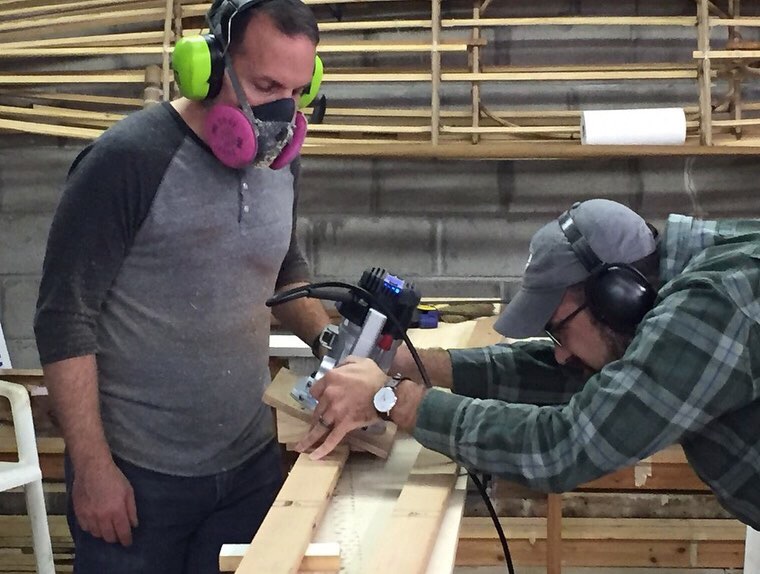
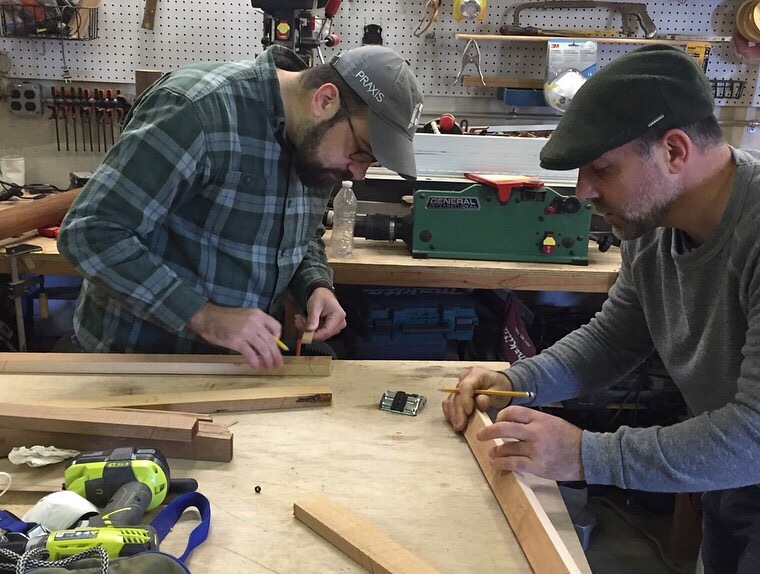
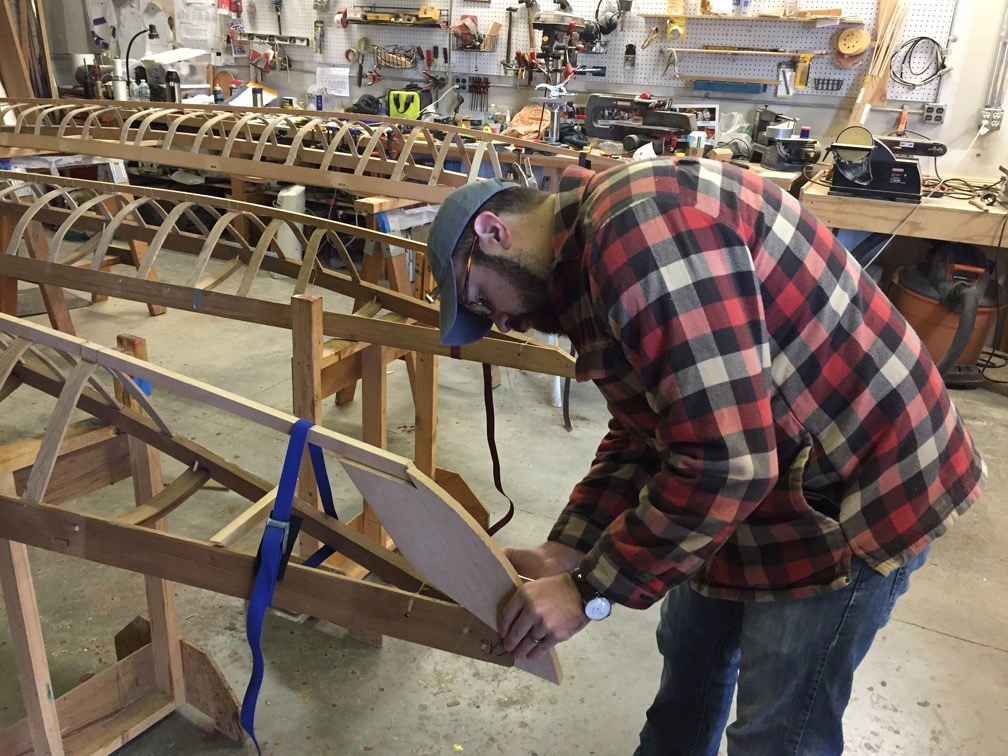
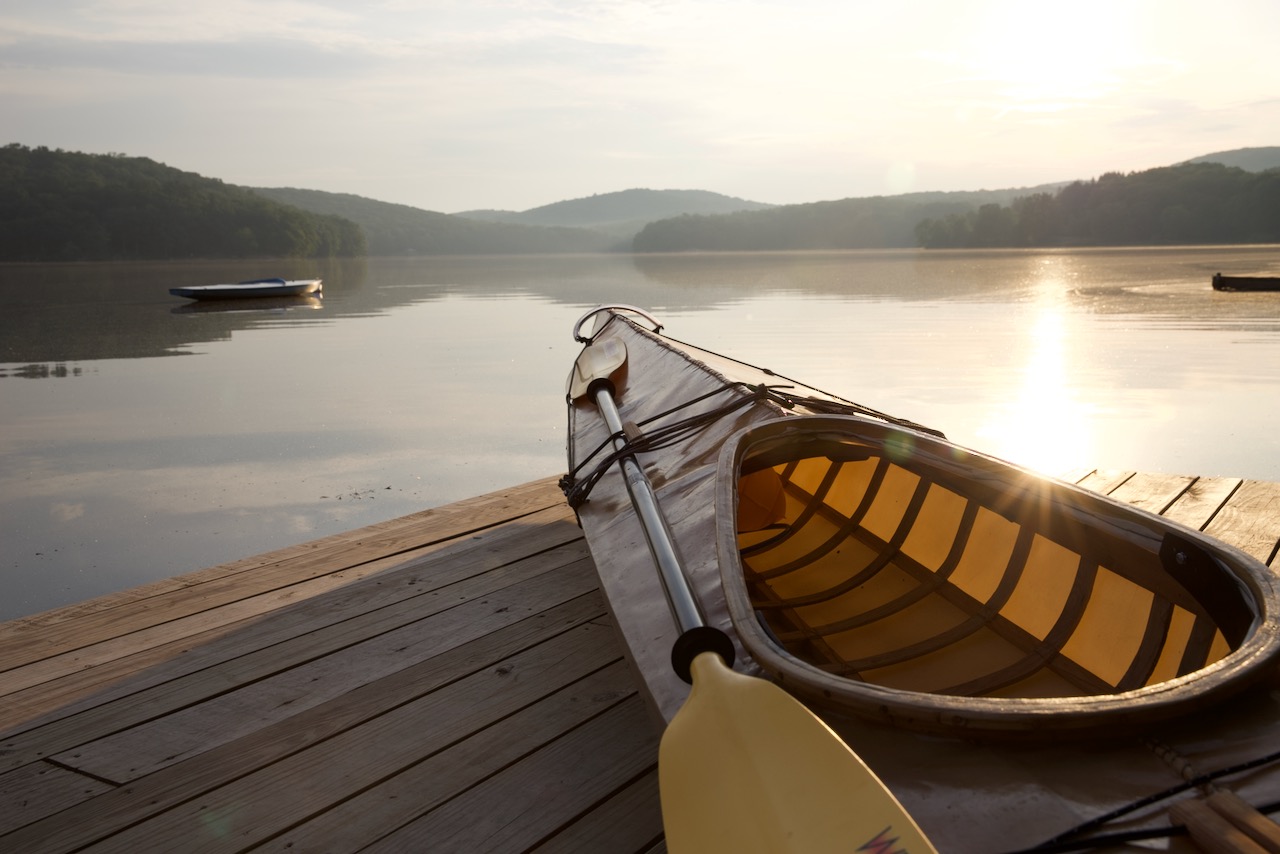
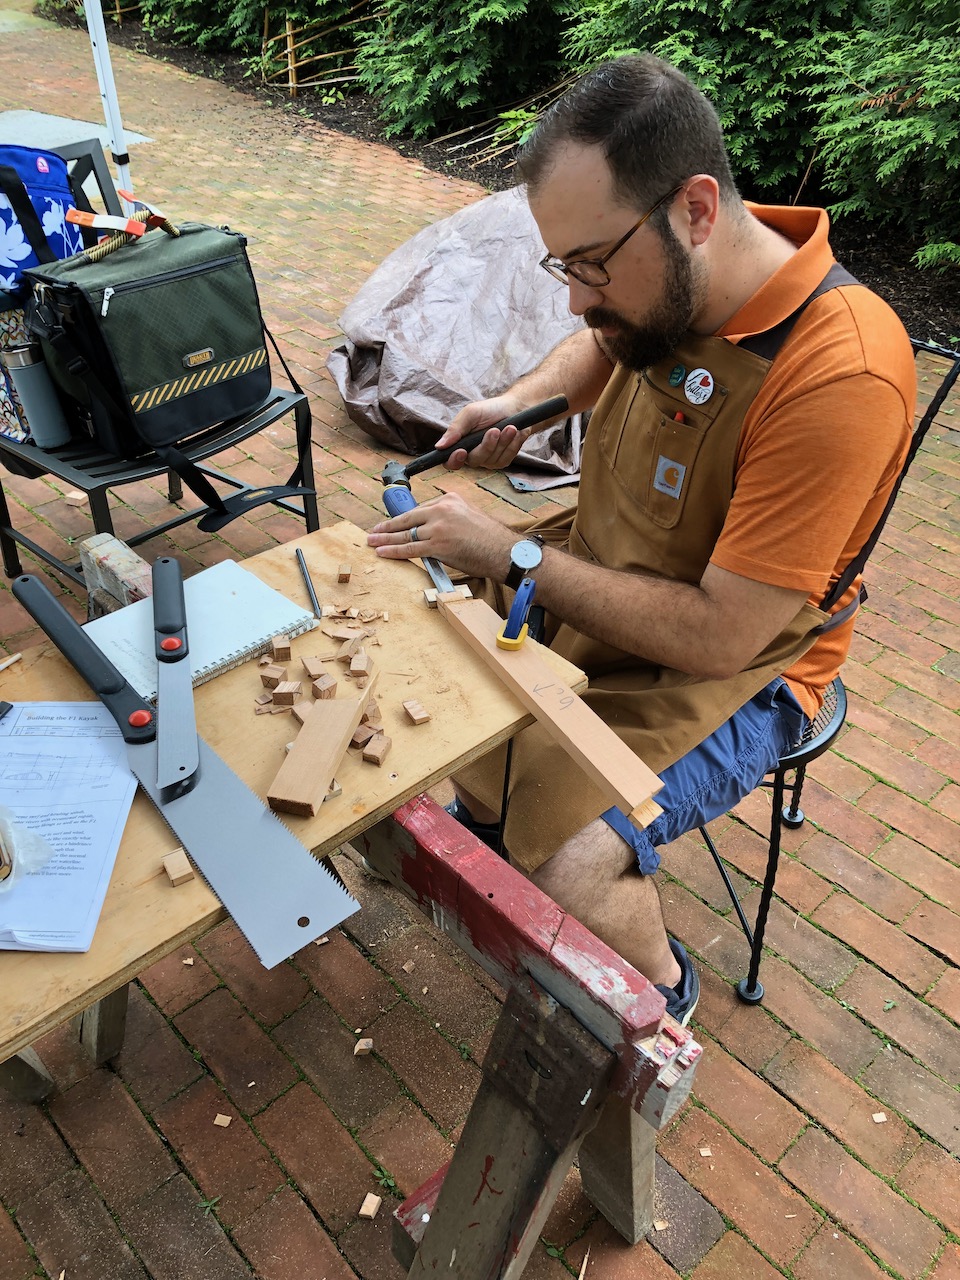
Over the winter of 2018/2019 and summer of 2019 I built two Cape Falcon F1 skin-on-frame style kayaks. I want to be better about documing my projects here, so I’m taking a few posts to document the backlog.
The primary benefit of a skin-on-frame style kayak is how light it is. They end up being ~30lbs, so they are easy to carry with one arm and for one person to toss it on top of a car, not something you can do with a heavy fiberglass boat.
These specific boats were designed by Brian Schulz of Cape Falcon Kayak and I used a combination of his excellent online courses to learn how to build them, plus the tutelage of Jack Gilman of YPRC Boatbuilders and Jon Richer of Hudson Boat Company.
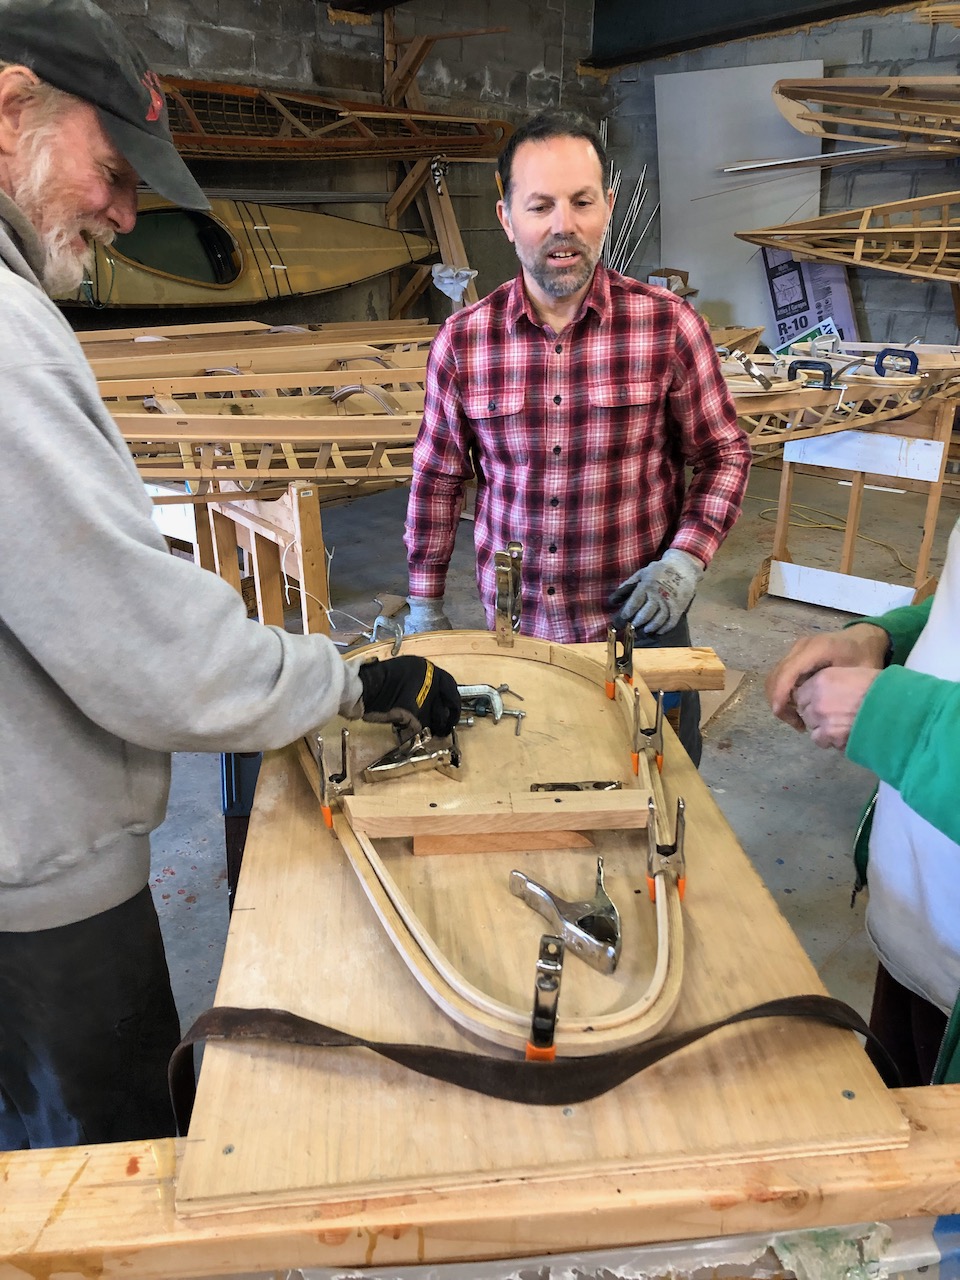
The first build was as a group with YPRC and took place from October 2018 to May 2019, with a two month break in the middle during the coldest part of the winter. Six of us built boats together twice a week and roughly kept pace, helping each other out as we went along.
I honed a lot of important techniques through this build:
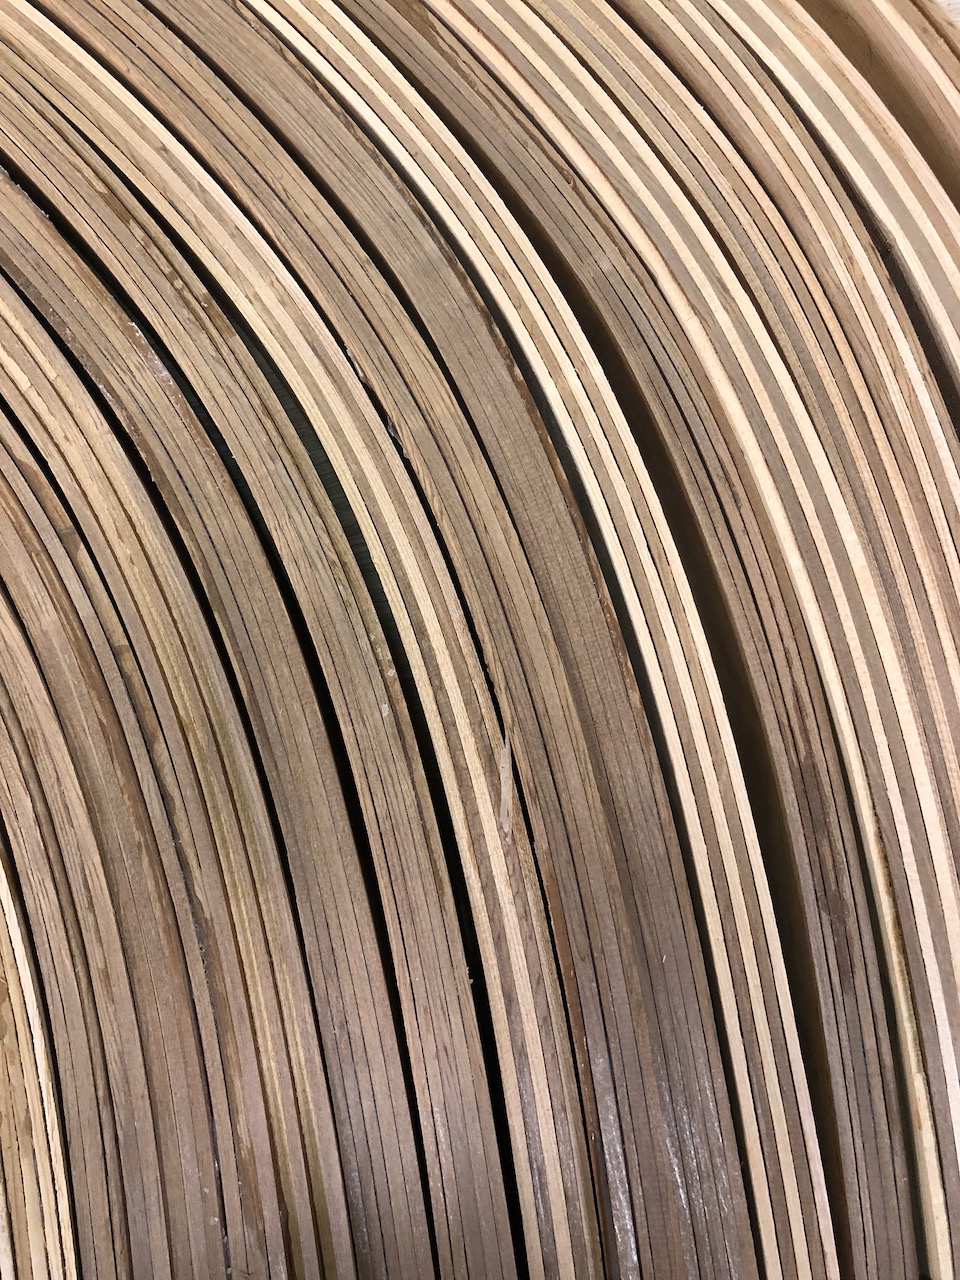
Routing the gunwales, laminating curved deck beams, chiseling straight deck beams, and assembling the frame:

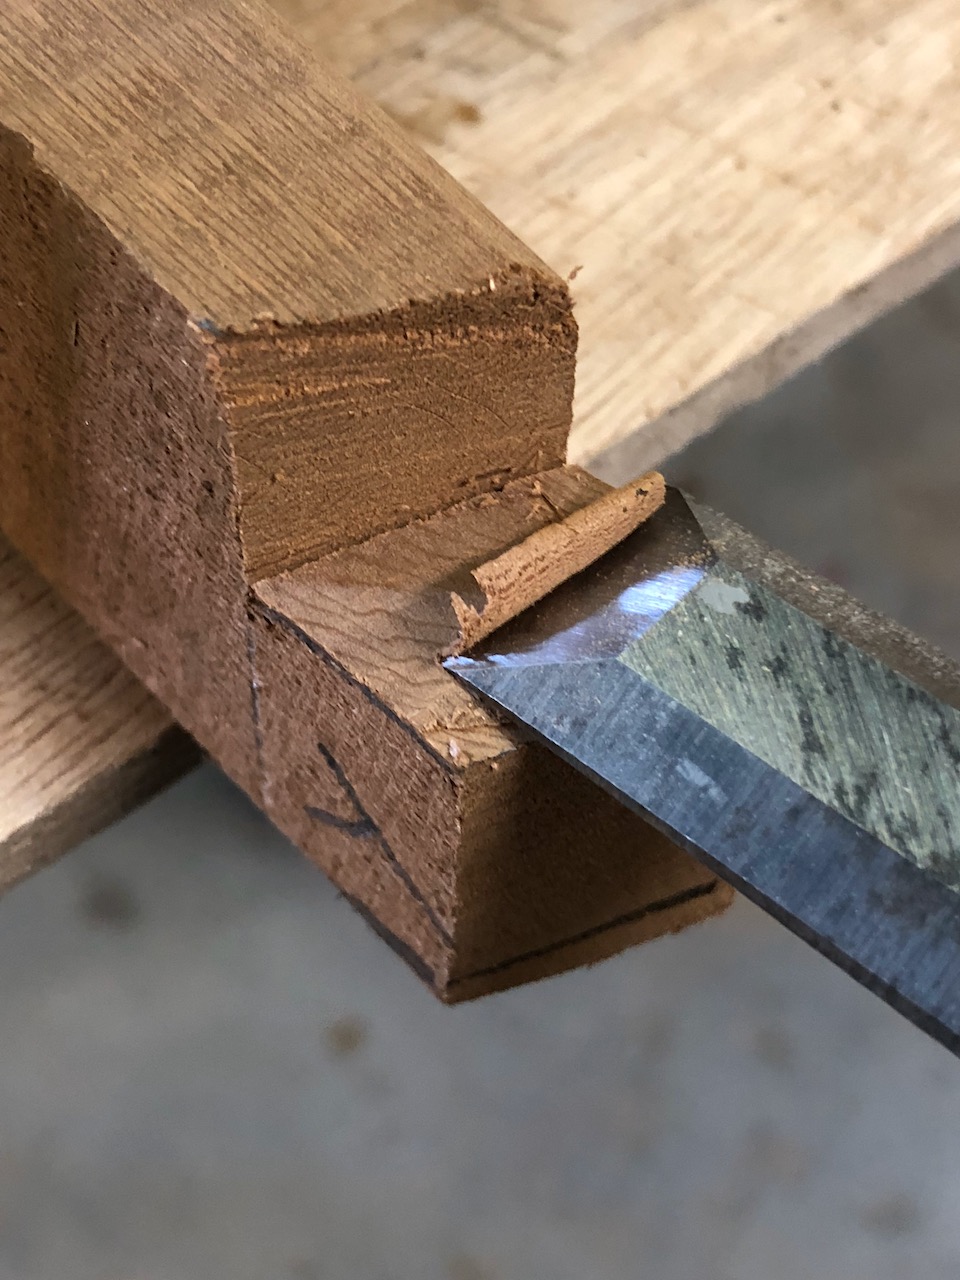
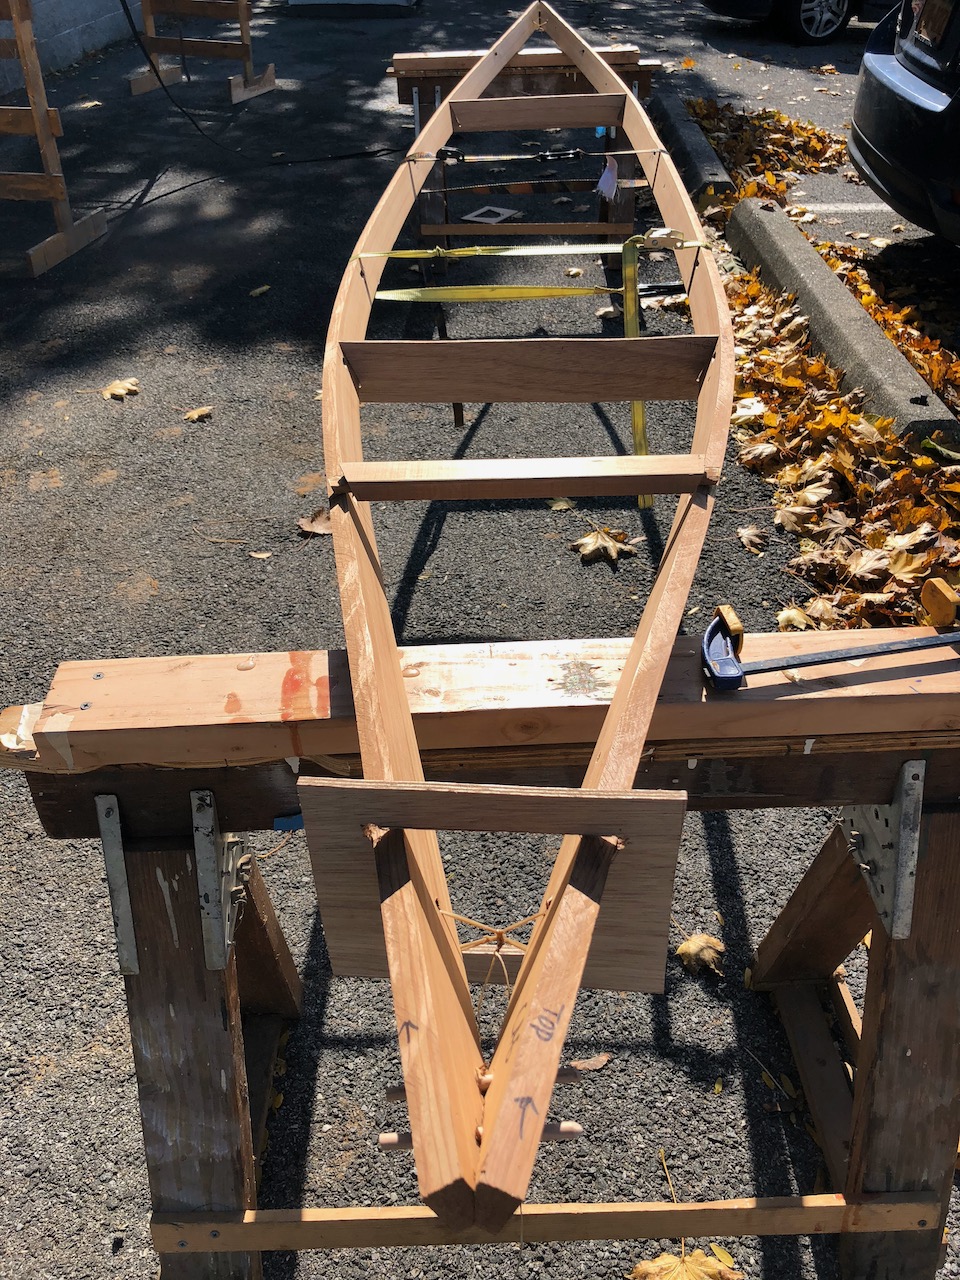


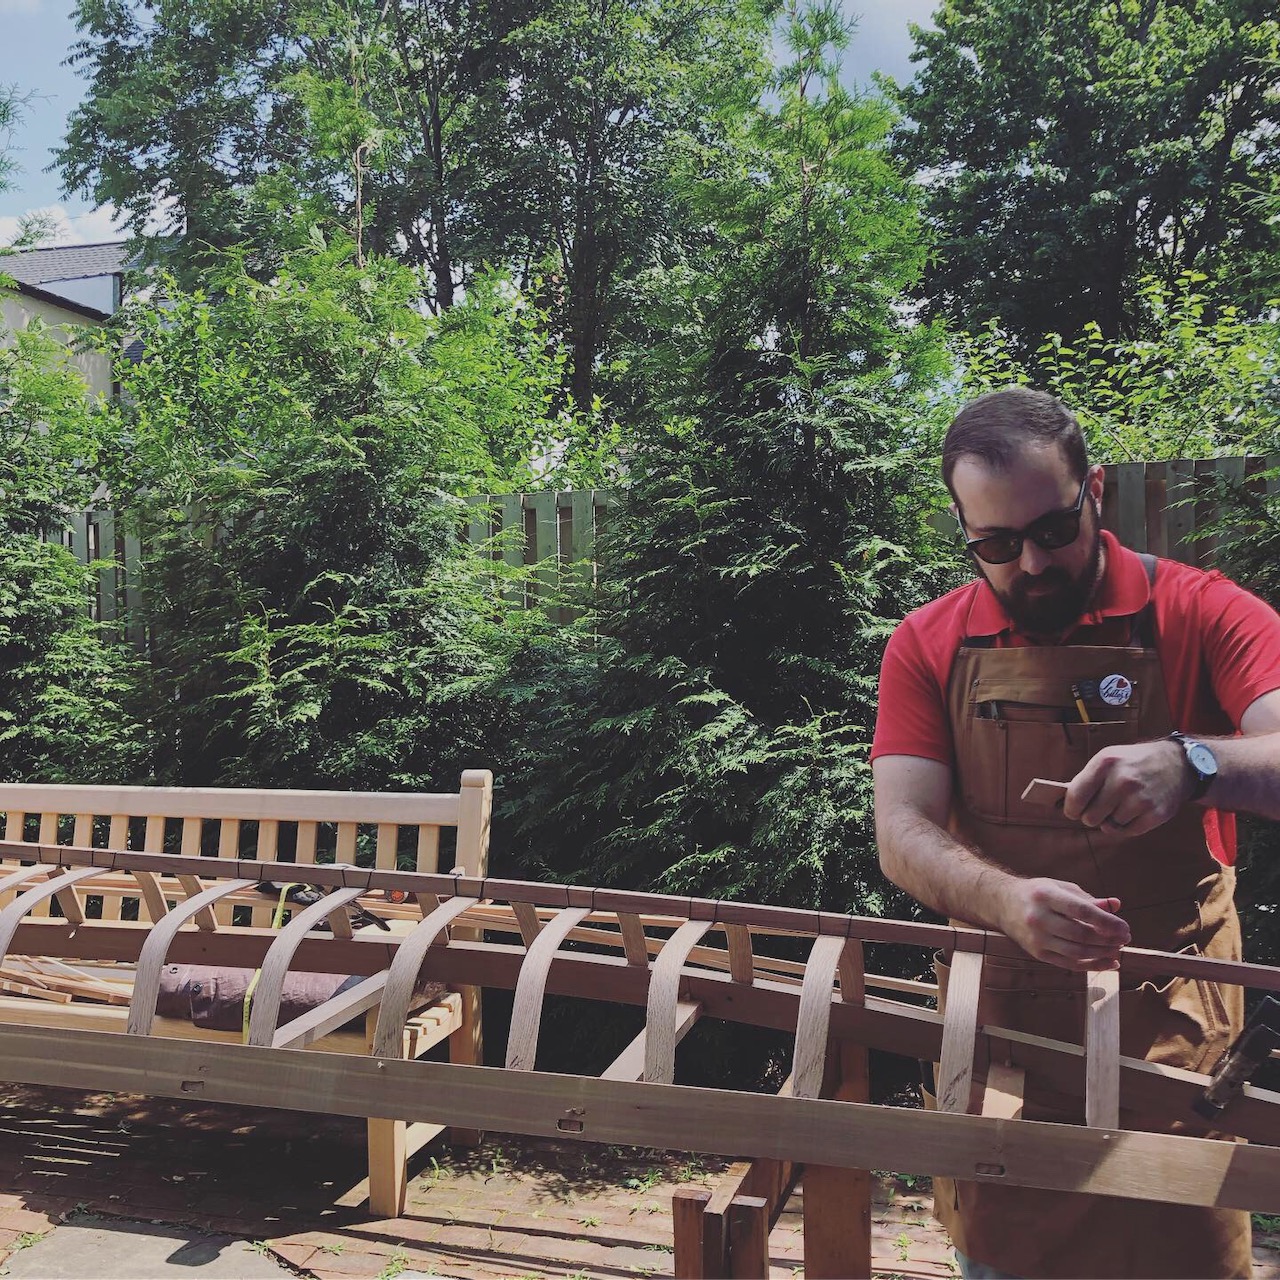
Steam bending ribs, lashing the keel and stringers, shaping the stem, and finishing the frame:


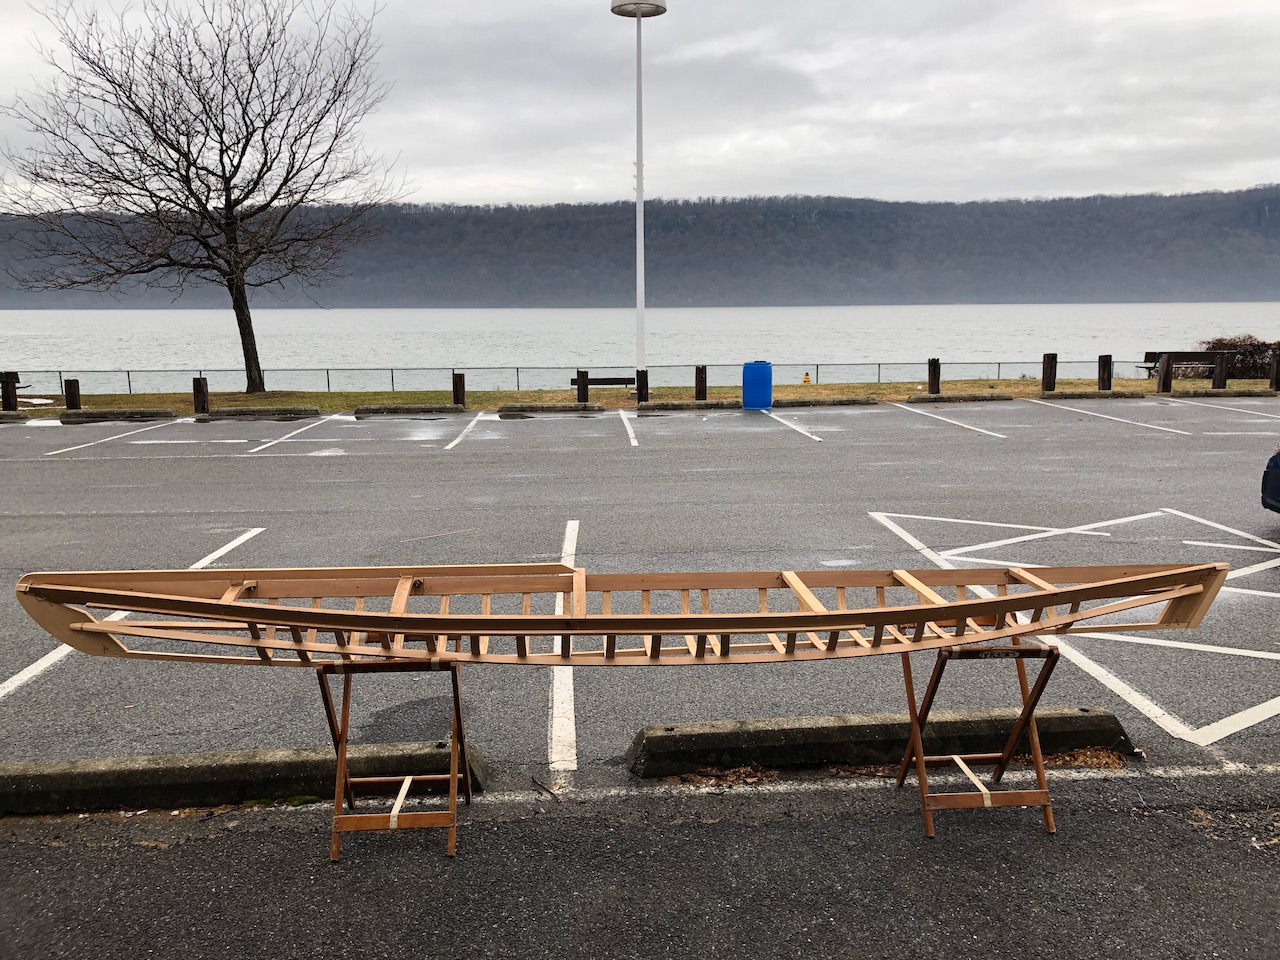
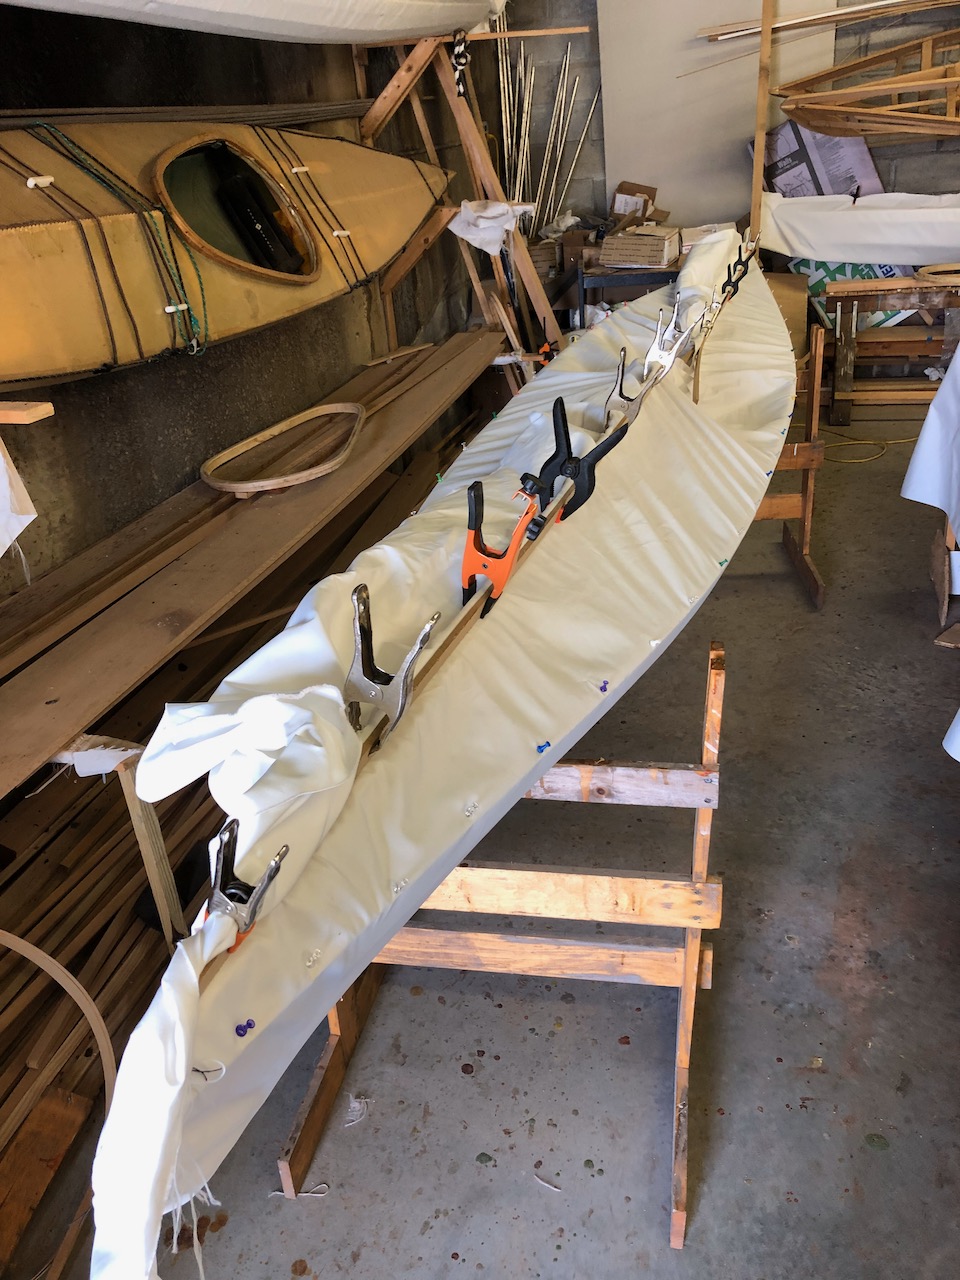
Making coamings, cutting and sewing the skin, and applying polyurethane coating.


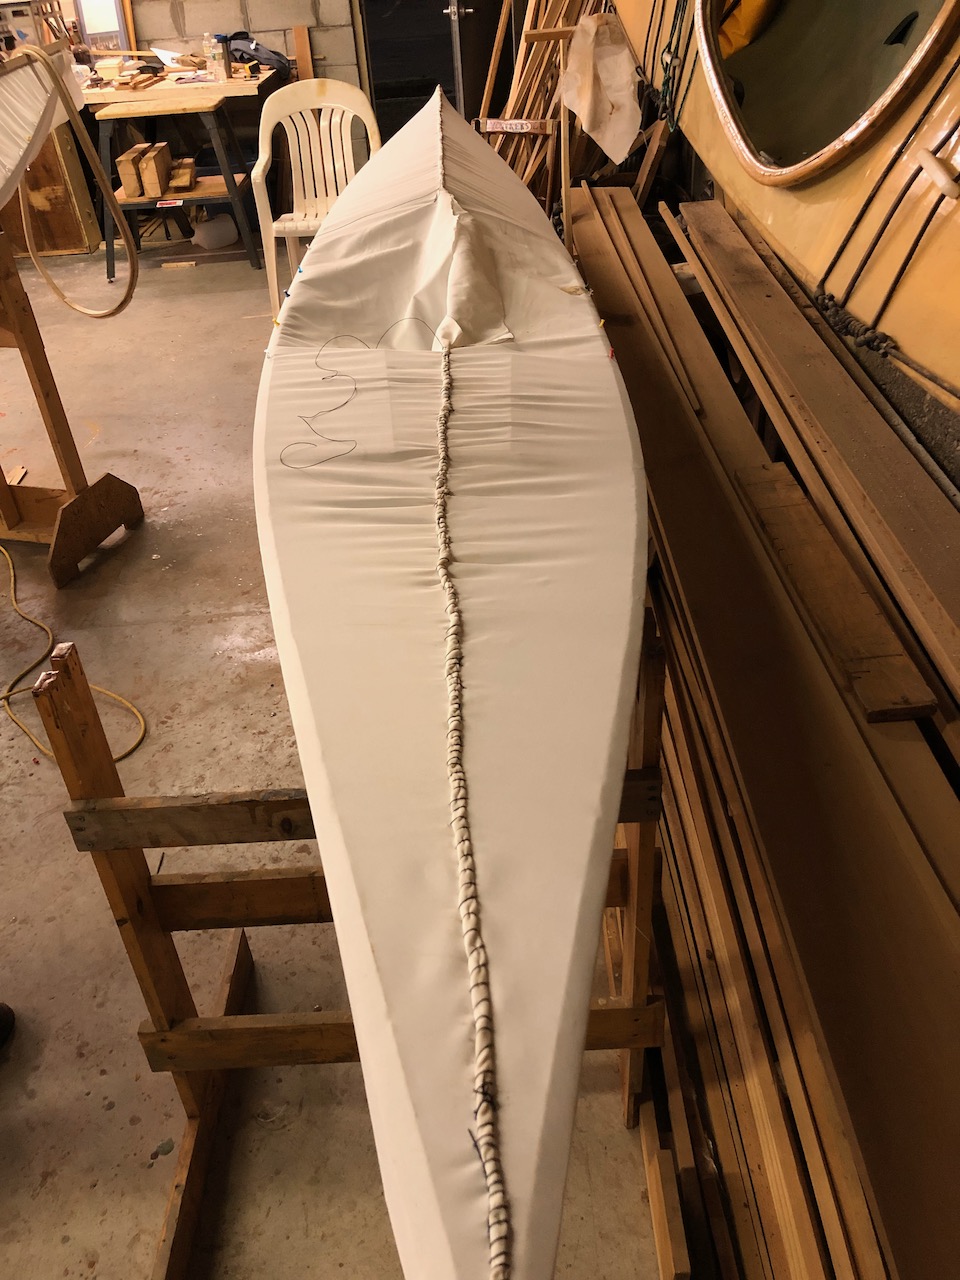
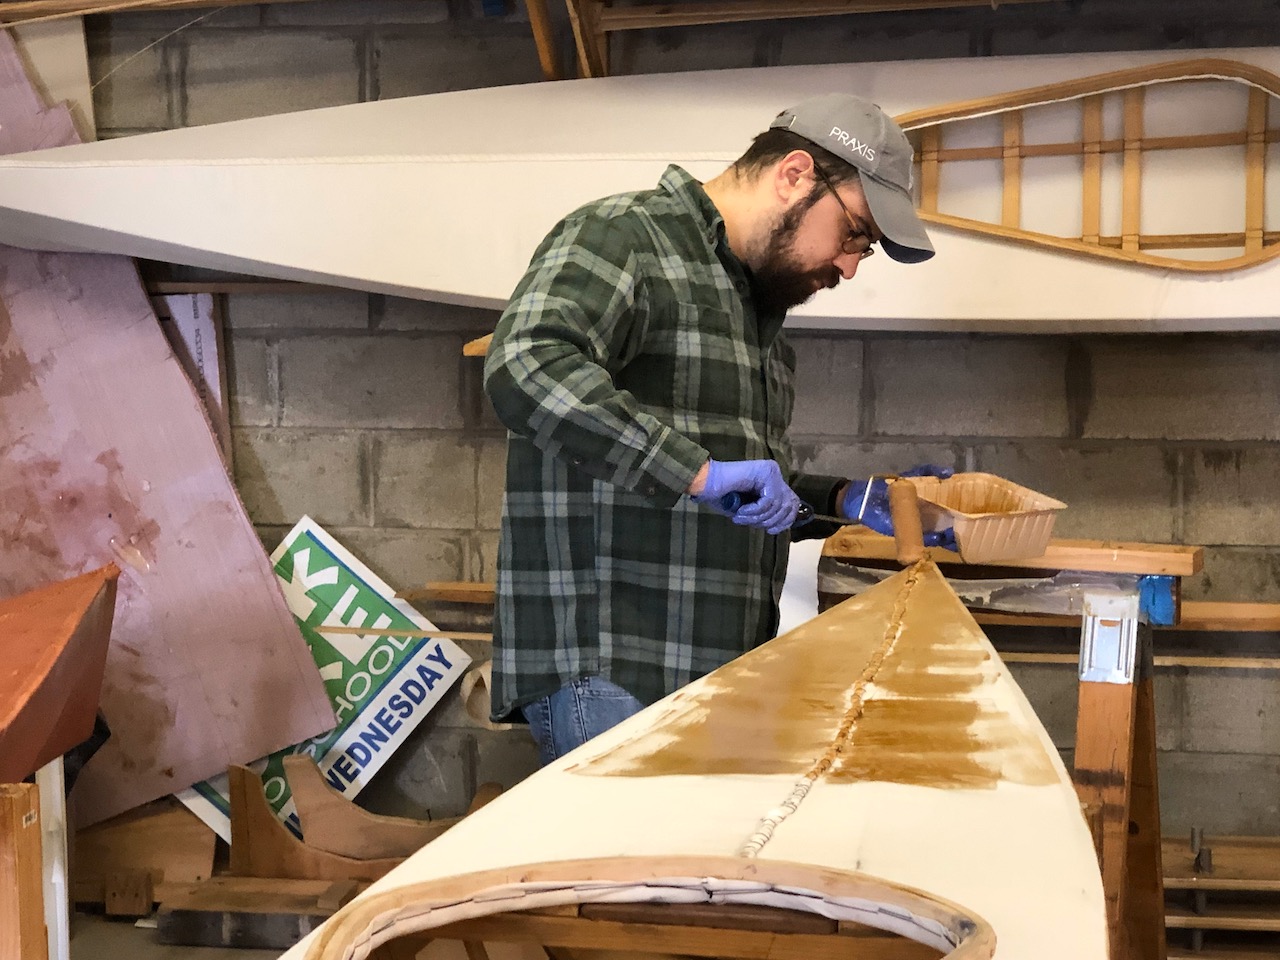
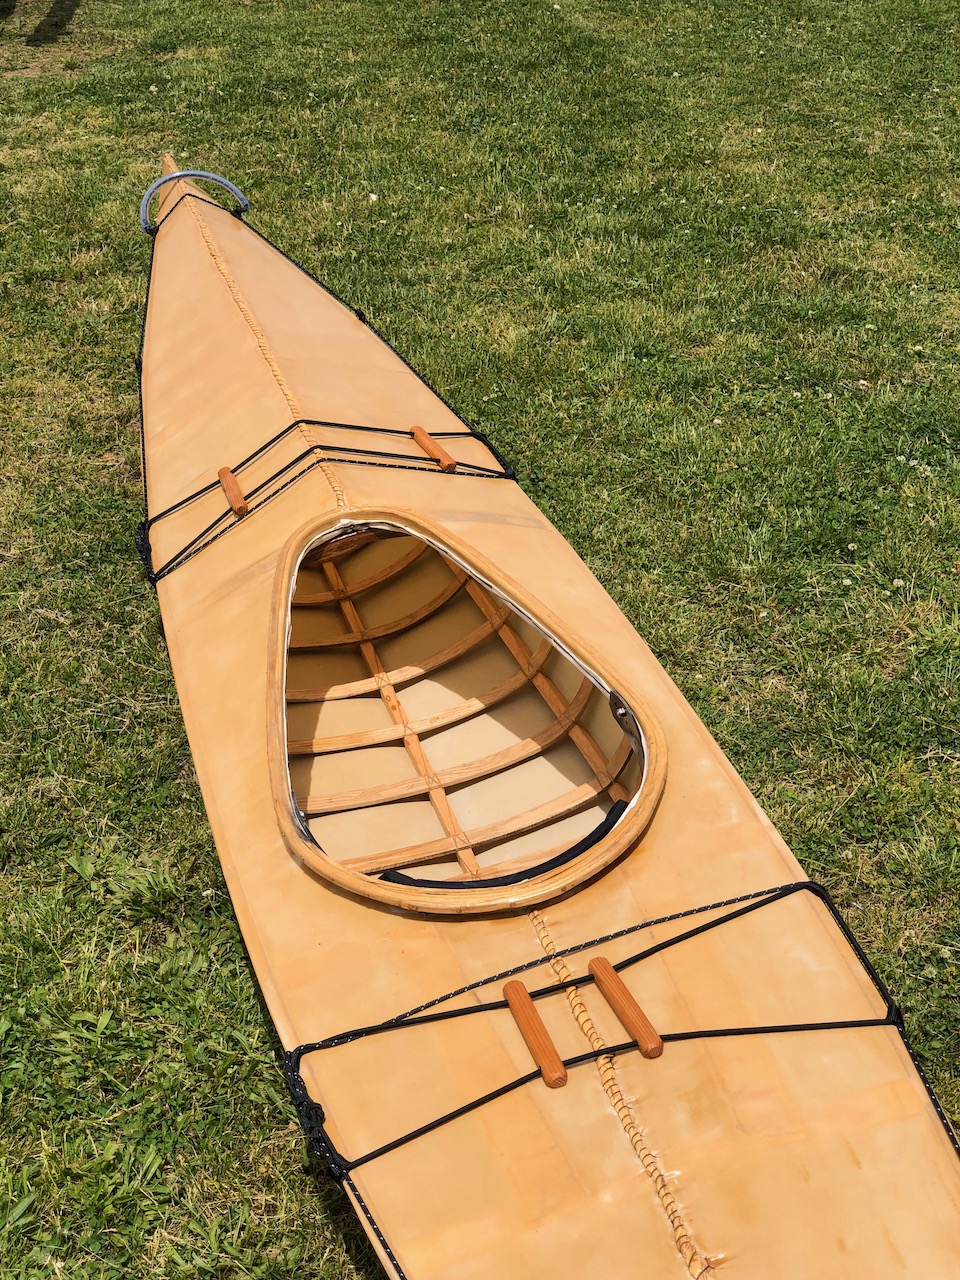
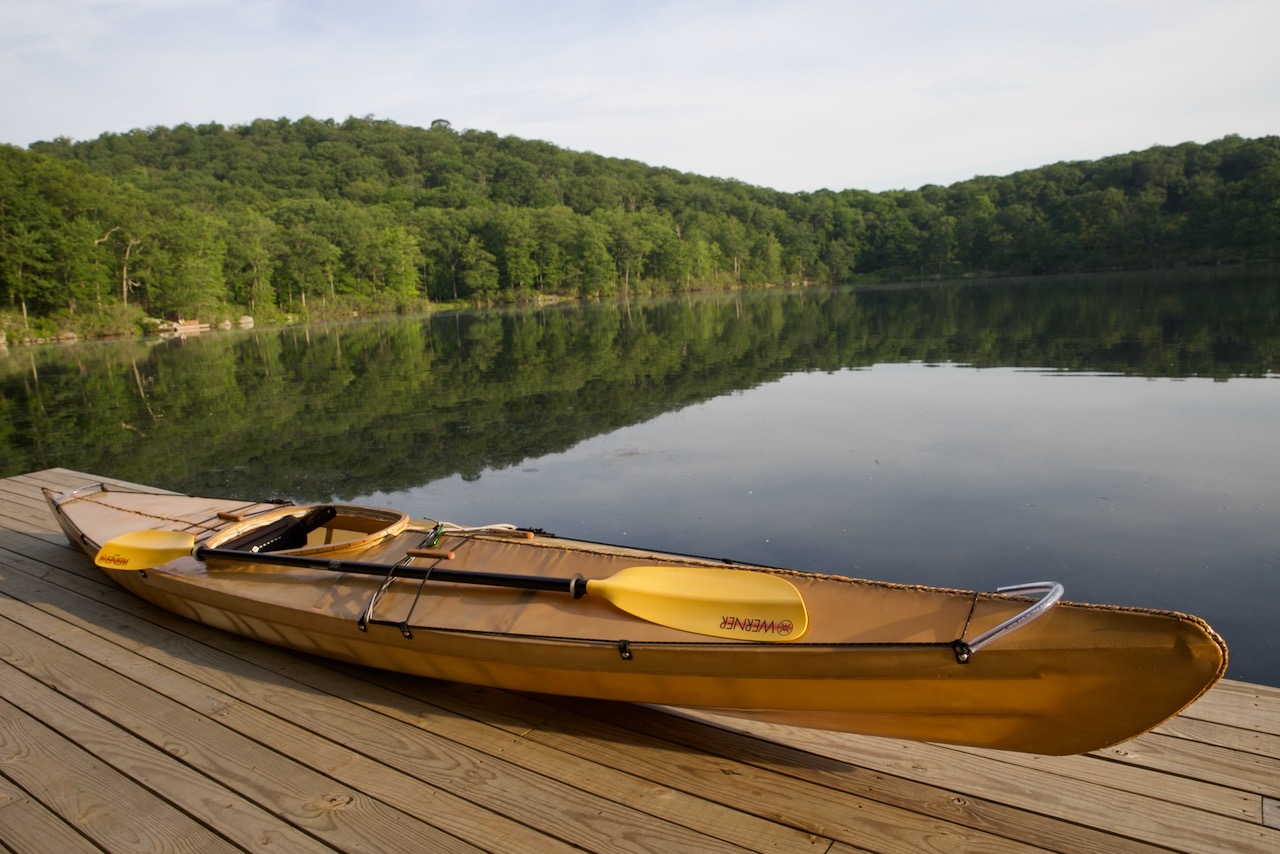
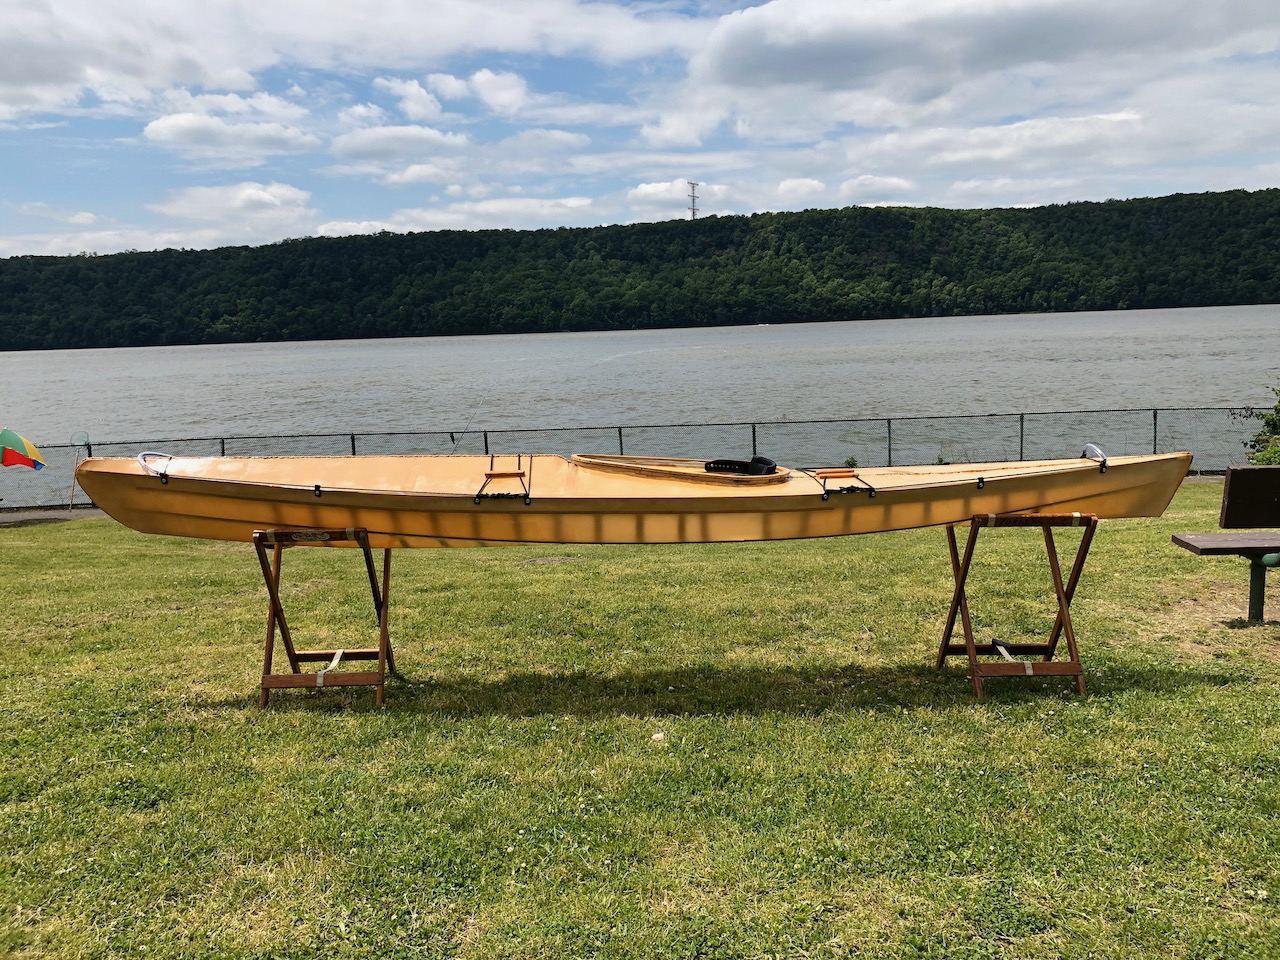
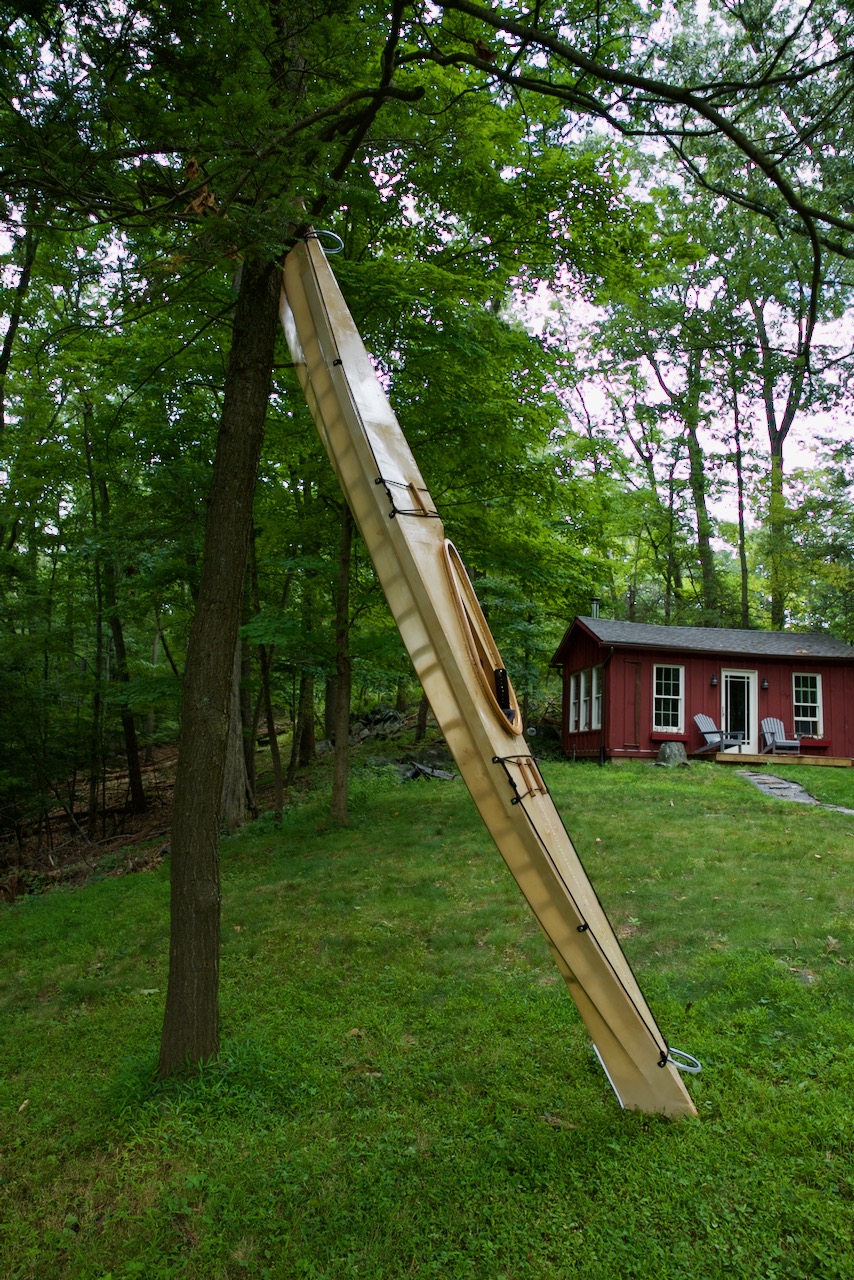
The finished boat!


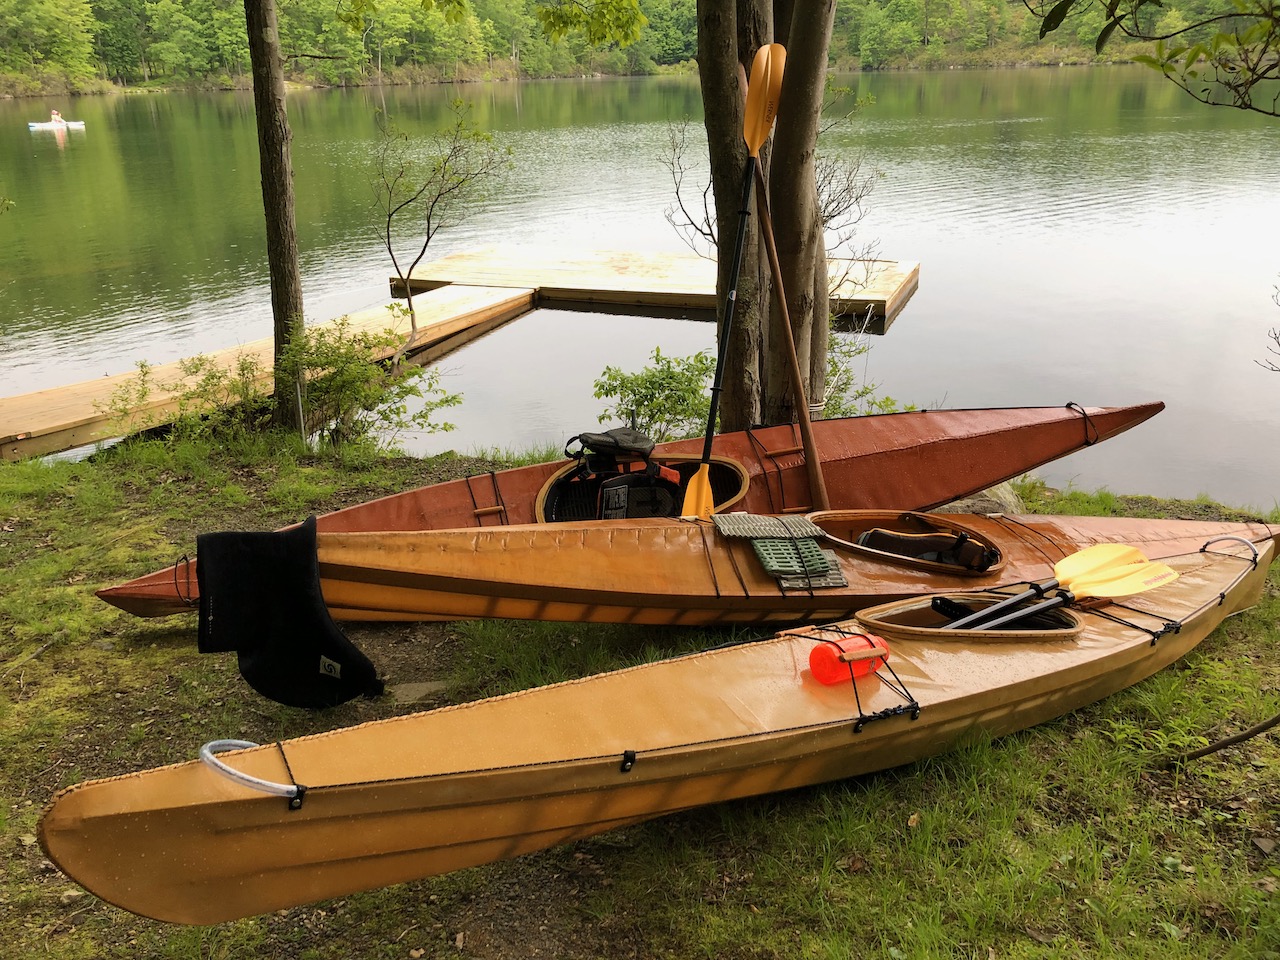
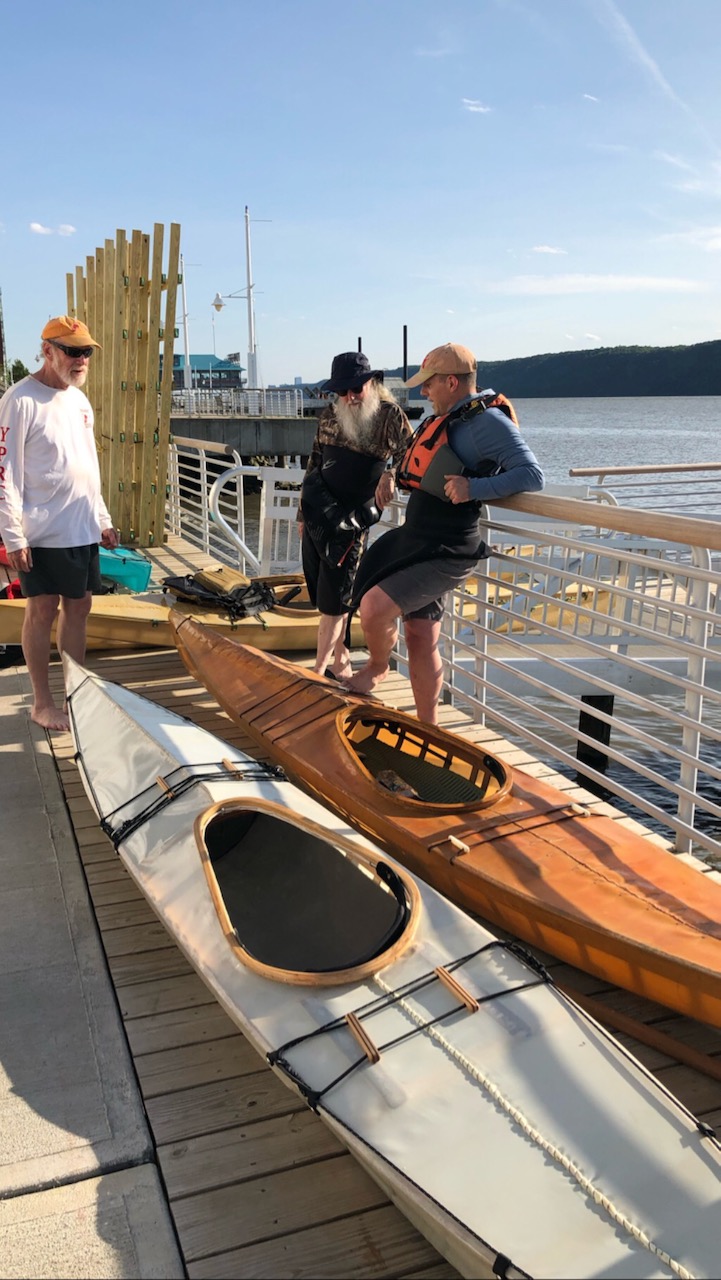
After learning a lot on the first build, I teamed up with Jon Richer to build another alongside him at a faster pace so that Amanda could have her own kayak to go out in, too. We built two as a public demonstration at the Edward Hopper House Museum in Nyack, NY. We knocked it out in about 4 weekends with some travel in between. I was much more confident after having built the first one, which translated to a faster build time. It was a great feeling.
Things that we improved on the second build:


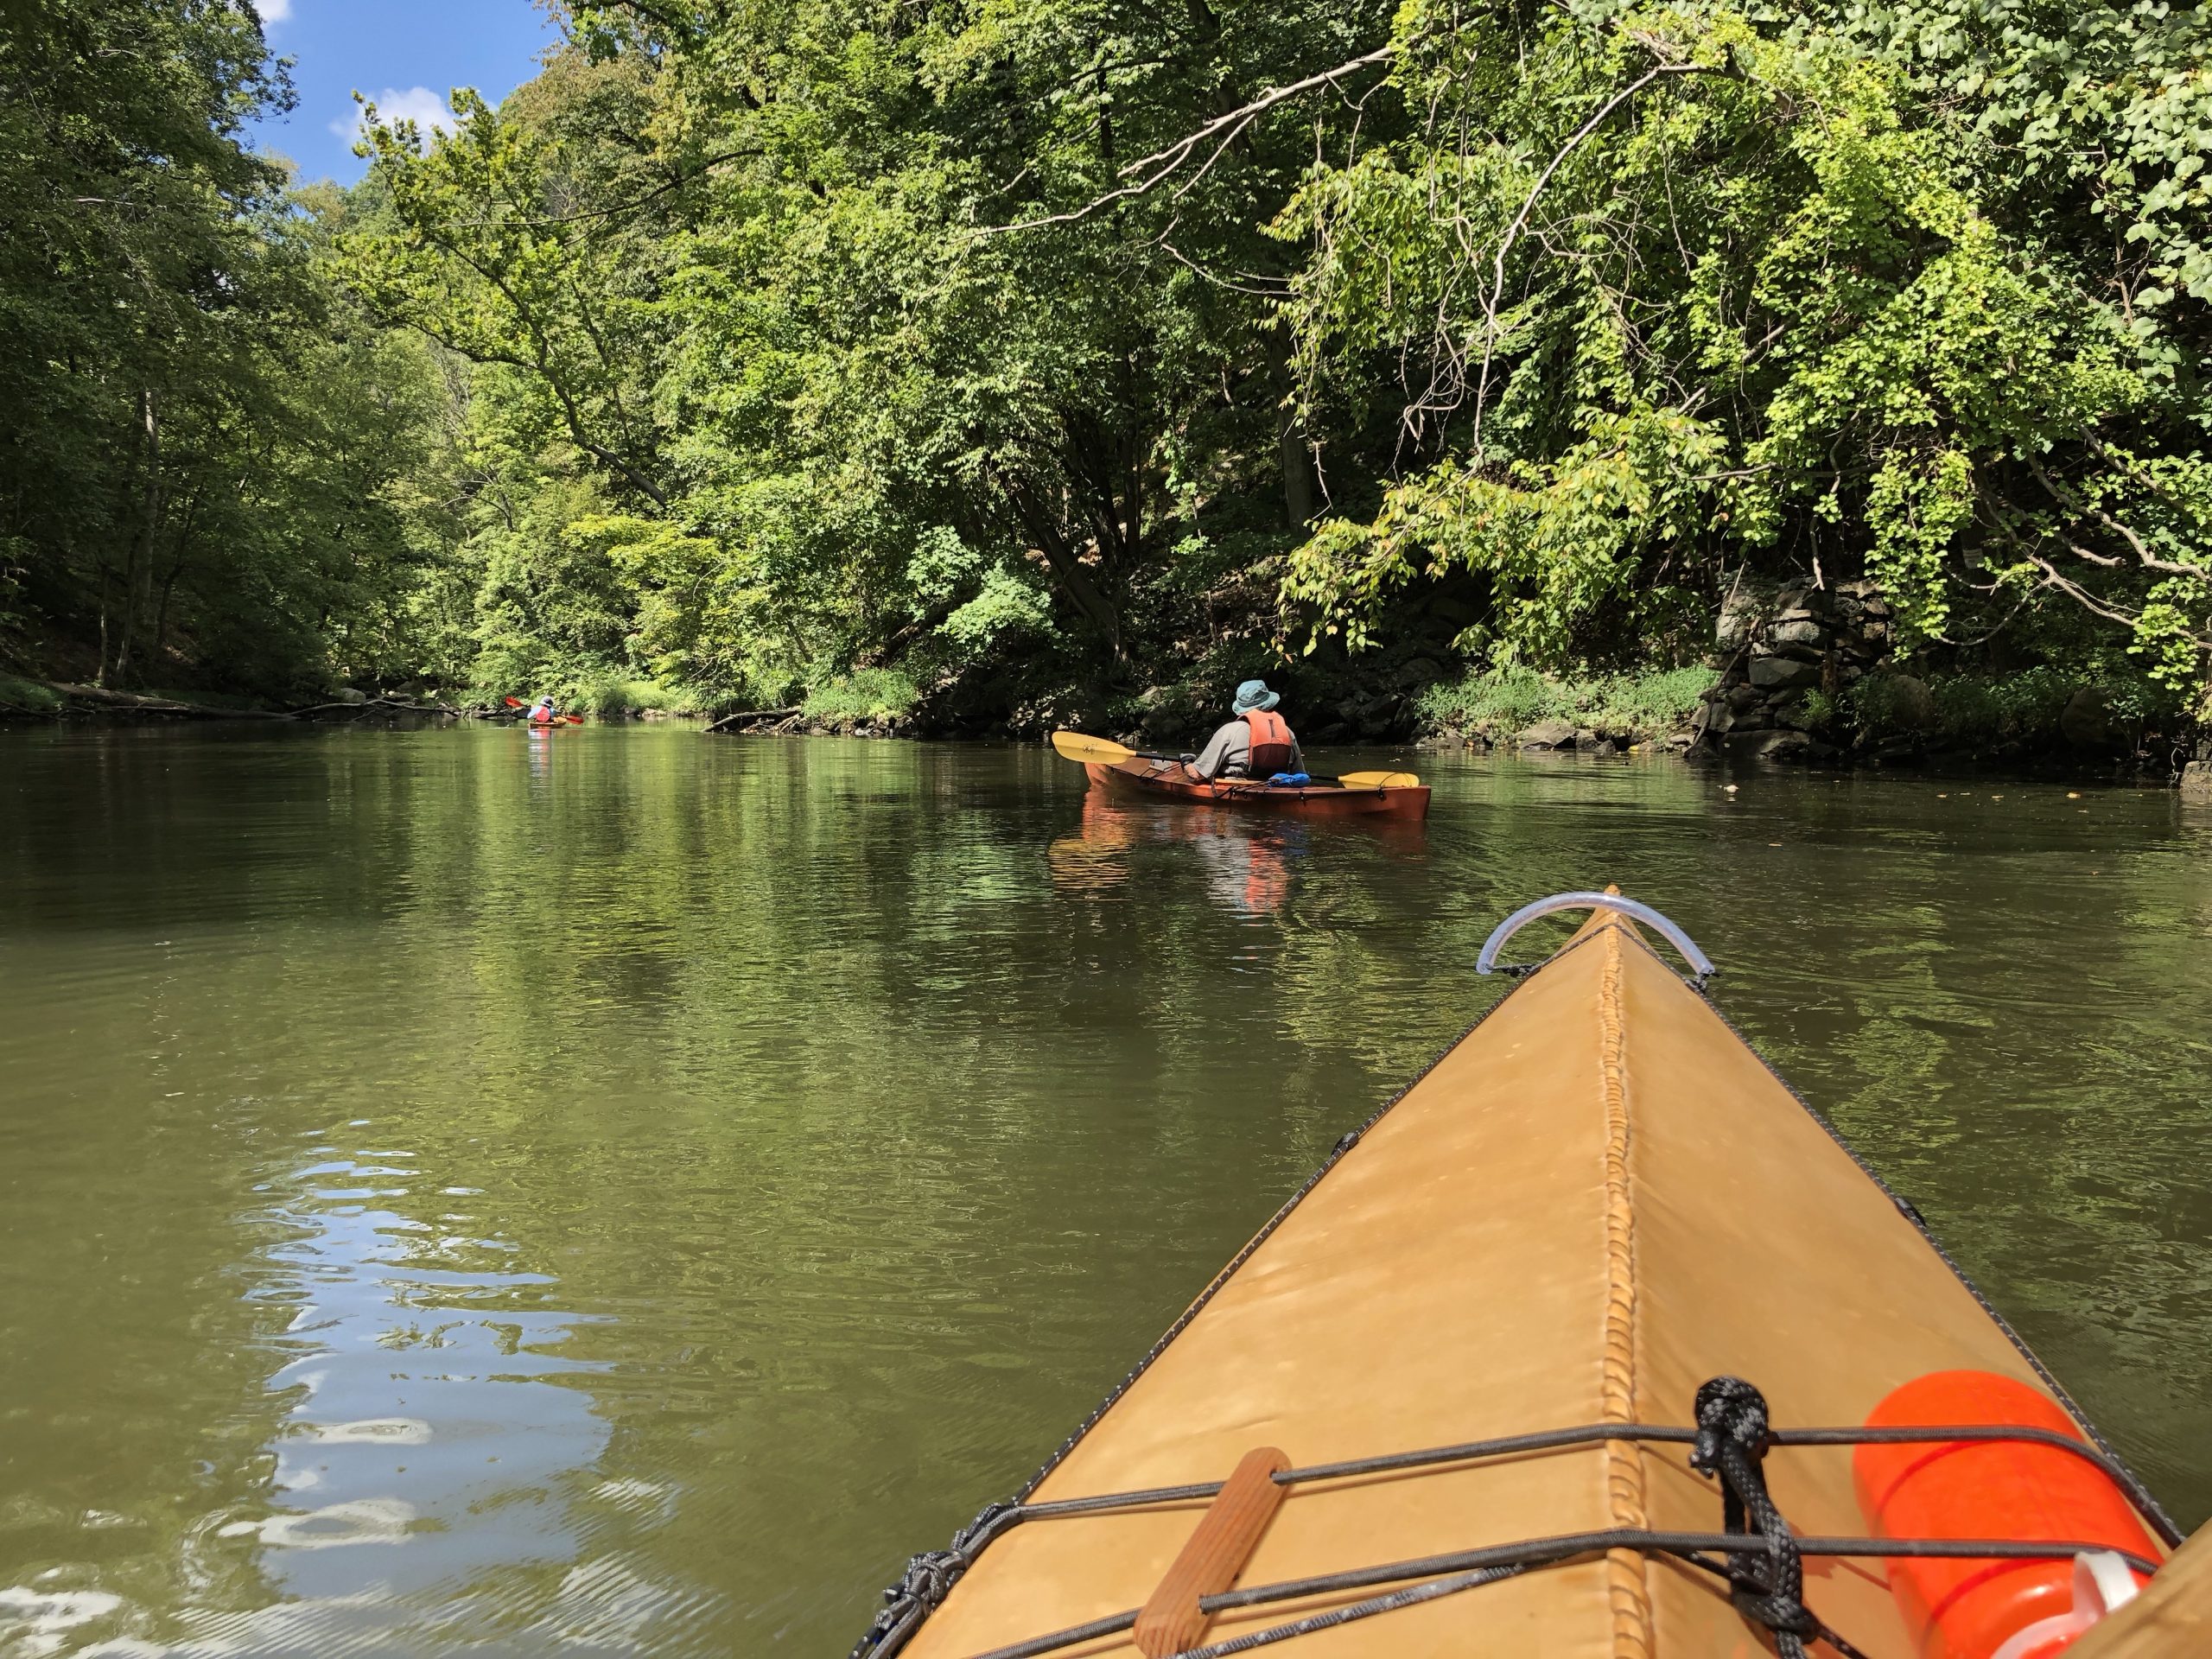
Amanda and I absolutely love our kayaks and take them out regularly, both on the Hudson and inland lakes. I get a ton of joy every time we use them. Paddling in something that you built yourself and know every single part of just can’t be beat.


Two weeks ago while using the lathe on my Shopsmith Mark V, I heard what sounded like the belt slipping. I’d also been having some problems cutting heavy stock on the bandsaw attachment, so I figured it was time to change the old belts.
I had replacement belts on-hand from Jacob Anderson Shopsmith Repair, so I started watching his excellent videos to figure out how to tear down the headstock and replace the belts, I quickly realized what my actual problem was: The floating motor sheave was stuck open, so when I turned the Shopsmith up to higher speeds, the motor sheave didn’t close in relation to control sheave opening up, so the drive belt had too much slack and wasn’t getting any traction. After roughly 45 years, the sheave got gummed up with old oil, grease, dirt, and sawdust.

The floating motor sheave is number 119 in the diagram:

Since I had to tear down half of the headstock to get the motor out to work on the sheave, I decided to go the rest of the way and replace the upper Poly V belt as well. The whole thing needed some serious cleaning, oiling, and greasing anyway. My model was made in the mid 1970s and I don’t think it had ever been completely taken apart. The putty was still in the quill set screw at the top of the case. I don’t expect that is the kind of thing you replace after scraping it out.
Again, Jacob Anderson’s videos were incredibly helpful in figuring out how everything comes apart and goes back together. If you need Shopsmith parts, buy them from him!
The whole process took longer than I expected. It took me about 20 hours over the course of four days to take it completely apart, clean it, oil the moving parts, grease the bearings, and get it all back together again. I’m including the time I spent watching videos and making various jigs to help me work on it.

A few tricky points:
1. Removing the spring on the motor sheave.
The spring needs to be compressed in order to remove the retaining ring, and that spring has considerable pressure and a washer with it. Using Jacob Anderson’s advice, I drilled a hole through a piece of plywood and carved a groove for the washer to set in, pushed the spring down, and held it in place with some quick clamps. The washer still shot across the room, and it was pretty tricky to get back together again, but I don’t see any way it could have been done without something like this board.

2. Unsticking the floating motor sheave.
This thing wouldn’t budge by hand. I had to use a piece of plywood underneath and one on top, hammering them together to force it open. Once open, I did a good cleaning to remove the grime, then polished the shaft to help the sheave move. It still doesn’t move as easily as the top one for me, but it does move.
3. Putting the idler shaft (number 105 in the diagram) and eccentric bushing (103) back in after replacing the Poly V belt (55). The old belt was stretched out, but this one was much tighter. I also frustrated myself by stupidly putting the idler shaft and eccentric bushing back in once before putting the Poly V belt in and had to take it back apart. What a pain.
4. Calibrating the speed control
First, none of my three sets of Allen wrenches were long enough to get to the tiny screw inside the speed control face in order to take it off. I had to go out and buy some longer ones.
Second, you can’t adjust the speed control without moving the drives, either with the motor or by hand. This is not easy, especially since you probably set the control sheave open as wide as it could go (high speed) when putting the belt on. In order to calibrate it, you need to close down the control sheave to get it back in Slow mode. You shouldn’t start the machine at a high speed anyway, so you have to do this all by hand. Adding the disc sander attachment helps quite a bit by giving you something to turn like a steering wheel.
5. Putting the switch back in
I wasn’t paying close attention to the orientation of the switch and had just assumed it was still in the Off position, despite lots of jostling, so I had to be careful when plugging it back in for the first time. Thankfully I got it right, but I think I might mark it or tape it next time.
Thankfully everything worked as expected when I put it back on the stand and flipped the switch. The difference is night and day. No more slipping belts or the drive stopping when cutting heavy stock on the bandsaw or shaping something on the lathe at high speed.
With regular oiling, I shouldn’t have the issue with the floating motor sheave locking up again. Fingers crossed.
Turing’s Cathedral by George Dyson – I’m struggling to get through this one, but I really want to finish it. I started reading the physical book but ended up turning to audio, which I think is a better format for this. The sheer number of names, dates, and technical details make it tough to read, but easy to tune out in audio and focus on the narrative arc of how the digital universe got created, which is what I want out of this book.
Analogia by George Dyson – Much more interesting to me than Turing’s Cathedral. Breaks down the major eras in technology and makes the case that we are on the cusp of a new technological era driven by machines that are outside the scope of programmable control. Reading the hardcover version of this one.
The History of the Hudson River Valley: From Wilderness to the Civil War by Vernon Benjamin – This was a “welcome to the neighborhood” gift from our neighbors after we discussed the subject around a campfire. Enjoying it so far. Started it recently while hiking the Shawangunks, which is a great place to read a book like this. Hardcover.
Breath: The New Science of a Lost Art by James Nestor – Recommended by my friend Cameron Sorsby. Tl;dr breathe out of your nose, not your mouth. Audiobook.
How to Take Smart Notes by Sönke Ahrens – Picked this up intending to join the Roam Book Club v2, but haven’t done much participating in the actual sessions. Starting to use the Zettelkasten method while going through some non-fiction like Powerful and Demand-Side Sales. Reading the softcover version of this book.
Powerful: Building a Culture of Freedom and Responsibility by Patty McCord – I recently stepped into a squad lead position at work and this book came highly recommended, so I’m slowly working my way through it when I have some downtime during the work day. Hardcover.
Apex by Ramez Naam – Third book in the Nexus trilogy. Running computers in our brains and what personal and social consequences that has is the kind of sci-fi I like. Reading this one on Kindle.
Encounters with the Archdruid by John McPhee – I picked this one up at our local used bookstore. I love McPhee and will buy pretty much any of his books when I see them. He weaves interesting history and geology into physical travel stories.
Looks like I’m actively reading eight books, all of which I intend to finish. I have no problem stopping books if I don’t like them, and I won’t put books like that in this list.
Eight seems like a lot. I usually don’t have more than five going at any one time. I’ll buckle down and finish a few of these before I pick up any more. I’m not having issues keeping them clearly separated in my head because they are pretty distinct subject matters.
Demand-Side Sales by Bob Moesta
The Code of the Woosters by P. G. Wodehouse
Paris in the Present Tense by Mark Helprin
Cryptonomicon by Neal Stephenson
The Inevitable: Understanding the 12 Technological Forces That Will Shape Our Future by Kevin Kelly
Want to see what I’ve finished recently? Check out my Reading page.
I set up this blog on WordPress in 2008. In 2015 I moved it to Jekyll and back filled those old posts in 2018. Now I’m back on WordPress with the entire archive. Why? I want to post more and WordPress is more conducive to that.
With Jekyll I had to create a new markdown file with all of the yaml front matter I wanted and my automated templates were never quite right, then I had to get the Jekyll site running to preview the post (running the inevitable Jekyll and gem upgrades and troubleshooting issues with some plugin that broke), then run the custom build process I made to commit the changes, push them to Github, build the site, then deploy the changes to S3 and Cloudfront with s3_website, which is no longer being maintained. It was “rickety as hell” as an old family saying goes.
With WordPress, Pressable keeps core up to date for me, so I just open the site, write the post, and click publish. No messing around with build tools, no finicky yaml templates, and no annoying Ruby and Java dependencies to fight with.
Also, with WordPress, basic things like Search and Category Archives are available by default instead of something you need to hack on. The Plugin ecosystem is much better, too.
The Jekyll site build and all the tools I built around it was a fun project, but I’m glad to be back on WordPress. I recently started working at Automattic, which of course played a role in my decision to switch back, but I had planned to make the switch long before I had applied.
The speed of the 100% static Jekyll site served via Cloudfront was slightly faster than this WordPress site, but the difference isn’t big enough to matter to me. The Pressable CDN and object caching is pretty dang fast, and as I said above, I care more about being able to update the site faster and easier than I could with Jekyll.
I had big ambitions for this project: I wanted to build a new theme from scratch adhering to the WordPress-Extra ruleset for PHPCS and the starter theme my team uses. I kept putting it off, preferring to be offline when not working. I was itching to get my site migrated, so I decided to modify an existing theme with a child theme and focus my energy on the migration.
I essentially combined three sites into one.
/wp-content/uploads/ folder on the server hosting cagrimmett.com so that the import would also pull in the featured images.I built out a cool reading list feature in Jekyll using yaml data files and a template that grouped the books I read by year and displayed the count. I was able to rebuild it pretty quickly with a custom post type, custom fields, and two queries: One to group the books by year and sort by date read, and the other to display the counts.
Check out the reading page, my favorite page on the site!
I thought I’d have a big issue with redirects, but with some careful planning about 95% of old links just work.
By going back to the old databases from existing WordPress sites, I was able to use existing post IDs, which is great because my old links used the post ID permalink structure. Post ID permalinks redirect to the post by default, even if you have a different permalink structure.
For the Jekyll posts, I was able to match the permalink structure I had on the Jekyll site, category/year/month/day/slug, so those work, too. The only issue I ran into is that I had some uncategorized posts in Jekyll and Jekyll leaves uncategorized out of the permalink while WordPress doesn’t. So I installed the Redirection plugin to add some redirects for those and monitor 404s.
I do have a few issues left to clean up:
I plan to eventually build out my own theme from scratch and I want to build some of my own custom blocks for a few ideas I have.
But first, back to regular blogging.
At work a few months ago, I mentioned the concept of digital gardens on a call. Not everyone knew what digital gardens were, and the term means different things to different people using it, so I put together a P2 about what I think a “digital garden” is.
What is a digital garden?
to link, annotate, change, summarize, copy, and share — these are the verbs of gardening
Mike Caulfield in The Garden and the Stream: A Technopastoral
Where is this term from?
I first started noticing people I follow talking about it in April of this year: Maggie Appleton, Tom Critchlow, Anne-Laure Le Cunff, Venkatesh Rao, Andy Matuschak, Anna Gát, and Joel Hooks.
Maggie Appleton found the earliest use of the term, which harkens back to the old school web: Mark Bernstein’s 1998 essay Hypertext Gardens.
It is similar to a commonplace book, another popular term on the IndieWeb. A Zettlekasten comes to mind, too.
Essays to check out
Commonly used tools
Some thoughts, digital garden-style

I’ve tried a few different methods of logging my completed tasks (notebook, notes app, a different notes app), but the friction of opening the book/app, finding the note, and logging the task was too high and I always abandoned the effort after a week.
I’ve finally got something that stuck: Things URL schemes + Alfred Custom Web Search.
Here’s how it works:
things:///add?title={query}&completed=true
Of course, you need Alfred and Things installed for this to work. They are tools I use every day. I highly recommend them.
You can customize the link however you like, by adding tags, projects, etc. I keep it simple and just have a completed task.
Want to use this? Here is a URL to add this directly to Alfred. (It will only work if you have Alfred installed.)

Yesterday was my last day at Crash.
A little over three years ago Isaac emailed me one morning asking if I had a few minutes for a phone call. I took it, then a month later I started full time at Praxis. A year and a half later we split the company and I went with the CrashArchived Link team.
IâÃÂÃÂm very proud of the things I worked on with both teams. Here are a few highlights:
In addition to the above, I learned a ton about:
Morgan von Gunten wrote a nice goodbye for me in last weekâÃÂÃÂs Crash Report.Archived Link
IâÃÂÃÂm thankful for the time I had with these teams and what we worked on together. It was exactly what I needed at the time.
So why am I leaving?
IâÃÂÃÂve been on the edge of burnout for the past 6 months. My role changed many times in the last three years. IâÃÂÃÂve adapted rapidly to the changing needs of the company, wore many hats, and figured out a lot of stuff. That was fun for a while, then it got pretty taxing. I decided at the beginning of February that it was time for a change. I want to settle down into one role.
It is hard. IâÃÂÃÂve poured my heart into these teams for the past three years. It is not an easy decision to walk away, but I think it is the best decision for me, my health, and my family.
I used the Crash philosophy to go land a new role. I did my research, crafted a personalized pitch, and sent the pitch in along with the regular application. I got an immediate reply and threw myself into landing the role through the trial.
Automattic was the first place I applied. Yes, I applied to a few other places as backup, but Automattic was the place I really wanted to go.
I have a long history with WordPress. This very blog started on WordPress back in 2008, and IâÃÂÃÂve developed at least 30 WordPress sites since and helped Praxians with ~200 more. CookLikeChuck.com runs on WordPress, the Praxis curriculum portal runs on WordPress, and CrashâÃÂÃÂs content is powered by a decoupled WordPress instance. IâÃÂÃÂm a steadfast remote worker, and Automattic is one of the largest fully distributed companies, with 1100 people across 75 countries. I resonate deeply with their Creed and Open Source mission.
Thankfully, it worked out. IâÃÂÃÂm joining the WordPress.com Special Projects Team, working to empower people who are doing cool things, one website at a time.
I start at Automattic on Monday.
At The Remnant: Radical Individualism, Satisfaction, and Irresponsibility
https://theremnant.substack.com/p/response-radical-individualism-satisfaction
How to Learn New Software Quickly
https://crash.co/content/tools/how-to-learn-new-software-quicklyArchived Link
Day 12!
I tried to add user authentication with EmberFire and Ember Simple Auth. I get through the provider workflow with Twitter, see a new user in Firebase, see the correct user data in the network panel in Chrome, and the ember_simple_auth-session cookie has “authenticated” in the content field. But session.isAuthenticated never seems to be true.
I must be doing something wrong, but I don’t have the time to figure it out today. Time to keep packing. I’m buying a house tomorrow and moving in this weekend!
Day 11!
After some frustrating trial and error and searching through docs with lots of words I don’t quite understand, Dave Wasmer kindly helped me figure out how to get Ember Objects (the results of Ember data queries) in a format I’m used to working with: Something that looks like a regular array of objects, or “POJO” as Dave said.
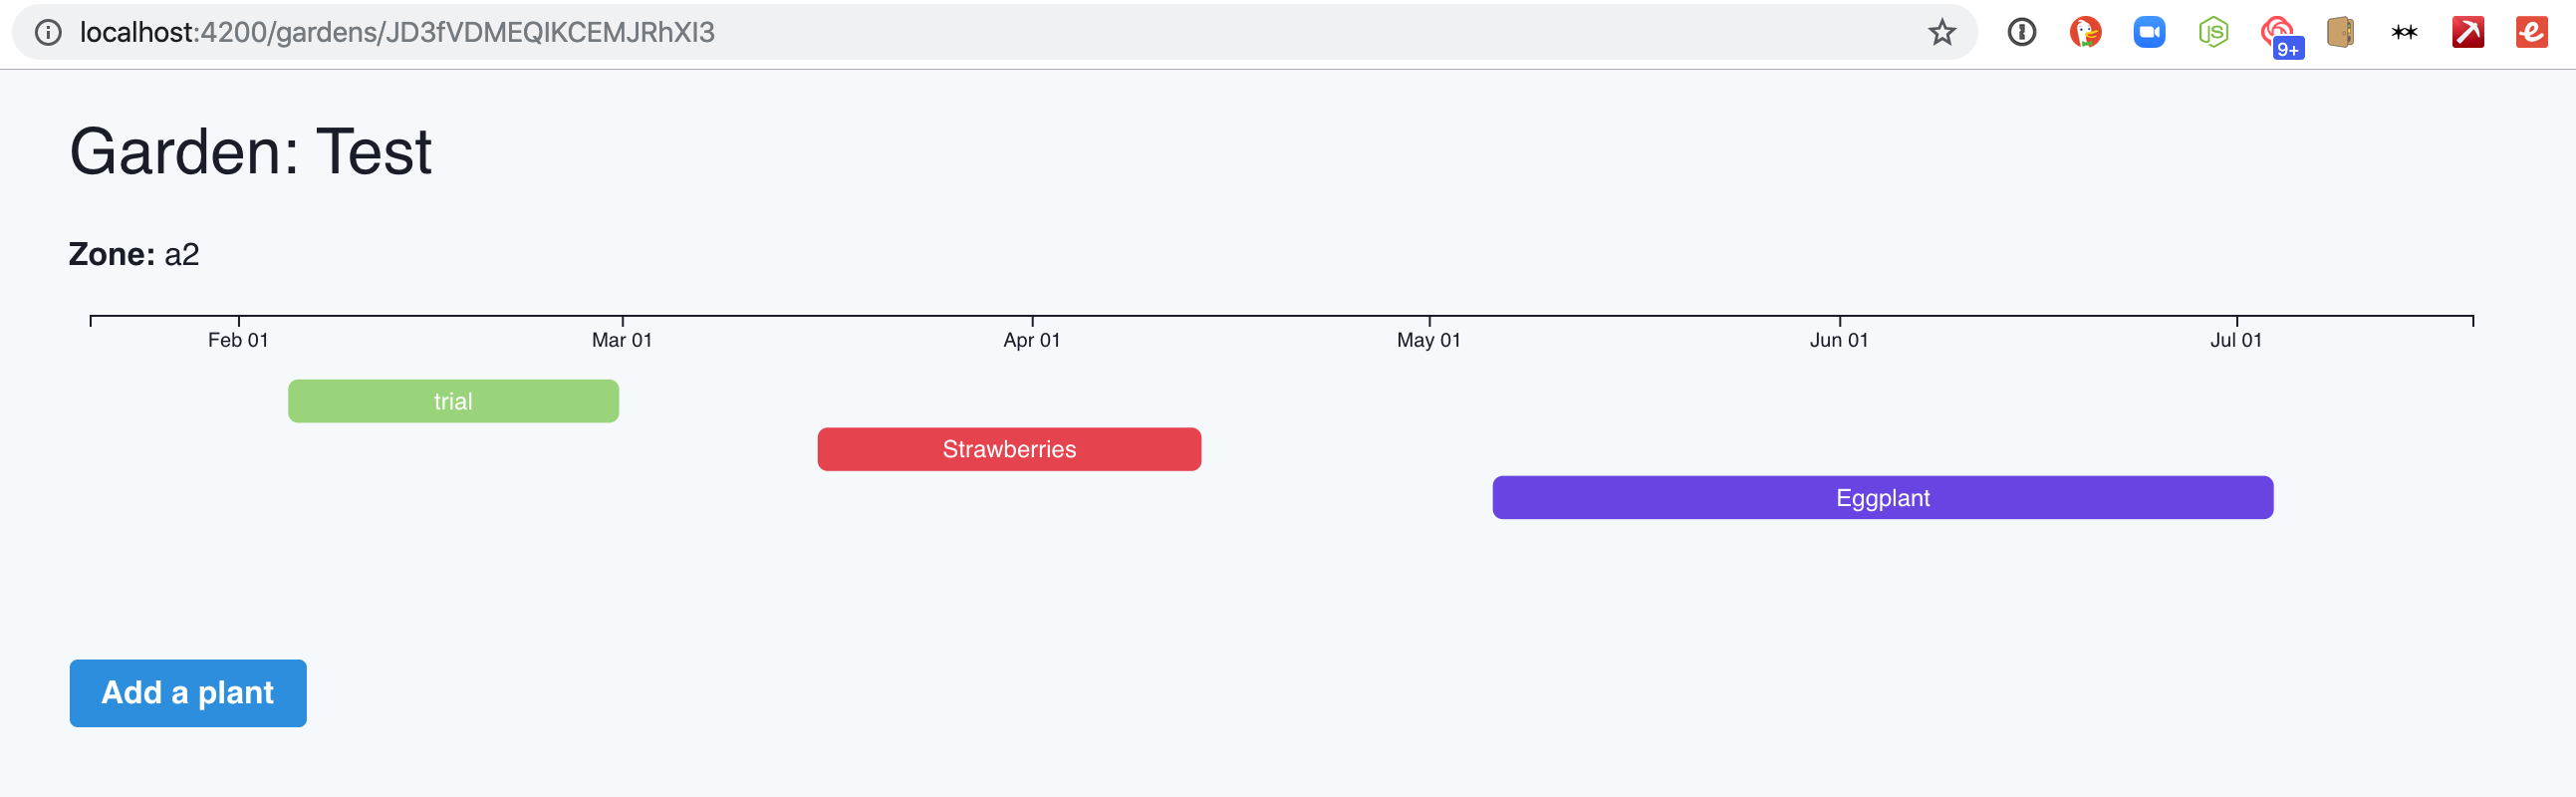
The solution ended up being calling the map method on the array-but-not-really-array and toJSON on each item in that. Then I get something back that looks like [{name: ..., startDate:...}, {...}]
model.plants.map(c => c.toJSON()); This allowed me to render the charts with Ember Data stored in Firebase.
Tomorrow: Digging back in to D3’s update pattern and getting the chart automatically updating when adding a new plant. Dave’s helpful suggestion was to look into the “data down, action up” pattern.
Thanks, Dave!