
How to Learn New Software Quickly
https://crash.co/content/tools/how-to-learn-new-software-quicklyArchived Link
How to Learn New Software Quickly
https://crash.co/content/tools/how-to-learn-new-software-quicklyArchived Link
Day 12!
I tried to add user authentication with EmberFire and Ember Simple Auth. I get through the provider workflow with Twitter, see a new user in Firebase, see the correct user data in the network panel in Chrome, and the ember_simple_auth-session cookie has “authenticated” in the content field. But session.isAuthenticated never seems to be true.
I must be doing something wrong, but I don’t have the time to figure it out today. Time to keep packing. I’m buying a house tomorrow and moving in this weekend!
Day 11!
After some frustrating trial and error and searching through docs with lots of words I don’t quite understand, Dave Wasmer kindly helped me figure out how to get Ember Objects (the results of Ember data queries) in a format I’m used to working with: Something that looks like a regular array of objects, or “POJO” as Dave said.
The solution ended up being calling the map method on the array-but-not-really-array and toJSON on each item in that. Then I get something back that looks like [{name: ..., startDate:...}, {...}]
model.plants.map(c => c.toJSON()); This allowed me to render the charts with Ember Data stored in Firebase.
Tomorrow: Digging back in to D3’s update pattern and getting the chart automatically updating when adding a new plant. Dave’s helpful suggestion was to look into the “data down, action up” pattern.
Thanks, Dave!
Day 10!
I had a conversation on Twitter with Sam Selikoff and Ilya Radchenko, then later on Slack with Ilya and Dave Wasmer about using Firebase + EmberFire + Ember Data vs GraphQL + Hasura (Sam’s suggestion) vs GraphQL + Fauna (Ilya’s suggestion) for my data needs. I appreciate their inputs and arguments, but I ultimately went with Firebase + EmberFire for two reasons:
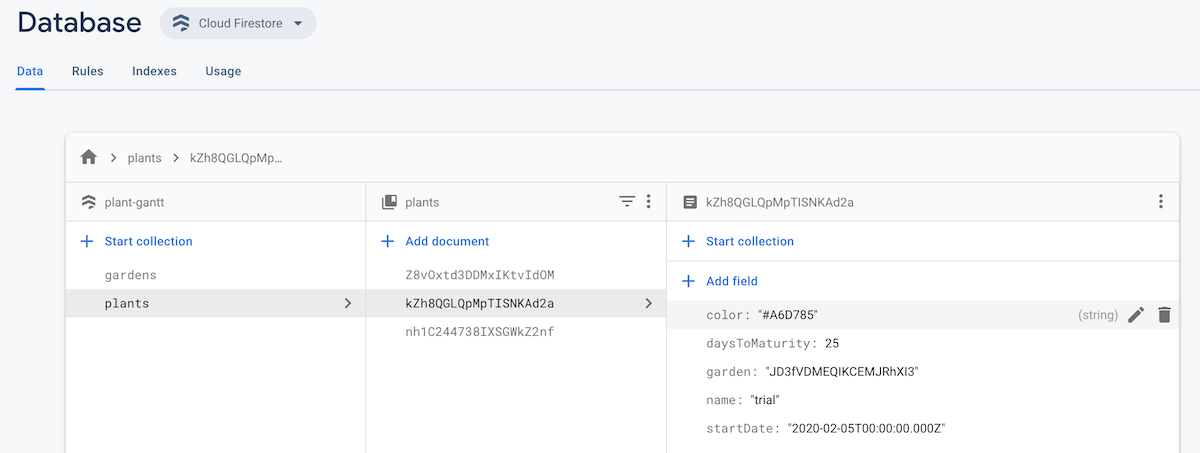
So that means I set up Firebase and EmberFire today. It was surprisingly easy! The quickstart guide was solid. I was saving Ember Data to Firebase and retrieving it in my routes in no time.
I modified my Add a Garden form to save to Firebase, then transitioned to the Edit route where I passed along the ID of the garden I just created an retrieved the garden record’s data in the route. Then I read the Ember Data relationships docs and was able to both save and retrieve a garden’s related plants.
Then I got stuck: I tried to pass the plant data to the calendar component to render the chart and I can’t get it to work. The data isn’t coming through as I expect. I assume it has something to do with relationships in Ember data as promises, but haven’t quite figured the solution out yet. So that will be tomorrow’s project.
I feel like I’m making progress, though! It was super satisfying to see my collections and documents appear in Firebase.

Day 9!
store not being recognized magically disappeared when deleting node_modules and running yarn to install them again. Node, man. So good, but so frustrating sometimes.

I thought I’d be able to get it all working locally before setting up EmberFire and Firebase, but after seeing that IDs for Ember Data are usually assigned on the server and having a talk with with Dave Wasmer and Ilya Radchenko, it sounds like I might be better off setting up Firebase now instead of trying to get Mirage to work. That is a little more than I have time for today, so that will be tomorrow’s goal.
Day 8! Another short session of work on a plane before I go home and pack up my apartment. Today I finished separating different functional parts of my components into individual components and started integrating Ember data.
I hit an issue I wasn’t able to research since I wrote it only a place without internet access, so the below might be wrong.
My models:
export default DS.Model.extend({ garden: DS.belongsTo('garden'), startDate: DS.attr('date'), name: DS.attr('string'), color: DS.attr('string'), daysToMaturity: DS.attr('number') }); export default DS.Model.extend({ name: DS.attr('string'), startDate: DS.attr('date'), plants: DS.hasMany('plant') }); store is throwing errors for meDay 7! Today I’m traveling, but I got some work done on the plane: I figured out my routes and started breaking apart components to their individual functions.
My routes:
Router.map(function() { this.route('login'); this.route('signup'); this.route('gardens', function() { this.route('edit', { path: ':slug' }); this.route('new'); }); this.route('public-profile', { path: ':user_slug' }, function() { this.route('garden', { path: ':garden_slug' }); }); }); Day 6! Short update today after tons of phone calls, move packing prep, and packing for a trip.
I also tried to fix a bug with the color picker where it wouldn’t close, but didn’t solve it.
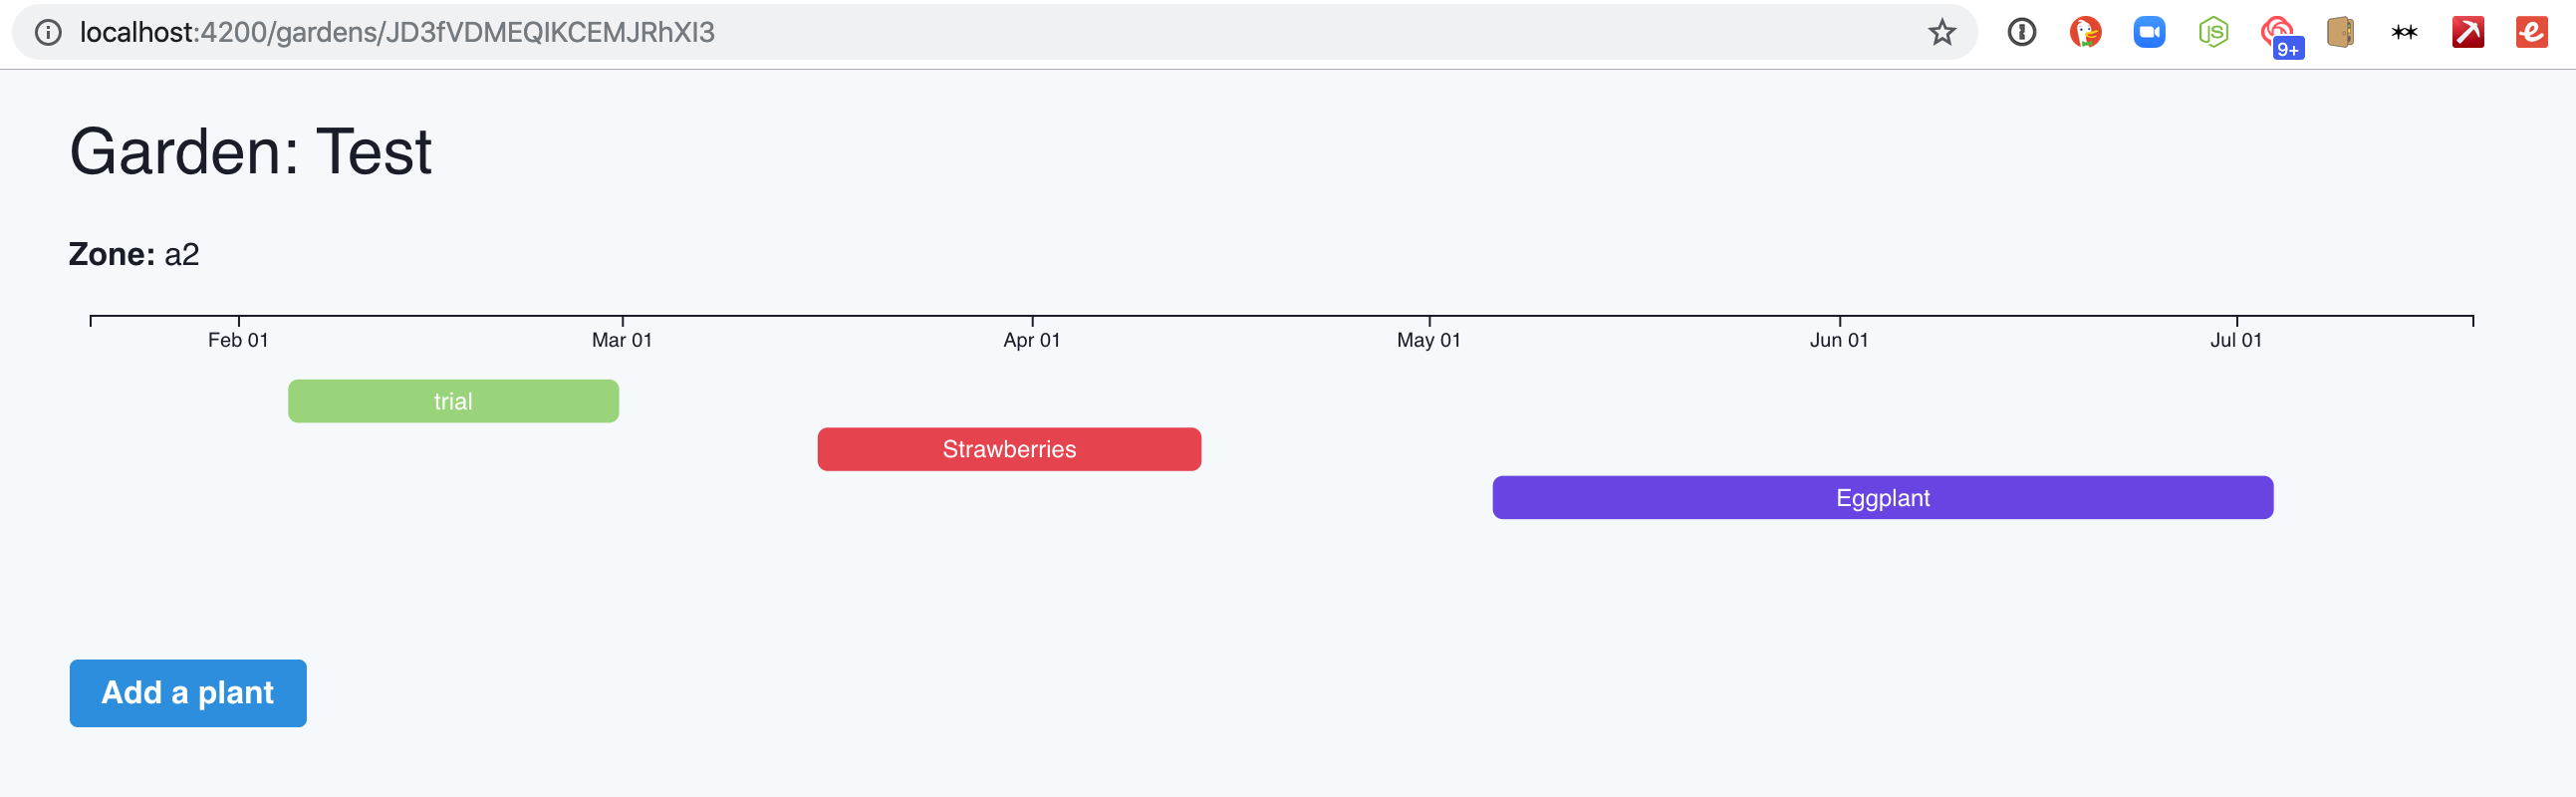
Amanda gave me another good idea today: For items like tomatoes, it would be good if there was another bar at the end that was lighter to signify a harvesting time window.
Today’s commits:
update() to update the chart instead of destroying and redrawing it
Day 5! I didn’t think I’d make this much progress today, but I’m happy I did.
ember-truth-helpers and ember-decoratorsThe scale bug:  You see here that blueberries are going off the right side. This is because I was calculating the scale based on the last plant in the list, which isn’t always the one that will be harvested last, only the one that will be planted last.
Instead, I had to use d3.max and offset to create a custom function to look at all of the plants and see which one would be harvested last:
let lastToHarvest = maxIndex(sortedData, d => timeDay.offset(new Date(d.start), d.daysToMaturity) ); Today’s commits:
Here’s how it works so far!

update() to update the chart instead of destroying and redrawing it
Day 4!
Making the chart responsive took me down a weird rabbit hole. I tried using a computed property and then a bunch of different addons, but none of that worked. So I went the old-school route and wrapped the chart drawing in a function and then added an event listener to remove the chart and redraw it. There is probably a more elegant way to handle it, but I don’t know what it is.
window.addEventListener('resize', function() { selectAll('svg').remove(); drawChart(); }); Today’s commits:
Day 3!
Resources that helped me:
Today’s commits:

Day 2! I woke up excited to work on this and spent an hour on it before work.
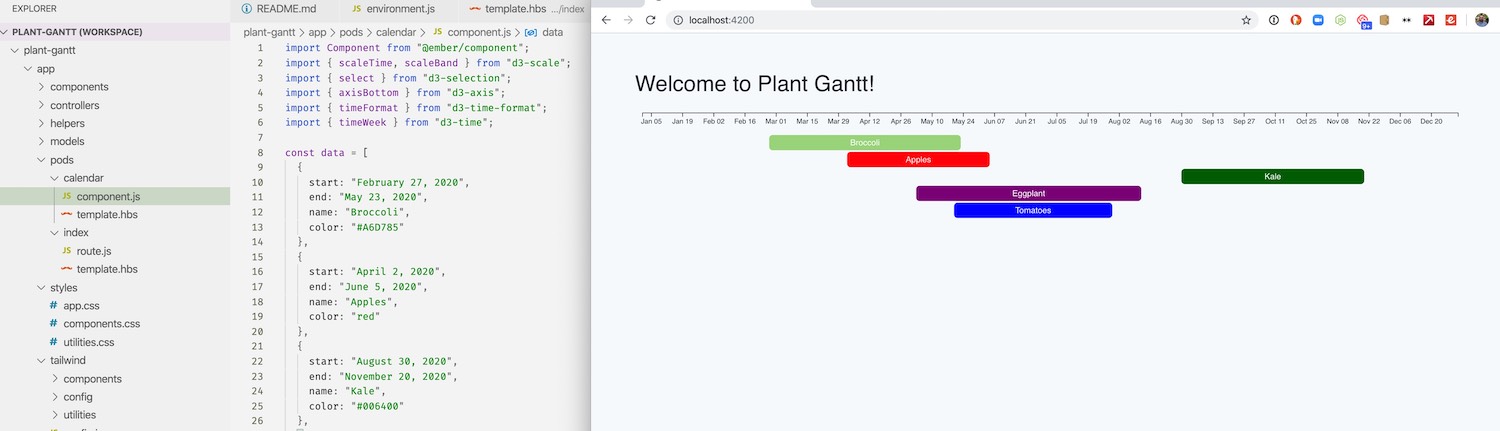
Figured out the basics of the D3 implementation for Plant Gantt:
Here is the Observable notebook.
Get back into Ember land and figure out how to incorporate a chart with mocked out data in an Ember component.
I’ve wanted to do Advent of Code for a few years, but I just can’t get excited about random puzzles. Not knocking all the folks involved in it–more power to you! It just isn’t for me. So I haven’t participated.
Last week while flipping through a seed catalog to figure out what I’m going to plan in my garden next year, I had an idea: I want to build a plant starting/harvesting calendar for my garden. Building that will be my own Advent of Code project this year.
Today was Day 1, planning day.
Plant Gantt. Amanda came up with it and it is perfect. A gantt chart for plants.
I may not get this done in 25 days, but I intend to make progress every day. It will be tough with the month ahead: Two out of state trips, moving into our new house, and holiday parties. I’ll carve out time every day to get some work done, though.
I find myself regularly scouring business websites for logos to use. More and more of them use build pipelines that take all SVGs and embed them inline, making it impossible to just right click and download the image.
Here is my short workflow for downloading inline SVGs:
companyname.svgcompanyname.svg in Sketch.app and change the colors if needed. Sometimes the colors are applied via CSS, which won’t come in with the SVG element.Note: I still use steps 3 and 4 even if my end goal is SVG. First, I want to make sure the colors are correct. Second, Sketch adds some important attributes to SVGs like Viewbox that are helpful if you are using the file on the web.
Here is a video I made walking through the process:
A Case Study in Workflows and Productivity: Chuck Grimmett
https://discoverpraxis.com/how-to-be-productive/Archived Link
Chuck Grimmett at Makerpad: How Crash fortifies its engineering team with no code tools
I transitioned by previous book notes section to a new reading list section. Why?
So, I decided to implement Frank Chimeroâs design with my own reading list.
Instead of just hardcoding them in a page and repeating tons of HTML for the rest of my life, I decided to put the reading list in a Jekyll data file (I chose yaml) that I could easily add to and make a simple template to output.
First, I started with my previous book notes section. Since they were stored in a Jekyll Collection, I was able to write a quick Liquid for loop to generate most of my list for me. But I didnât want to: include a full star rating, just a recommended star. So I chose to star books that I rated 5/5:
{% assign reviews = site.book_reviews | sort: "date" | reverse %} {% for review in reviews %} - title: "{{ review.title }}" author: {{ review.author }} link: {{ review.book-link }} star: {% if review.stars == 5 %}yes{% else %}no{% endif %} {% endfor %}The result looked like this:
- title: "Stories of Your Life and Others" author: Ted Chiang link: http://amzn.to/2Ghql7a star: yes - title: "A Burglar's Guide to the City" author: Geoff Manaugh link: http://amzn.to/2rElHgb - title: "The Story of Sushi: An Unlikely Saga of Raw Fish and Rice" author: Trevor Corson link: http://amzn.to/2DAvzct - title: "The Island at the Center of the World: The Epic Story of Dutch Manhattan and the Forgotten Colony That Shaped America" author: Russell Shorto link: http://amzn.to/2yqLmaE star: yes Awesome! That spit me out a list of everything Iâve written book notes for. Since it is sorted by date in reverse chronological order, it was quick for me to manually break it up by year:
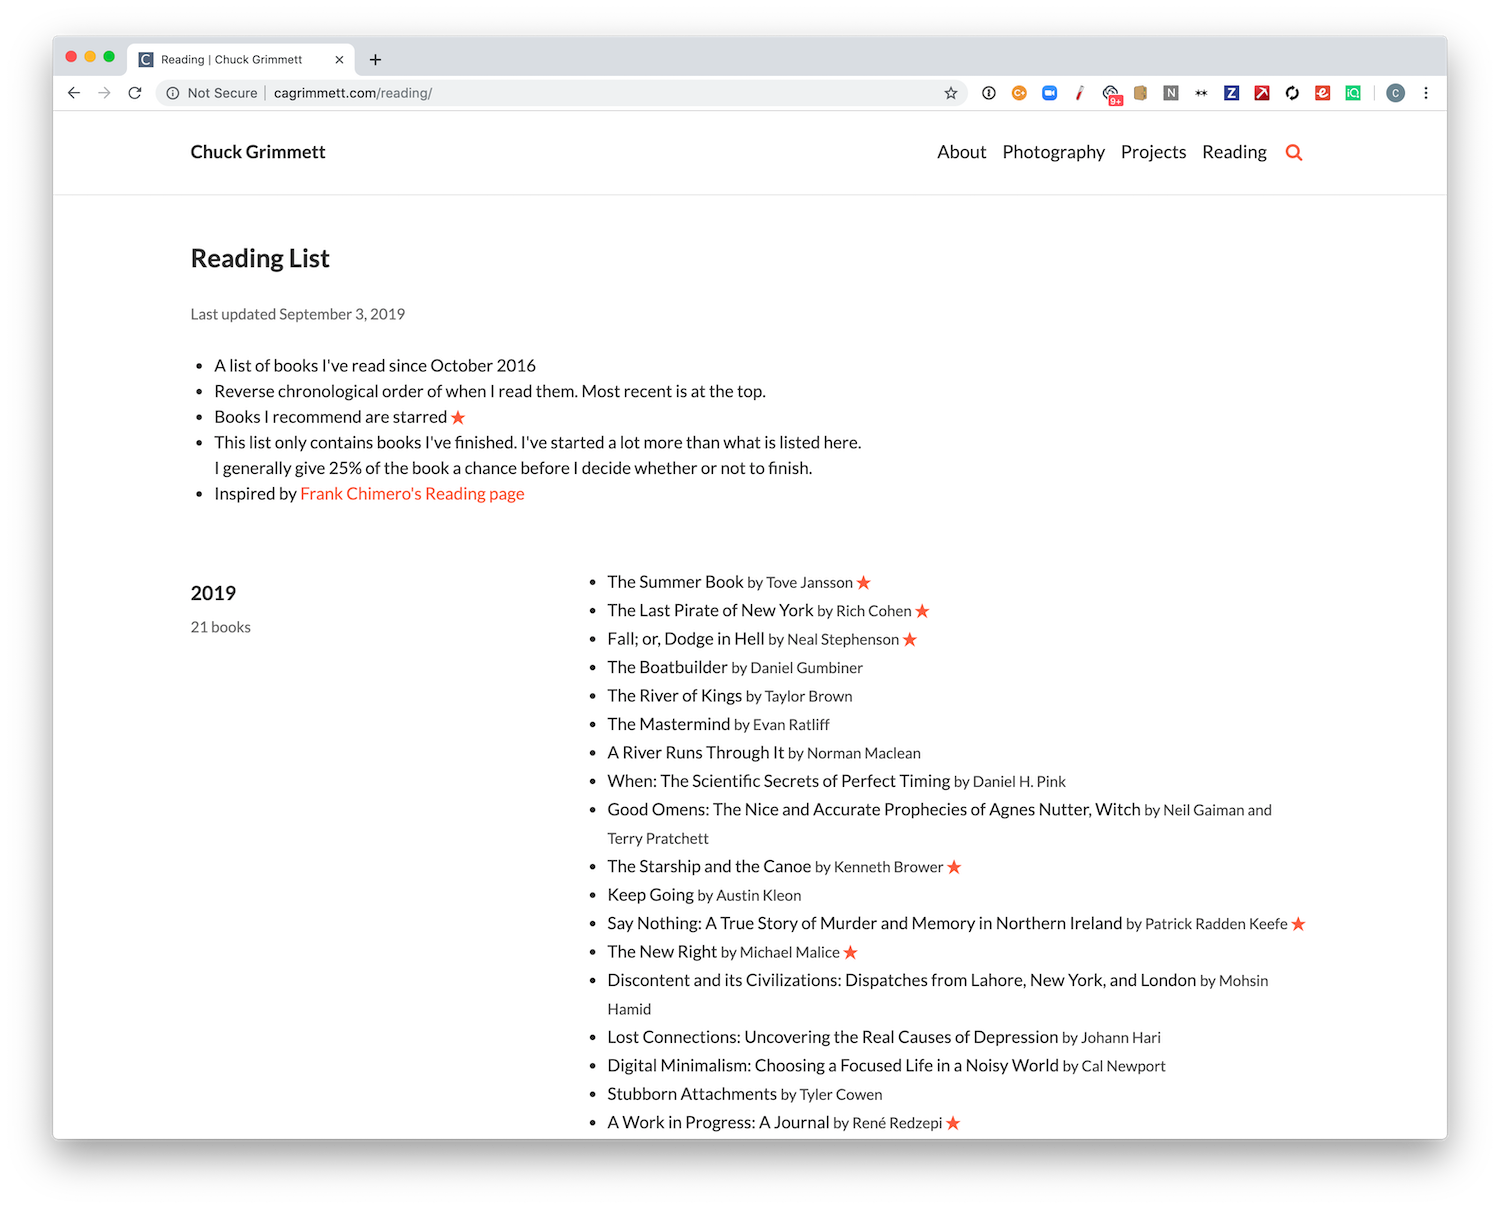
- year: "2019" books: - title: The Summer Book author: Tove Jansson link: https://amzn.to/2ZMtUuC star: yes - title: "The Last Pirate of New York" author: Rich Cohen link: https://amzn.to/34h0Oa3 star: yes - title: "Fall; or, Dodge in Hell" author: Neal Stephenson link: https://www.amazon.com/Fall-Dodge-Hell-Neal-Stephenson/dp/006245871X star: yes - year: "2018" books: - title: "The World is a Narrow Bridge" author: Aaron Thier link: https://amzn.to/2PK3OZc - title: "Fashion Climbing" author: Bill Cunningham link: https://amzn.to/2PJqkgz - title: "Cape Cod" author: Henry David Thoreau link: https://amzn.to/2ZIISBV - title: "The Outermost House" author: Henry Beston link: https://amzn.to/2MOf3hb star: yes Excellent. Two more steps:
Once I added the âlast updatedâ key, the yaml structure looked like this:
lastupdate: September 3, 2019 list: - year: "2019" books: - title: The Summer Book author: Tove Jansson link: https://amzn.to/2ZMtUuC star: yes - title: "The Last Pirate of New York" author: Rich Cohen link: https://amzn.to/34h0Oa3 star: yes - title: "Fall; or, Dodge in Hell" author: Neal Stephenson link: https://www.amazon.com/Fall-Dodge-Hell-Neal-Stephenson/dp/006245871X star: yes - title: The Boatbuilder author: Daniel Gumbiner link: https://amzn.to/2Lgvh0l - year: "2018" books: - title: "The World is a Narrow Bridge" author: Aaron Thier link: https://amzn.to/2PK3OZc - title: "Fashion Climbing" author: Bill Cunningham link: https://amzn.to/2PJqkgz - title: "Cape Cod" author: Henry David Thoreau link: https://amzn.to/2ZIISBV - title: "The Outermost House" author: Henry Beston link: https://amzn.to/2MOf3hb star: yes Hereâs how I loop through that data to create my reading page:
{% for entry in site.data.reading.list %} {{entry.year}}
{{entry.books | size}} books {{entry.year}}"> {% for book in entry.books %} - {{book.link}}" alt="_blank" rel="nofollow noopener">{{book.title}} {% if book.star %}â
{% endif %}
{% endfor %}
{% endfor %}Note that {{entry.books | size}} line: This is what outputs the number of books Iâve read in a particular year by spitting out the size of the books array. This is one of the big benefits of using a data file instead of hardcoded HTML or markdown. Just add a new book and everything else updates itself. Plus, I can use the data file for other things later if I so choose.
Here is the result:
You can check it out over at the reading list page, or you can see the code over at my Jekyll Tools Github repository.
If you liked my book notes, donât worry. They arenât going anywhere. Iâm keeping the pages up for posterity, but Iâm not updating them any more.
IÃÂÃÂÃÂâÃÂÃÂÃÂÃÂÃÂÃÂÃÂÃÂve listened to, read, and used a lot more than what is on this list, but this stuff is what I recommend to others. If you want specific recommendations, shoot me an email!
DonÃÂÃÂÃÂâÃÂÃÂÃÂÃÂÃÂÃÂÃÂÃÂt call it a comeback. Newsletters have been here for years. Here are new oneÃÂÃÂÃÂâÃÂÃÂÃÂÃÂÃÂÃÂÃÂÃÂs IÃÂÃÂÃÂâÃÂÃÂÃÂÃÂÃÂÃÂÃÂÃÂve joined:
If you install mysql via Homebrew ($ brew install mysql) and start it via Homebrew services ($ brew services start mysql), chances are that you’ll see an error when trying run mysql -u root on the command line.
If that error is command not found: mysql, the issue is likely that you need to add the Homebrew mysql directory to your PATH.
On my machine, Homebrew installed mysql here:
/usr/local/Cellar/mysql@5.7/5.7.25/ To add this to your PATH, add this to your .bash_profile (or .zhsrc if you use ZSH):
export PATH=/usr/local/Cellar/mysql@5.7/5.7.25/bin:$PATH Then, reload your shell and type mysql -u root to confirm all is working.
You can quit the mysql CLI via mysql> q
Are you getting foreign key constraint errors when trying to restore Craft CMS database backups? Here is how to solve it.
Every time I download a backup of a Craft 3 database and try to restore it to my local development environment, I get this error: Cannot add foreign key constraint
This happens because the SQL dump has the data in a different order than it should be loaded in according to the foreign key constraints.
The solution is to use a MySQL session variable to turn off foreign key constraints and be able to load your data in the order it is currently in.
How?
WARNING: Do NOT even think of doing this in your production environment. Only development. You’ve been warned.
Open your .sql dump in your favorite text editor and put this line at the top:
SET FOREIGN_KEY_CHECKS = 0;
Save it, then retry your import. Works for me every time.
I wrote this post so that I don’t have to search how to do it in six months when I need to do it again.
p.s. if you want to do something similar in postgres instead of mysql, search for SET CONSTRAINTS ALL DEFERRED.

Last week I updated three large WordPress sites for Praxis from PHP 5.6 to 7.2. Here is the process I used on all three to make it a smooth transition.
Note: I do contract work and can help you figure this upgrade out. Reach out if you are interested in getting a quote.
First you need to know how much time you should plan to spend doing this work. A quick way to find the scope of the problem is to run the PHP Compatibility Checker plugin. It checks your themes and plugins, spitting out errors, warnings, and filenames/line numbers of the offending code so you know where to start.
Even if you get a 100% clean pass with the compatibility checker, I suggest going through the rest of my list. The compatibility checker isn’t perfect. You don’t want to roll those downtime dice. Fool me one time, and all that.
Copy down your current theme and database into your local development environment. This is important. Don’t use the version you have from work you did a few months ago. Stuff changes on the server all the time. Pull down a copy to be safe. Configure your local environment to use PHP 7.2. If you are unsure whether or not you are on 7.2 locally, you can always use a WordPress plugin like Debug Info to check. Also make sure to turn on error reporting in your php.ini.
Don’t have a local development environment yet? I like Valet.
While you are at it, I suggest upgrading your WordPress core to the latest version (5.1.1 as of this writing) and updating all of your plugins. Rip that bandaid off. On the plus side, it will probably make the PHP upgrade process easier, too.
This is either the easiest or hardest step. If your site looks fine and everything functions as it should, great! You won the lottery.
It is probably worth double checking that you actually are on PHP 7.2 with the debug plugin mentioned above. Also worth clicking all around your site and checking everything. Sometimes most of the site will load, but you’ll get weird inline error messages like this:
Warning: Use of undefined constant Y - assumed ‘Y’ (this will throw an Error in a future version of PHP) in /nas/content/staging/creativecourse/wp-content/themes/business-pro-theme/page-archive.php on line 70 If you navigate to the site locally and all you see is a sea of errors like I did on one site, you have some work cut out for you. Here are some tips:
wp-includes or wp-admin in the file paths, you need to update your WordPress core.wp-content/themes/ in the file path, and you don’t have any custom work done on the site, the quickest fix is to upgrade your theme or find a new one.wp-content/plugins/somepluginname/ in the file path, find that plugin and disable it or update it and try again. You should still be able to get to your /wp-admin/ dashboard even with a broken site because the most recent core works with PHP 7.2.Keep track of the changes you make. I keep a running list in my favorite notes app. Theme updates, core updates, plugin updates, and code changes. Write it all down. Better yet, version control it with git and commit along the way.
If you have any premium plugins that require activation keys, make sure that you contact the developer to get two extra development keys for local testing and production. Most will provide those to you at no extra cost. Some platforms give you 5 keys per purchase anyway just for this reason. I decided to roll the dice and not get keys for one plugin, and ended up crashing my production site with the upgrade because I didn’t test that plugin. Don’t be like me.
All three of my sites needed some work done, even the newest of the three. One didn’t load at all until I made some theme updates. One plugin crashed a site and had no updates available, so I had to do without. Some custom code I had written needed updates, too. It took me a few afternoons to sort it all out.
Once you have everything sorted out locally and you’ve triple tested everything, go ahead and push your work up to a staging environment. Good hosts like WPengine make having a production and staging environment easy. You can control the PHP versions independently. I use WPengine’s git deployment to move my local updates to the staging server. SFTP works, too. If you need database changes, you’ll also need to do a database migration. Core and plugin updates will need a database migration (Don’t forget to change the site URL or you won’t be able to log in!) If you need to do a database migration, use the instructions here
My preferred workflow is to copy the full production site (code + database) to staging, push my code changes, then do the core and plugin upgrades on the server (they often involve database changes), which is when my change list above comes in handy. I don’t like doing database migrations unless I absolutely have to, because with lots of users logging in to the site, data is bound to get out of sync with my local version in a matter of hours. Getting back in sync is tricky, so I choose to avoid the problem altogether by only moving code, keeping my change file, and replaying the steps on the staging server.
If you don’t have a staging environment and can’t get one with your host, or you can’t upgrade the PHP version yourself on your host, then you need a different plan. You’ll need to set up another site on another host that uses PHP 7.2, then put the updated copy of your site there. If you do this,proceed to the alternate #5 below.
Don’t assume everything works. Test it! Use different user account levels (admin, editor, author, contributor, and subscriber). Try every critical function on your site.
Only move on to the next step when you are certain everything works like it should.
Before you do anything else here, make a back up of your site and your database. Good hosts like WPengine make this easy. If you are doing this manually, verify the backups work locally. You can to be able to roll back if there is an issue.
I planned a maintenance window with my users a few days ahead of time. If you have users who rely on the site, you should, too.
Update your production environment to PHP 7.2, then copy the staging server to the production server. If you are confident that there were no users updating content in between the staging copy above and now, you can copy database and all. If there are changes you don’t want to lose on the production database, you’ll need to use my method and only copy over the theme code, then do core and theme updates on the production site. This is when planned downtime comes in handy.
If you set up a separate site on 7.2 (not a staging environment of a production site) and it works, then you are ready to cut over to the new version. Configure that new site to use your domain (URL field on the setting page), then point your domain’s DNS records at the new server. If you need to do a database migration, use the instructions here.
Don’t assume everything works. Test it! Use different user account levels (admin, editor, author, contributor, and subscriber). Try every critical function on your site. Use the Debug Info plugin to verify that the PHP change took.
If there are any issues, you might need to roll back to an earlier restore point and PHP version (or point your domain back to your other server), or do some real-time debugging. If your production and staging servers mirror each other in every way except PHP version, you shouldn’t run into anything unexpected. If you do, figure out where the difference is and go back to #3 above.

Newton Graphic Science Press in Japan published one of my photos twice in the past year. They found it via my Illum project on Flickr and requested permission to publish it.
Of course, I said yes.
Here are the spreads the sent me afterward:


The photo is from a high school physics contest held by the American Association of Physics Teachers where I won Second Place in 2008. Here is my original post from 2008 when I found out.
Now I’ve been published in Japan. Sweet. Remember to freely share your work. You never know who’ll end up seeing it and what opportunities might come your way.
I used to use Homestead for local WordPress and Craft development. It was nice because everything worked out of the box. Well, theoretically. In reality, it worked about 80% of the time, but 20% of the time I’d get cryptic errors from Vagrant like:
It was always a rabbit hole of headaches that could take half a day to resolve. Most resolution happened in the form of me destroying a box and rebuilding it, losing my databases. So much fun.
Today I got the SSH error again and had enough. I went looking for a better solution and found Valet. Their pitch:
Valet is a Laravel development environment for Mac minimalists. No Vagrant, no /etc/hosts file. You can even share your sites publicly using local tunnels.
Sounds great. It won’t eat my battery, RAM, CPU, or take gigs of disk space for vitual machines. Sign up the heck up.
It was super easy to set up with tools I already use: Homebrew and Composer. Instructions here.
The only tricky part was making composer directory available in my Mac’s PATH, since I’ve only ever used it inside individual projects. Turns out with zsh you have to give the explicit path, you can’t just use ~/, so I added this to my .zshrc: export PATH=/Users/cagrimmett/.composer/vendor/bin:$PATH
Once I loaded the profile with source ~/.zshrc, I was good to go. I linked my main projects folder so Valet knows where to look for projects, changed my wp-config.php files to point at my local mysql database instead of Homestead’s, then navigated to project-folder-name.test and was good to go!
Valet runs at startup, so I don’t have to run cd ~/Homestead && vagrant up anymore, just brew services start mysql@5.7 if I need a database running (which you usually do for WordPress development.)
I like that Valet makes it so easy to use different PHP versions. For example, to use 7.2, you go to your command line and type: valet use php@7.2
I’m looking forward to never using Vagrant or VirtualBox again. Peace out
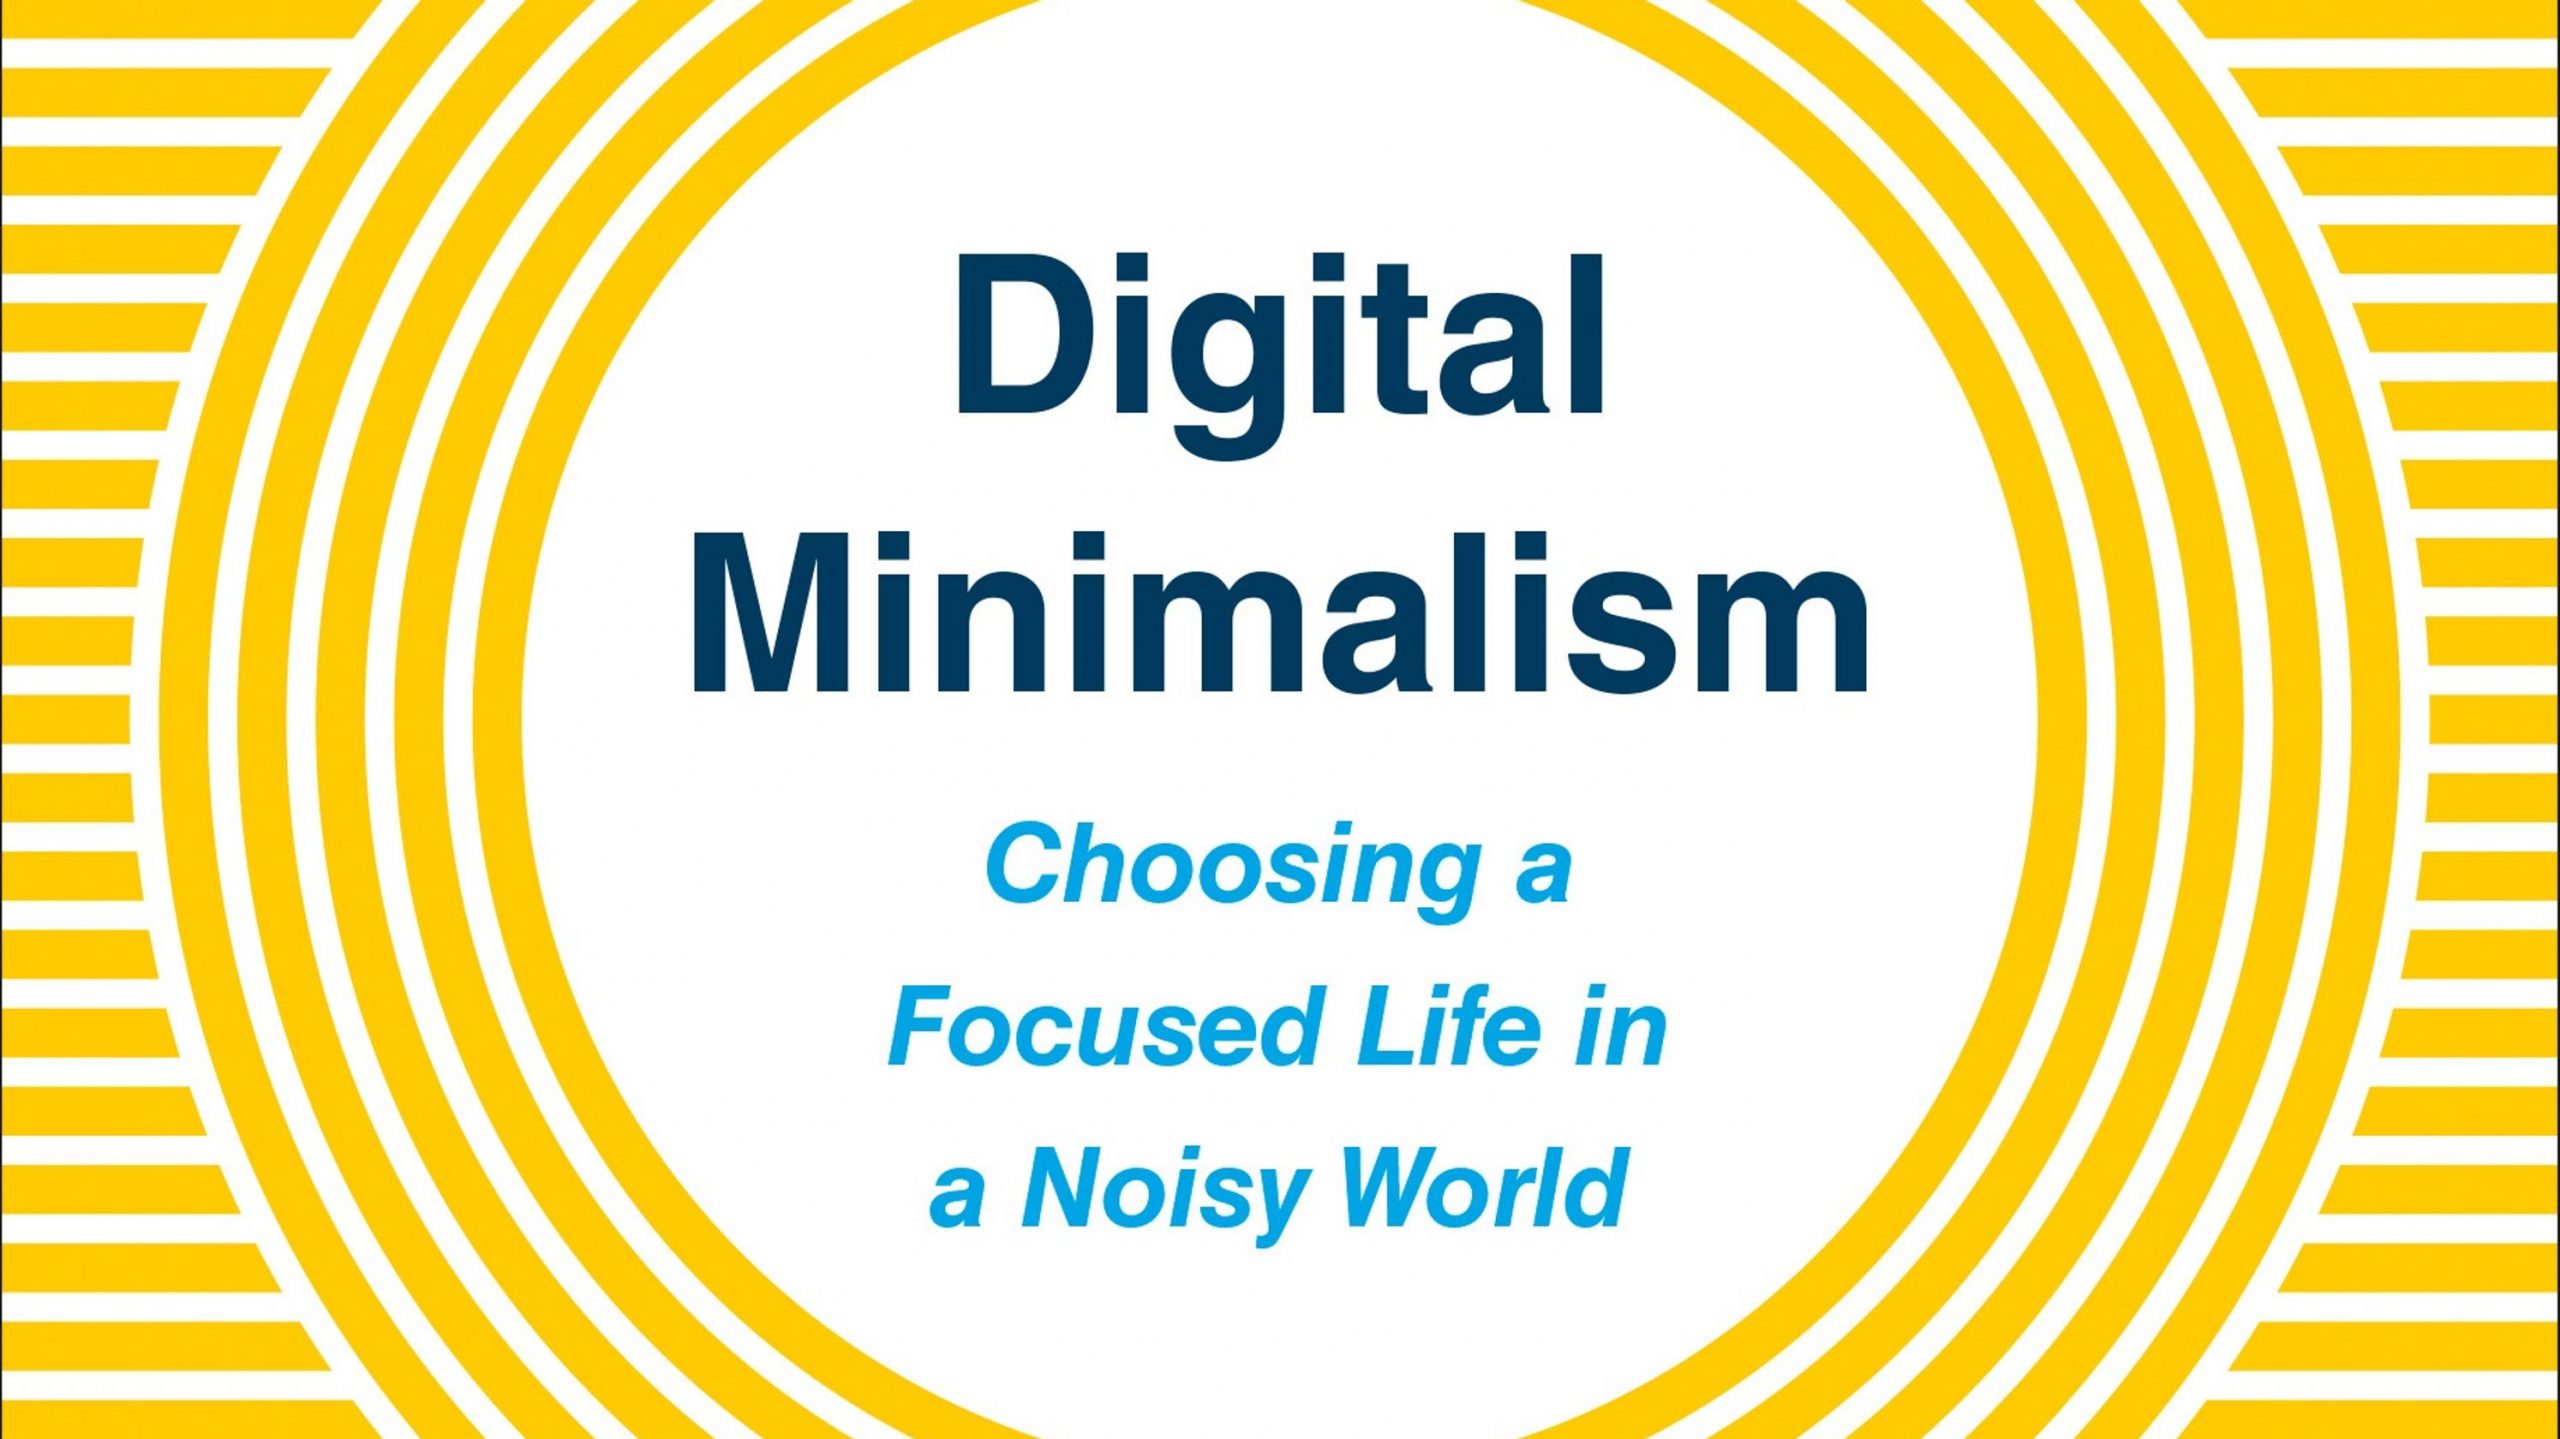
I recently read Cal Newport’s Digital Minimalism. I was more or less convinced before I picked the book up that I’m wasting too much time on social media and my ability to focus is becoming fragmented. I read this to hear his solution to this issue: Ruthlessly cutting out digital tools that don’t bring you value.
I’d consider myself, in Newport’s parlance, a digital maximalist. I have accounts on every major platform, am an early-adopter of new digital platforms, social networks, and tools, and evangelize tools I find useful. My always connected.
While I generally love this, I’ve noticed that my ability to focus for long periods of time and to sit and observe without needing a distraction (my phone) has diminished significantly. This is a problem. I value my observation abilities and don’t want to lose them. I also have so many things I want to do: Blog posts to write, spoons to carve, places to explore, etc.
Following Newport’s advice for doing a digital declutter, I took stock of what I think is causing me the most harm: Mindless scrolling. Here’s where it shows most:
Only particular cycle that is bad for me is checking Slack, then my email, then Twitter, then Slack, then my email, then Twitter in an endless loop on my phone. I have no idea why I do this. Sometimes I’ll zone out and do this for 15 minutes straight without seeing anything new. Crazy.
I saw that my friend Chris Johnson is doing a digital declutter, so I decided to join him.
Here is my Digital Declutter plan for the next 30 days:
You’ll probably still see my post my blog posts on social media, but I’ll be doing that through Buffer so I stay away from the feeds. I still want those readers, you know.
After 30 days I’ll reintroduce some things back into my life, but probably not all, and I’ll probably slim things down quite a bit. Probably some Instagram and Twitter, but restricted times. I’ll probably keep the main phone restrictions. We’ll see.
I’m looking forward to this. I want my attention, observation, and creativity back. And along the way, my happiness.
My Career Launch Story on the Career Crashers Podcast
https://crash.co/blog/career-crashers-podcast-episode-4/Archived Link