
This is part one.
Part two is adding a climbing wall: https://cagrimmett.com/2024/03/07/adding-a-climbing-wall-to-an-a-frame-swing-set/
Part three is adding a slide platform: https://cagrimmett.com/2025/05/03/adding-a-slide-platform-to-an-a-frame-swing-set/
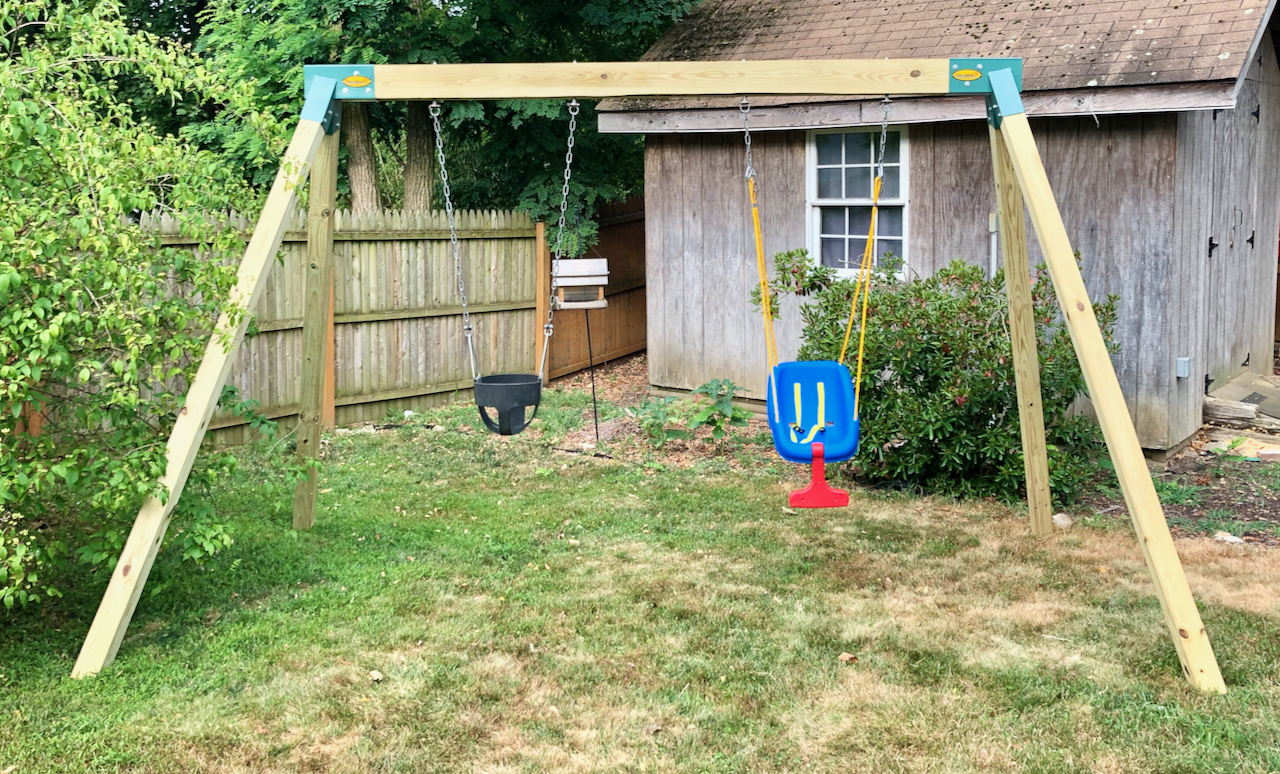
We just built my son a swing set using Eastern Jungle Gym’s A-frame brackets. When I started out, I couldn’t find a guide that laid out everything I needed to buy, how to put it together, and what kind of footprint the finished product would have. So I decided to put one together.
Finished Dimensions
- Width: 7ft 3in
- Length: 13ft 3in
- Height: 7ft 9in
Lumber
- 4 – 4″x4″x8′ pressure treated posts
- 1- 4″x6″x10′ pressure treated beam
Some people don’t like the chemicals in pressure treated wood, but this is going to be out in the elements 24×7, so I think it is worth using treated lumber to keep it from rotting. I plan to put deck sealer & stain on mine once it dries out a bit.
Lumber is very expensive right now, so this cost $127 when I purchased it in July 2022.
Hardware
- 2 Eastern Jungle Gym A-Frame brackets
- This kit comes with the brackets and the bolts that you will need. Make sure to get the A-Frame brackets, not the 90 degree brackets.
- Swing brackets
- You need two per swing. The 10′ beam has enough room for two swings, so I linked to a set of four brackets. You could squeeze in a third if you needed to. These are nice because they will go all the way through the beam and hold a lot of weight. There is no way these are coming out. The ones that just screw to the underside of the beam with a few screws make me nervous.
Swings
You’ll need swings! The swing set I built is for a 1 year old, so we have two baby swings: One black bucket swing like the ones you see at playgrounds and one of the blue Little Tikes rocker swings that is more of a full seat. Charlie likes both, so we usually switch between them when we are swinging. He usually starts in the bucket swing then switches to the rocker when he gets tired of holding himself up. We also have a regular sling-style swing to switch in if an older kid comes over (or for Amanda or me to use!).
We also plan to get a two-person porch swing to occasionally swap in so Amanda and I can sit there while Charlie is playing in the yard when he is a little older. The swings are easy to change with the swing brackets I linked to above—just pull out the pin, pull off the chain, put the new chain on, and put the pin back in.
Eastern Jungle Gym, the makers of the A-Frame bracket we are using, has lots of good swing options for all ages.
If you buy or have a swing that doesn’t come with chains, you’ll need approximately 10 feet of swing chain per swing (5 feet per side).
Tools
- Drill set up for drilling
- I think we used a 3/16″ for drilling pilot holes for the lag bolts for attaching the A-frame brackets to the posts and beam to avoid them splitting.
- We used an extra long 1/4″ bit to drill the initial hole though the beam for the swing brackets. Then we enlarged it from each side with a 7/16″ bit (the hanger brackets are 10mm, which is between 3/8 and 7/16).
- Impact driver
- You either need a socket adapter to use one of your sockets with the impact driver to drive in the hex lag bolts, or you could use a universal driver if you have one.
- If you don’t have an impact driver, you could use a standard drill on the low setting, or you could use a socket wrench, though it will take longer.
- Some swings have special kinds of bolts that you need a special driver (like a star bit with a pin in the center) to attach to the chain. Take a look at your swings before you get started to see what you’ll need.
- Bolt cutters
- We needed to cut some chain down to the right length, so bolt cutters came in handy.
- Adjustable wrench
- You’ll need a wrench to put the nuts on the hanger brackets. They are too long for a driver.
- Hack saw with a metal cutting blade + Angle grinder with flap disc
- The hanger brackets we bought stuck out of the top of the beam a few inches, so we used a hack saw with a metal blade to cut them down after they were on, then ground them down with an angle grinder + flap disc so they wouldn’t be sharp. This step is totally optional.
- The bolts are stainless steel, so they will dull your blade quickly. Might need a backup blade.
- Sawhorses
- Sawhorses are helpful, but not necessary. You could put this together on the ground.
- Rubber-faced hammer
- We had to tap the A-Frame brackets and the swing hanger into place with a rubber-faced hammer. If you don’t have one, you can use a regular hammer with a piece of 2×4 as a buffer so you don’t mar your brackets.
- Measure tape
- We need to do a bit of measuring to get the swings in the right place.
- Short step ladder
- Will be helpful for driving the bolts and attaching the swings once the swing set is stood up.
- A friend
- This is heavy. You’ll need someone to help you stand it up!
Putting it together
- Put the A-frame brackets on the 4x6x10 beam with the outer edge of the beam flush against the outside of the brackets. Make sure the spots for the legs are facing out and down.
- Drill pilot holes with 3/16in bit and drive the lag bolts in to secure the A-frame brackets in place.
- Drill the holes for the hanger brackets. Measurements here assume two regular swings. You may need to adjust if you are adding a third swing or a two-person swing.
- Measure 10in from the inside edge of the A-frame bracket and make your first mark. This is where the first bracket of the first swing will go. Then measure 24in from your mark and make your second mark. This is where the second bracket of the first swing will go.
- Repeat from the other side.
- You will have something like 29in between the two inside marks.
- Make marks in the middle of the beam at your marks.
- Drill the pilot holes all the way through with the long 1/4in bit at all four marks. Make sure the bit is perpendicular to the beam and straight.
- Enlarge the holes with a 7/16in bit from both sides.
Here is a rough diagram of what the bracket placement looks like:

- Put in your swing hanger brackets.
- You want the bracket flush against the beam on the bottom, so run one washer and nut all the way down to the U-shaped hanger.
- Tap the bolts through.
- Put a washer on the top, then use your wrench to tighten down the lock nuts.
- Cut off and grind down the bolt if you’d like to. Leave some of the thread in case you need to get the bolt off later.
- Put in all four posts for the legs and drive one bolt in each, then stand it up. You’ll probably need two people for this.
- Adjust the legs (wiggle them, pull them out, push them in, etc) until they seem solid and at a good resting spot. Then drill pilot holes with the 3/16in bit and drive in the remaining lag bolts.
- Attach the swings. Make sure the chains are the same length. Count the links! If you need to shorten the chain, this is where the bolt cutters come in handy.
- Go get your child and push them on the swing!


Future plans
- We plan to put deck sealer + stain on the wood to help it last longer (and look better in the yard)
- Next year I plan to put a small climbing wall on one side, kind of like this:

Update, March 2024
I added the climbing wall and wrote a post about that, too.
Leave a Reply